Writing native modules
If we cannot find an open source module to meet our application's needs, we may need to write our own. For instance, we might need to write our own native module if we require some very specific behavior or if we have code from previously developed native applications that we want to incorporate into a React Native project.
We are going to create native modules-one for iOS and one for Android-that allow the user to select an image from their device's media library when the avatar icon is pressed on the profile page. As we develop these modules, we'll look at exposing both native methods and constants. We will also look at several different methods of communicating between JavaScript and native code, including callbacks, promises, and events.
Native modules in iOS
As we mentioned at the beginning of this chapter, in order to follow along in this section, you will need some basic Objective-C knowledge. When writing native modules for iOS, we will also work in Xcode because this will automatically add our native files to the project. This chapter also won't go into much detail about using Xcode, but luckily we do not need many of its features. To open the project in Xcode, find the RNNYT.xcodeproj file within the ios directory and double-click on it; this should open in Xcode by default.
In Objective-C, each module needs two files. The first is the header file and has a .h extension. The header file describes the general interface of the module (how other Objective-C code can interact with the module). The second is an implementation file, which uses a .m extension and implements the interface described in the header file. We are creating a native module that lets us interact with the device's image library, so we'll name the module ImageLibraryManager and create two files for the module within the ios/RNNYT directory: ImageLibraryManager.h and ImageLibraryManager.m.
Setting up the module
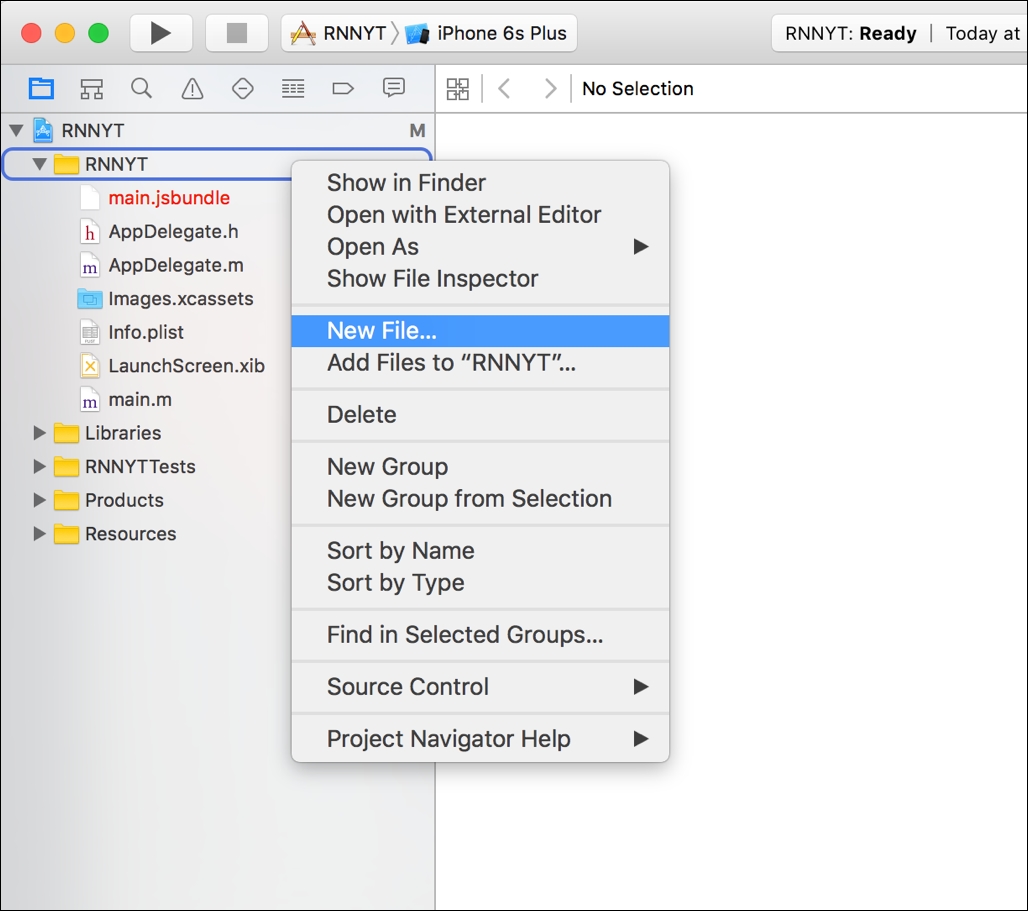
To add new files, right-click on the RNNYT folder in the left sidebar and click on New File..., as shown in the following screenshot:
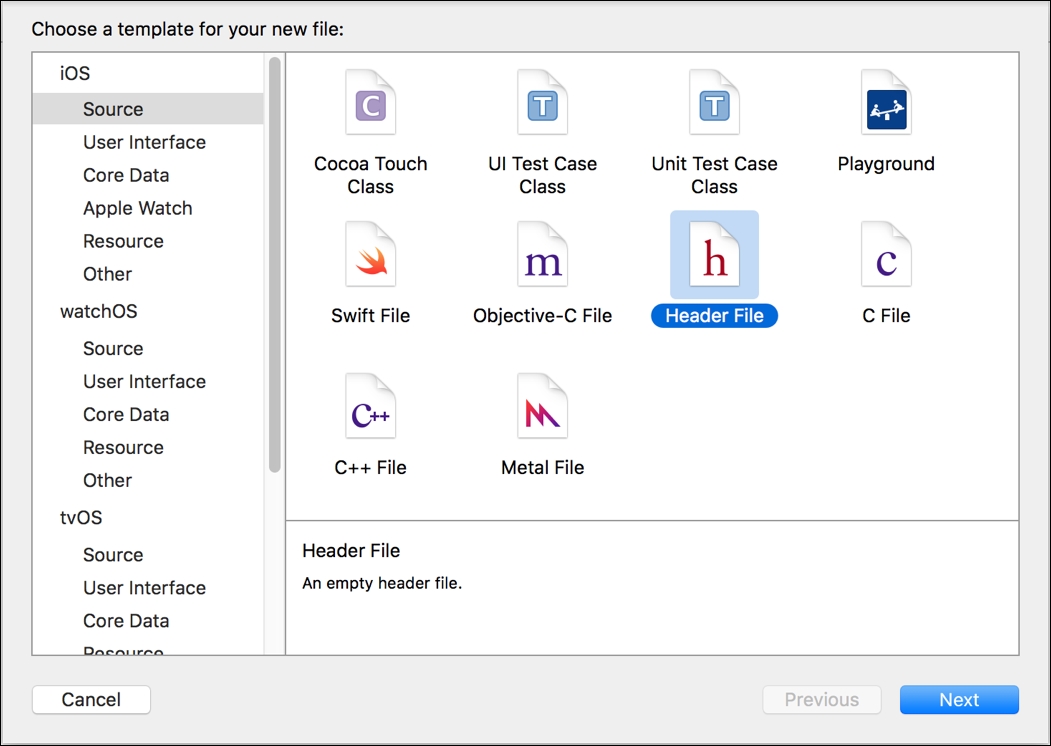
Select the Header File file type, as shown in the next screenshot:
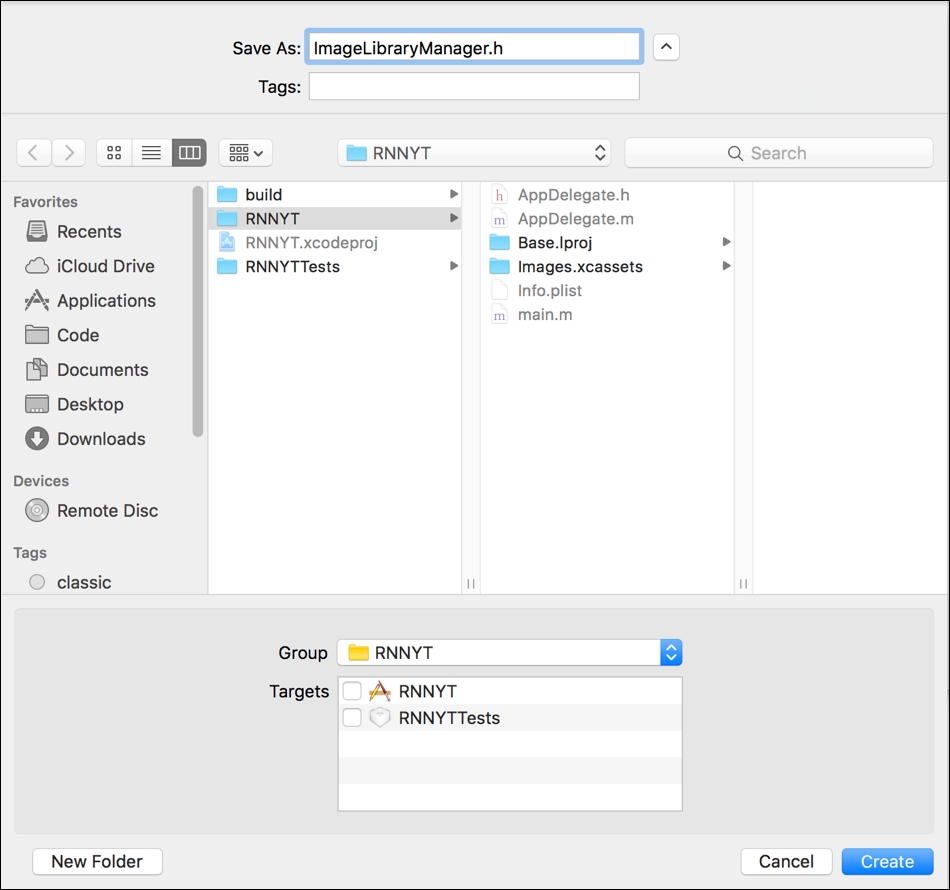
Finally, give the file a name and ensure it is in the appropriate folder in the filesystem.
Tip
Xcode project structure and filesystem location are actually independent, but for our sanity, we will keep them the same.
Repeat this process for the implementation file, choosing Objective-C File as the file type. Then, give the file the appropriate name and select the Empty File template, as shown in the following screenshot:
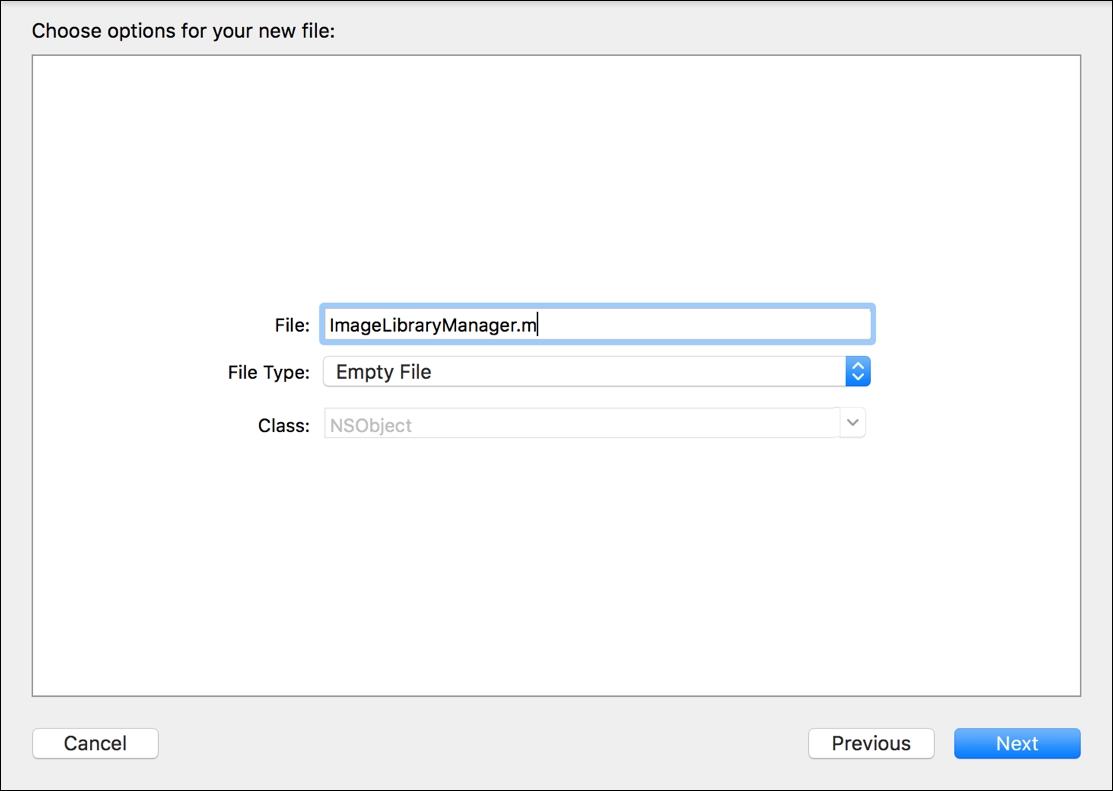
Once again, ensure we are placing this file within the ios/RNNYT/ directory on the filesystem, as shown in the next screenshot:
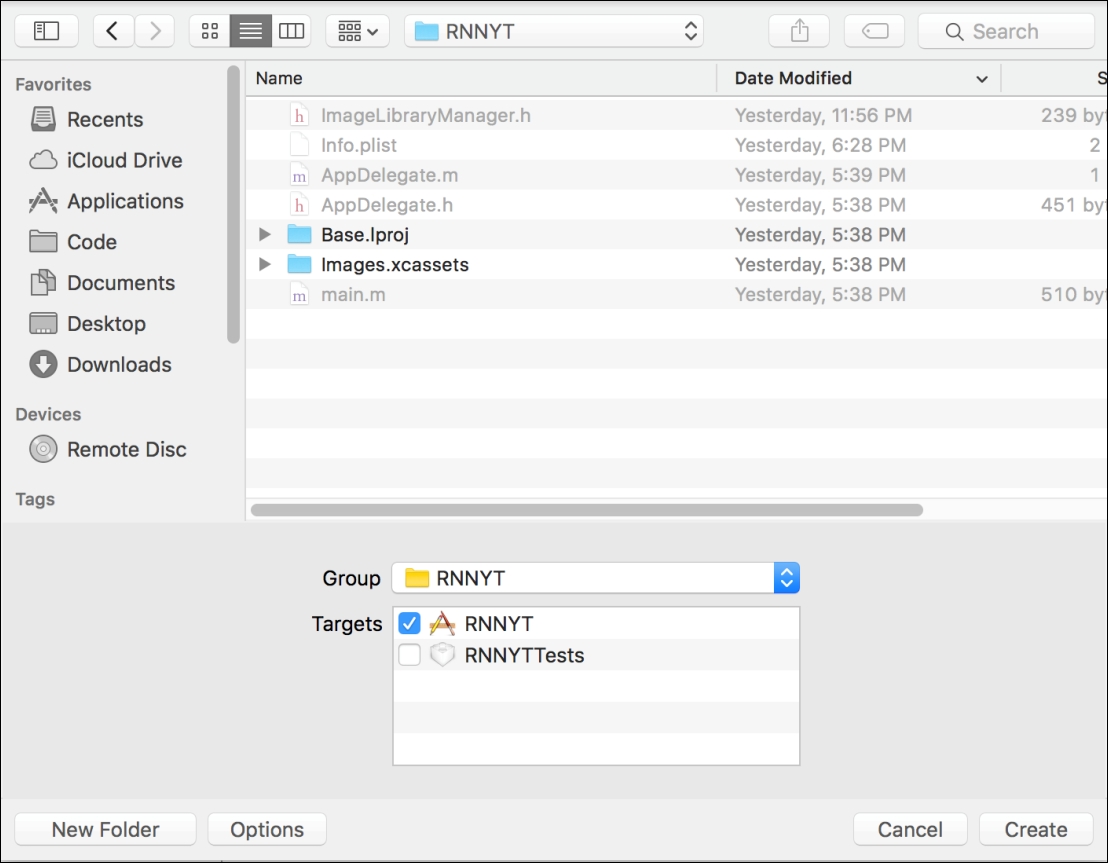
Xcode will have probably filled in some boilerplate code into the header file that we created, but we'll start replacing that content:
#import "RCTBridgeModule.h"

@interface ImageLibraryManager : NSObject <RCTBridgeModule>
@end
Our header file imports the RCTBridgeModule (React Bridge Module) interface:
#import "RCTBridgeModule.h"
We then describe the interface for the ImageLibraryManager as a class that extends from the NSObject base class and implements the React Native Bridge protocol. All React Native native modules for iOS need to implement this protocol:
@interface ImageLibraryManager : NSObject <RCTBridgeModule>
@end
We also need to replace the code in the ImageLibraryManager.m implementation file:
#import "ImageLibraryManager.h"

@implementation ImageLibraryManager

RCT_EXPORT_MODULE();

@end
Here we need to first import the header file:
#import "ImageLibraryManager.h"
Next, we need to create the implementation of the class described in the header file. In order for this class to function properly as a React Native module, we also need to add the RCT_EXPORT_MODULE macro:
@implementation ImageLibraryManager

RCT_EXPORT_MODULE();

@end
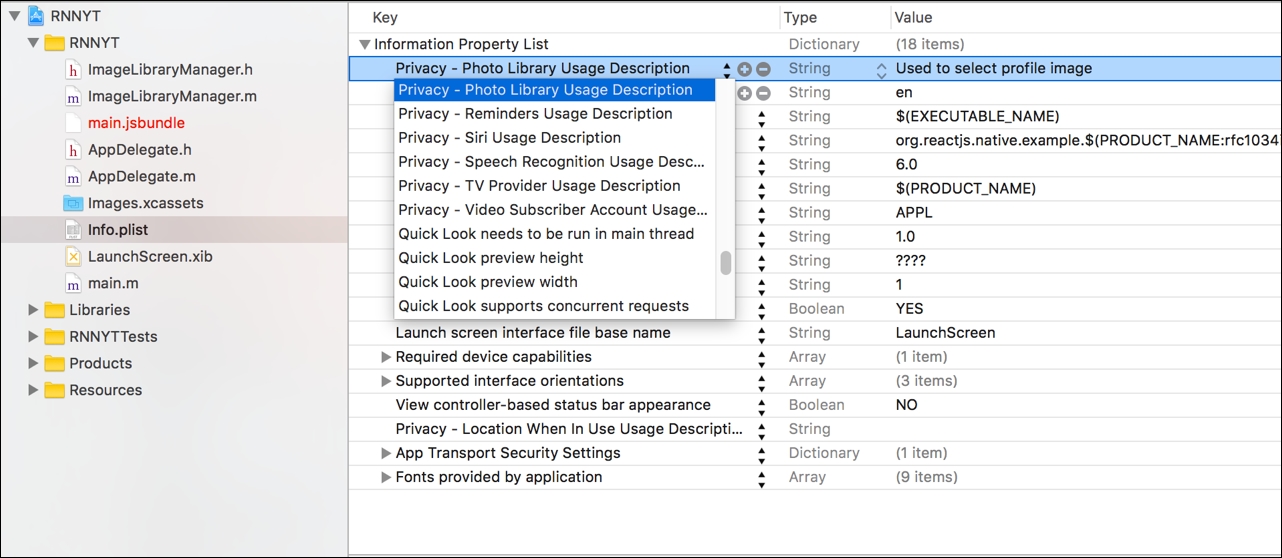
Finally, as of iOS 10, if an application will access the user's media library, it needs to provide an explanation for this in the Info.plist file. To do this, select the Info.plist file on the left-hand side in Xcode. Then, add this new value by selecting Privacy - Photo Library Usage Description and providing a brief explanation, as shown in the following screenshot:
We've now added all of the boilerplate necessary to start writing a native module. With this code, we've created a module that can be accessed in JavaScript. To access it, in the Profile.js file, we have to import NativeModules from the react-native package, which will now contain our new module:
import React, { Component } from 'react';
import {
  View,
  StyleSheet,
  NativeModules
} from 'react-native';
import Icon from 'react-native-vector-icons/EvilIcons';
import Title from './Title';
import AppText from './AppText';
import * as globalStyles from '../styles/global';

const { ImageLibraryManager } = NativeModules;
Currently, the ImageLibraryManager module exists, but has no functionality within it. Throughout the rest of this section, we'll start adding both constant properties and methods to the module to make it more useful.
Exporting methods
Just like we can export an entire module by using the RCT_EXPORT_MODULE macro, we can export a method of that module by using the RCT_EXPORT_METHOD macro. We pass the method we wish to export as an argument to this macro. Since we are creating this module to allow the user to select an image from their image library, we'll call the method selectImage:
RCT_EXPORT_METHOD(selectImage)
{
  // Code here
}
We'll also import the RCTLog so that we can test calling the newly exposed method:
#import "ImageLibraryManager.h"

#import "RCTLog.h"

@implementation ImageLibraryManager

RCT_EXPORT_MODULE();

RCT_EXPORT_METHOD(selectImage)
{
  RCTLogInfo(@"Selecting image...");
}

@end
Finally, we can now call this method from JavaScript when the user presses on the avatar icon:
import React, { Component } from 'react';
import {
  View,
  StyleSheet,
  TouchableOpacity,
  NativeModules
} from 'react-native';
import Icon from 'react-native-vector-icons/EvilIcons';
import Title from './Title';
import AppText from './AppText';
import * as globalStyles from '../styles/global';

const { ImageLibraryManager } = NativeModules;

export default class Profile extends Component {

  render() {
    return (
      <View style={[globalStyles.COMMON_STYLES.pageContainer, styles.container]}>
        <TouchableOpacity
          onPress={() => ImageLibraryManager.selectImage()}
        >
          <Icon
            name="user"
            style={styles.avatarIcon}
          />
        </TouchableOpacity>
        <Title>Username</Title>
        <AppText>Your Name</AppText>
      </View>
    );
  }

}

const styles = StyleSheet.create({
  container: {
    justifyContent: 'center',
    alignItems: 'center'
  },
  avatarIcon: {
    color: globalStyles.HEADER_TEXT_COLOR,
    fontSize: 200
  }
});
We first import the TouchableOpacity component to add a press listener to the avatar icon:
import React, { Component } from 'react';
import {
  View,
  StyleSheet,
  TouchableOpacity,
  NativeModules
} from 'react-native';
import Icon from 'react-native-vector-icons/EvilIcons';
import Title from './Title';
import AppText from './AppText';
import * as globalStyles from '../styles/global';
We then wrap the Icon component in the TouchableOpacity and here we can call the new selectImage method when it is pressed:
<TouchableOpacity
  onPress={() => ImageLibraryManager.selectImage()}
>
  <Icon
    name="user"
    style={styles.avatarIcon}
  />
</TouchableOpacity>
Now, when we rebuild the project and press the avatar, we should see the message Selecting image... in the Chrome console. Another important note when working with native modules is that, whenever the native code changes, you will have to rebuild for that platform (in this case react-native run-ios); a JavaScript refresh is not sufficient.
We now need to implement the native behavior. We'll be making use of a native iOS class UIImagePickerController and thus will need to import UIKit in the header file:
#import "RCTBridgeModule.h"
#import <UIKit/UIKit.h>

@interface ImageLibraryManager : NSObject <RCTBridgeModule>
@end
We can now complete the implementation of this module's selectImage method in the implementation file:
#import "ImageLibraryManager.h"

#import "RCTLog.h"

@import MobileCoreServices;

@implementation ImageLibraryManager

RCT_EXPORT_MODULE();

RCT_EXPORT_METHOD(selectImage)
{
  RCTLogInfo(@"Selecting image...");

  UIImagePickerController *picker = [[UIImagePickerController alloc]  init];

  picker.sourceType = UIImagePickerControllerSourceTypePhotoLibrary;
  picker.mediaTypes = @[(NSString *)kUTTypeImage];
  picker.modalPresentationStyle = UIModalPresentationCurrentContext;

  picker.delegate = self;

  UIViewController *root = [[[[UIApplication sharedApplication] delegate] window] rootViewController];

  [root presentViewController:picker animated:YES completion:nil];
}

- (void)imagePickerController:(UIImagePickerController *)picker  didFinishPickingMediaWithInfo:(NSDictionary *)info
{
  NSString *fileName = [[[NSUUID UUID] UUIDString] stringByAppendingString:@".jpg"];
  NSString *path = [[NSTemporaryDirectory()stringByStandardizingPath]  stringByAppendingPathComponent:fileName];
  UIImage *image = [info objectForKey:UIImagePickerControllerOriginalImage];
  NSData *data = UIImageJPEGRepresentation(image, 0);
  [data writeToFile:path atomically:YES];
  NSURL *fileURL = [NSURL fileURLWithPath:path];
  NSString *filePath = [fileURL absoluteString];

  RCTLog(@"%@", filePath);

  [picker dismissViewControllerAnimated:YES completion:nil];
}

@end
There is a lot happening here, so let's break it down. The first thing we do in the selectImage method is create a new UIImagePickerController instance:
UIImagePickerController *picker = [[UIImagePickerController alloc] init];
Next we set some properties on the picker to tell the image picker how to display it and what types of media can be selected:
picker.sourceType = UIImagePickerControllerSourceTypePhotoLibrary;
picker.mediaTypes = @[(NSString *)kUTTypeImage];
picker.modalPresentationStyle = UIModalPresentationCurrentContext;
The kUTTypeImage constant comes from the MobileCoreServices library, so that will have to be imported:
@import MobileCoreServices;
Next, we set the delegate for the picker instance. In Objective-C, a delegate is an instance of a class that implements a specific protocol. This allows certain functionality (for instance, what to do when the image is selected) to be delegated to another object of our choosing. For this example, we'll make the ImageLibraryManager instance itself (self) the delegate:
picker.delegate = self;
We then find the root view controller that is currently active:
UIViewController *root = [[[[UIApplication sharedApplication] delegate] window] rootViewController];
We'll use that view controller to open up our image picker instance:
[root presentViewController:picker animated:YES completion:nil];
That completes the selectImage method. However, for the delegation portion to actually work, we need to do two things. First, we need to update the header file to ensure that our ImageLibraryManager class implements the appropriate protocols, in addition to the RCTBridgeModule that it previously implemented:
#import "RCTBridgeModule.h"
#import <UIKit/UIKit.h>

@interface ImageLibraryManager : NSObject <RCTBridgeModule,  UINavigationControllerDelegate, UIImagePickerControllerDelegate>
@end
As we can see, two protocols are needed to be a delegate for the UIImagePickerController: UINavigationControllerDelegate and UIImagePickerControllerDelegate.
Second, we need to add the implementation of these protocols, which is a method that is called when the image picking has been completed by the user, named imagePickerController:didFinishPickingMediaWithInfo:
- (void)imagePickerController:(UIImagePickerController *)picker  didFinishPickingMediaWithInfo:(NSDictionary *)info
{
  NSString *fileName = [[[NSUUID UUID] UUIDString]  stringByAppendingString:@".jpg"];
  NSString *path =  [[NSTemporaryDirectory()stringByStandardizingPath]  stringByAppendingPathComponent:fileName];
  UIImage *image = [info  objectForKey:UIImagePickerControllerOriginalImage];
  NSData *data = UIImageJPEGRepresentation(image, 0);
  [data writeToFile:path atomically:YES];
  NSURL *fileURL = [NSURL fileURLWithPath:path];
  NSString *filePath = [fileURL absoluteString];

  RCTLog(@"%@", filePath);

  [picker dismissViewControllerAnimated:YES completion:nil];
}
We first have to do a number of things to extract the selected image and get a temporary file path to it:
NSString *fileName = [[[NSUUID UUID] UUIDString]  stringByAppendingString:@".jpg"];
NSString *path =  [[NSTemporaryDirectory()stringByStandardizingPath]  stringByAppendingPathComponent:fileName];
UIImage *image = [info  objectForKey:UIImagePickerControllerOriginalImage];
NSData *data = UIImageJPEGRepresentation(image, 0);
[data writeToFile:path atomically:YES];
NSURL *fileURL = [NSURL fileURLWithPath:path];
NSString *filePath = [fileURL absoluteString];
For now, we'll log the extracted file path so that we can see what is happening in the Chrome JavaScript console:
RCTLog(@"%@", filePath);
Finally, we close the image picker so that the user is returned to the profile page:
[picker dismissViewControllerAnimated:YES completion:nil];
Now, when we rebuild our iOS application, we can open the image picker by pressing on the profile page's avatar icon. When we select the image, the image picker will close and we'll see the file path logged in the console.
We now have a working native module. However, we don't yet have a way to communicate the result of the image selection back to our JavaScript. There are a few ways that we could potentially tackle this and we will examine each.
Communicating with callbacks
In JavaScript, callback functions are a common and traditional way to handle communication for asynchronous tasks. At a high level, a callback function is one that is called when an asynchronous task completes and is often passed the result of that asynchronous task. We can use callback functions when calling native module methods, which are necessarily asynchronous.
The first step here is to add a callback function as a parameter to the exposed native method. We use React Native's RCTResponseSenderBlock type to represent the callback function in Objective-C:
RCT_EXPORT_METHOD(selectImage:(RCTResponseSenderBlock)callback)
We aren't actually going to call the callback function until the user selects the image, which happens in the delegate method, so we need to store the callback function in an instance variable that can be accessed in either method. First, we'll declare the property on the class:
@interface ImageLibraryManager ()

@property (nonatomic, strong) RCTResponseSenderBlock callback;

@end
Next, in the selectImage method, we'll assign the callback function passed to the instance variable:
RCTLogInfo(@"Selecting image...");
self.callback = callback;
Finally, we'll call the callback function when we have the selected image's temporary file path:
RCTLog(@"%@", filePath);
self.callback(@[filePath]);
The RCTResponseSenderBlock callback takes an array of arguments that will be passed to the JavaScript callback function. When accepting arguments from JavaScript or calling JavaScript callback functions, we need to ensure that the data we pass in is serializable as JSON data (so that it can be interpreted by both languages). An NSString value, such as the filePath, is serializable, so this should work without issue.
The final step is to actually pass in a callback function from the Profile.js JavaScript file. We'll first reorganize the component by adding an onSelectImage method and binding the this context in the component's constructor:
constructor(props) {
  super(props);
  this.state = {};
  this.onSelectImage = this.onSelectImage.bind(this);
}

onSelectImage() {
  ImageLibraryManager.selectImage();
}
We'll call this new function when the avatar icon is pressed:
<TouchableOpacity
  onPress={this.onSelectImagePromise}
>
  <Icon
    name="user"
    style={styles.avatarIcon}
  />
</TouchableOpacity>
Now, let's pass in a callback function to the selectImage native method. Our callback will add the selected URL to the state of the component:
onSelectImage() {
  ImageLibraryManager.selectImage((url) => {
    this.setState({
      profileImageUrl: url
    });
  });
}
Finally, we'll use this URL to display the selected image in place of the avatar icon when it has been selected. To do this, we'll first need to add the Image component to our import statements:
import React, { Component } from 'react';
import {
  View,
  StyleSheet,
  TouchableOpacity,
  NativeModules,
  Image
} from 'react-native';
import Icon from 'react-native-vector-icons/EvilIcons';
import Title from './Title';
import AppText from './AppText';
import * as globalStyles from '../styles/global';
We'll also add some styles for the profile image to the StyleSheet:
const styles = StyleSheet.create({
  container: {
    justifyContent: 'center',
    alignItems: 'center'
  },
  avatarIcon: {
    color: globalStyles.HEADER_TEXT_COLOR,
    fontSize: 200
  },
  profileImage: {
    width: 150,
    height: 150,
    borderRadius: 75
  }
});
Then, we'll create a helper function that is responsible for rendering the profile image if it has been selected:
renderProfileImage() {
  if (this.state.profileImageUrl) {
    return (
      <Image
        source={{ uri: this.state.profileImageUrl }}
        style={styles.profileImage}
      />
    );
  }
  return (
    <Icon
      name="user"
      style={styles.avatarIcon}
    />
  );
}
Finally, we need to update the main render() method to use the new helper function instead of rendering the Icon component directly:
render() {
  return (
    <View style={[globalStyles.COMMON_STYLES.pageContainer, styles.container]}>
      <TouchableOpacity
        onPress={this.onSelectImage}
      >
        {this.renderProfileImage()}
      </TouchableOpacity>
      <Title>Username</Title>
      <AppText>Your Name</AppText>
    </View>
  );
}
We should now be able to select an image from the image library and see it appear within the profile page in place of the avatar icon. This is now a complete and functional integration with a native module, but in the next two sections, we'll examine two other communication methods that can be used as an alternative to callback functions.
Note
It is important to point out at this point that we are not persisting this image selection in any way. If we wanted to make this a fully functioning profile, we'd need some way to store the user's selection, which is outside of the scope of this chapter.
Communicating with promises
Just like callbacks, promises in JavaScript are used to handle responses to asynchronous tasks. We can write a second JavaScript method that uses the promise syntax instead of passing in a callback function. Then, we'll update our native module to respond to callbacks or promises.
First, we'll define an onSelectImagePromise method in the Profile.js file's Profile component class that functionally behaves the same as onSelectImage, but uses the promise syntax instead of a callback function:
onSelectImagePromise() {
  ImageLibraryManager.selectImagePromise().then((url) => {
    this.setState({
      profileImageUrl: url
    });
  });
}
We will also need to bind the this context in the constructor:
constructor(props) {
  super(props);
  this.state = {};
  this.onSelectImage = this.onSelectImage.bind(this);
  this.onSelectImagePromise = this.onSelectImagePromise.bind(this);
}
Now, let's use the following function when the avatar icon is pressed instead of the original callback-based method:
<TouchableOpacity
  onPress={this.onSelectImagePromise}
>
  {this.renderProfileImage()}
</TouchableOpacity>
The JavaScript code is now ready to communicate through promises in lieu of a callback function, but we need to also update the native code within the ImageLibraryManager.m file. We'll add a new selectImagePromise method to the native module that takes the resolve and reject parameters instead of the callback. React Native will notice that the final two parameters of this method are promise related and will allow us to communicate back to JavaScript by using them:
RCT_EXPORT_METHOD(selectImagePromise:(RCTPromiseResolveBlock)resolve
                  rejecter:(RCTPromiseRejectBlock)reject)
{
  RCTLogInfo(@"Selecting image...");
  self.resolve = resolve;
  self.reject = reject;

  [self openPicker];
}
Just like the callback, we need to store the resolve and reject functions in instance variables so that they can be accessed after the user has selected the image. We create the instance variables in the private interface:
@interface ImageLibraryManager ()

@property (nonatomic, strong) RCTResponseSenderBlock callback;
@property (nonatomic, strong) RCTPromiseResolveBlock resolve;
@property (nonatomic, strong) RCTPromiseRejectBlock reject;

@end
And then we assign them in the selectImagePromise method:
self.resolve = resolve;
self.reject = reject;
Because the selectImage and selectImagePromise methods share much of the same code, we've broken out that functionality into a helper function called openPicker:
- (void)openPicker
{
  UIImagePickerController *picker = [[UIImagePickerController  alloc] init];

  picker.sourceType = UIImagePickerControllerSourceTypePhotoLibrary;
  picker.mediaTypes = @[(NSString *)kUTTypeImage];
  picker.modalPresentationStyle =  UIModalPresentationCurrentContext;

  picker.delegate = self;

  UIViewController *root = [[[[UIApplication sharedApplication]  delegate] window] rootViewController];

  [root presentViewController:picker animated:YES completion:nil];
}
Then we can call it in both of the exported methods:
[self openPicker];
Finally, in the delegate imagePickerController method, we need to determine which communication method to use. We'll do this by checking which instance variable is not nil:
RCTLog(@"%@", filePath);

if (self.callback != nil) {
    self.callback(@[filePath]);
} else if (self.resolve != nil) {
    self.resolve(filePath);
}
Once we rebuild, our application should now communicate using a promise instead of a callback function. We didn't make use of the reject parameter in the native module, but in a real application, this would be called in the event of an error.
Communicating with events
The final way that we can communicate from a native module to JavaScript is by using events. Events can be triggered at any time by a native module and can be listened to by any number of JavaScript components. These features make the use case for events slightly different than that for callbacks or promises.
Events are especially useful when an action is not initiated by JavaScript, but instead initiated by the native code. An example of this might be a user gesture that happens in a custom native module. Events are also a useful paradigm when more than one JavaScript component needs to be aware of the action.
For our application, we'll add events to the beginning and end of the image selection process and allow JavaScript components to listen to these events should they choose to. To do this, we'll first need to make our ImageLibraryManager class extend the RCTEventEmitter class instead of the NSObject class. The RCTEventEmitter class comes with methods for sending events over the React Native bridge:
#import "RCTBridgeModule.h"
#import "RCTEventEmitter.h"
#import <UIKit/UIKit.h>

@interface ImageLibraryManager : RCTEventEmitter <RCTBridgeModule, UINavigationControllerDelegate, UIImagePickerControllerDelegate>
@end
Extending the RCTEventEmitter class requires us to implement the supportedEvents method that returns an array of event name strings. We'll add this method to the ImageLibraryManager.m implementation file:
- (NSArray<NSString *> *)supportedEvents {
  return @[@"ImageSelectionStarted", @"ImageSelectionEnded"];
}
Here we've added two supported event—one called @"ImageSelectionStarted" and another called @"ImageSelectionEnded". Now, we'll send an event at the beginning of the openPicker function that indicates the image selection process has started:
- (void)openPicker
{
  [self sendEventWithName:@"ImageSelectionStarted" body:nil];
  UIImagePickerController *picker = [[UIImagePickerController alloc] init];
  ...
}
Likewise, we'll send an event when the selection completes in the imagePickerController method, this time sending along the selected URL in the body of the event:
- (void)imagePickerController:(UIImagePickerController *)picker didFinishPickingMediaWithInfo:(NSDictionary *)info
{
  ...

  [self sendEventWithName:@"ImageSelectionEnded" body:filePath];
  [picker dismissViewControllerAnimated:YES completion:nil];
}
When we rebuild, our native module is now sending events. However, no JavaScript components are listening to these events. To start listening to these events (or any native events), we'll need to import from the react-native package the NativeEventEmitter module into Profile.js:
import React, { Component } from 'react';
import {
  View,
  StyleSheet,
  TouchableOpacity,
  NativeModules,
  Image,
  NativeEventEmitter
} from 'react-native';
import Icon from 'react-native-vector-icons/EvilIcons';
import Title from './Title';
import AppText from './AppText';
import * as globalStyles from '../styles/global';
We will subscribe to the image library manager's events when the component mounts, so we'll need to add a lifecycle method to the component:
componentWillMount() {
  const imageLibraryEvents = new NativeEventEmitter(ImageLibraryManager);
  this.setState({
    startEventSubscription: imageLibraryEvents.addListener(
      "ImageSelectionStarted",
      () => console.log('Image Selection Started')
    ),
    endEventSubscription: imageLibraryEvents.addListener(
      "ImageSelectionEnded",
      url => console.log('Image Selection Ended', url)
    )
  });
}
We start by creating a new NativeEventEmitter object for the ImageLibraryManager native module:
const imageLibraryEvents = new NativeEventEmitter(ImageLibraryManager);
When we add a listener, we need to specify both the event we want to listen to (that is, "ImageSelectionStarted") and a callback function to run when the event is triggered. For the start event, our callback function is simply logging to the console:
imageLibraryEvents.addListener(
  "ImageSelectionStarted",
  () => console.log('Image Selection Started')
)
The addListener function returns a subscription object that can be used to remove the listener at a later point in time. We'll store this subscription in the component's state so that we can ultimately remove it when the component is unmounted:
this.setState({
  startEventSubscription: imageLibraryEvents.addListener(
    "ImageSelectionStarted",
    () => console.log('Image Selection Started')
  ),
  endEventSubscription: imageLibraryEvents.addListener(
    "ImageSelectionEnded",
    url => console.log('Image Selection Ended', url)
  )
});
Finally, we'll add a componentWillUnmount lifecycle method to remove the subscriptions when the component is removed from the application:
componentWillUnmount() {
  this.state.startEventSubscription.remove();
  this.state.endEventSubscription.remove();
}
Now when we run the application, we will see event messages in the JavaScript console in Chrome in addition to the console messages we left earlier. Though we aren't using these to do anything other than login at this point, they could easily be used to replace the callback and promise methods.
Exporting constants
In addition to exporting methods, we can also export constants from our native modules. For our example, we'll make the names of the events being triggering constants instead of hard-coded strings. In order to export constants, the native module must define a constantsToExport method that returns a dictionary of constants.
The first thing we'll do in our ImageLibraryManager example is define a couple of string constants at the top of the implementation file:
static NSString *const StartEvent = @"ImageSelectionStarted";
static NSString *const EndEvent = @"ImageSelectionEnded";
We'll then refactor the event triggering methods to use these constants instead of the hard-coded strings:
[self sendEventWithName:StartEvent body:nil];
Finally, we'll define the constantsToExport method that allows these constants to be exported as part of the React Native native module:
- (NSDictionary *)constantsToExport
{
  return @{ @"startEvent": StartEvent, @"endEvent": EndEvent };
}
With the constants exported, they can now be accessed as top-level keys on the JavaScript ImageLibraryManager object:
ImageLibraryManager.startEvent
// 'ImageSelectionStarted'
In our Profile component, we'll replace the hard-coded event names used when adding the event listeners:
componentWillMount() {
  const imageLibraryEvents = new NativeEventEmitter(ImageLibraryManager);
  this.setState({
    startEventSubscription: imageLibraryEvents.addListener(
      ImageLibraryManager.startEvent,
      () => console.log('Image Selection Started')
    ),
    endEventSubscription: imageLibraryEvents.addListener(
      ImageLibraryManager.endEvent,
      url => console.log('Image Selection Ended', url)
    )
  });
}
We now have a complete native module that exports both methods and constants and communicates with JavaScript through callback functions, promises, and events. However, our Android application is now broken because the native module is only defined in iOS. The next step will be to create parity on Android by porting the module to that platform.
Native modules in Android
Just like native modules for iOS are written in their native language, Objective-C, native modules for Android are written in the native Android language, Java. Once again, this chapter will not go into great detail about Java and the Android ecosystem at large, but will just focus on the interface between native Android code and React Native JavaScript code.
We will also use Android Studio to develop our Android native module as it provides the best Java development experience. Like Objective-C, Java is an object-oriented language. To create our native module, we'll be creating a new class that has the same name as the one used in the previous section. It will be contained in the ImageLibraryManager.java file. We will also need to create an ImageLibraryManagerPackage.java class that will be used to register the module.
Our goal in this section is to build an Android native module that has the exact same API as the iOS module. This will ensure that our JavaScript code in Profile.js does not have to be updated at all and can run the same on both platforms.
Setting up the module
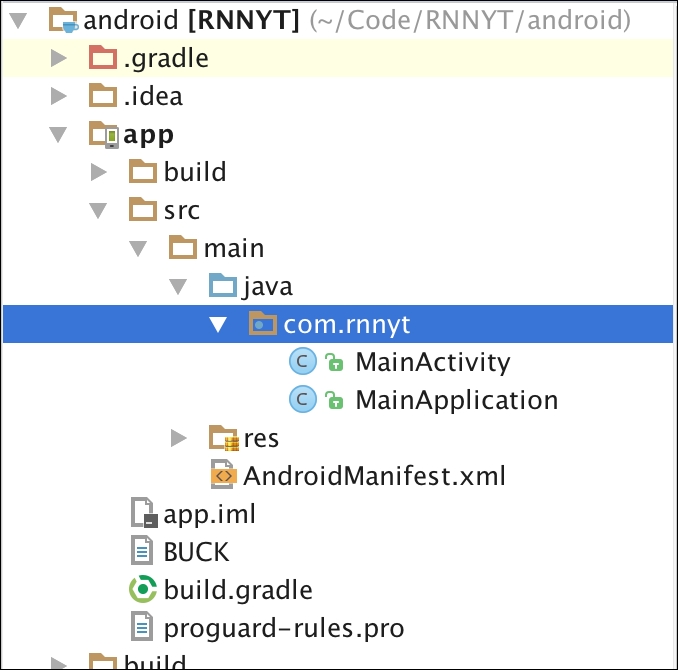
To open our project in Android Studio, first open the Android Studio application and then open the android directory of the RNNYT application. When you do this, you should see two modules on the left-hand-side Project tab. We will be working in the app module, so let's first expand it and find the com.rnnyt package inside the src/java folder.
Currently, there should only be two classes within this package, MainActivity and MainApplication, as shown in the following screenshot:
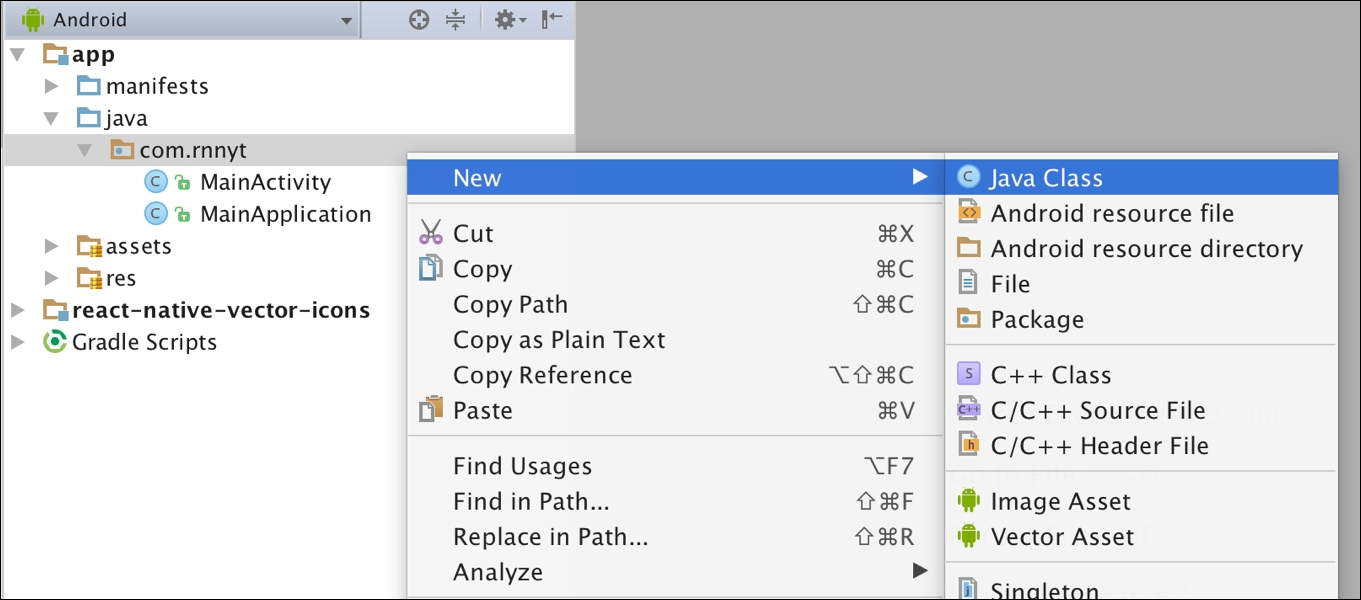
To add our new module class, right-click on the com.rnnyt package, and then click on New and then Java Class, as shown in the following screenshot:
In the resulting dialog, type in the name of our new class, ImageLibraryManager, as shown in the following screenshot:
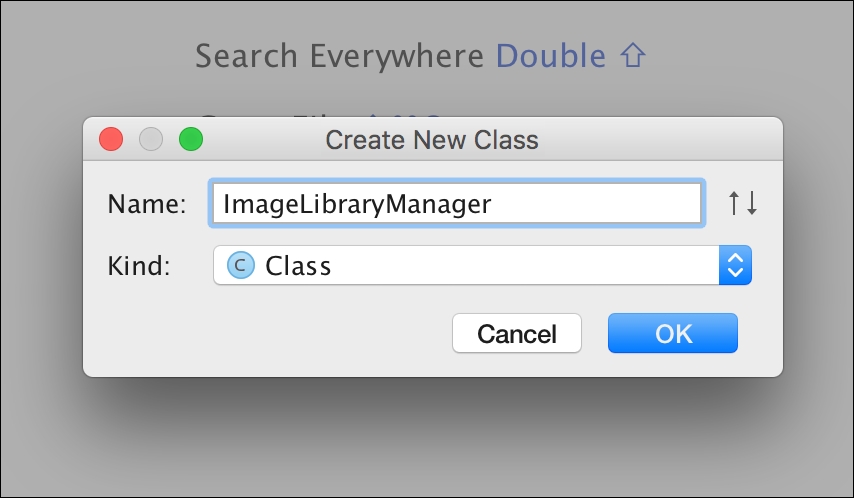
Repeat this process for the other ImageLibraryManagerPackage class.
When we create the classes, Android Studio will provide us with some boilerplate. We'll start in the ImageLibraryManager class:
package com.rnnyt;

public class ImageLibraryManager {
}
In order to turn this empty class into a React Native native module, we must do a few things. First, all native modules must extend the ReactContextBaseJavaModule class:
package com.rnnyt;

import com.facebook.react.bridge.ReactContextBaseJavaModule;

public class ImageLibraryManager extends  ReactContextBaseJavaModule {
}
The ReactContextBaseJavaModule class is abstract and requires us to implement a method called getName, which defines the name by which the module is accessed in JavaScript. We'll make ours consistent with the class name:
package com.rnnyt;

import com.facebook.react.bridge.ReactContextBaseJavaModule;

public class ImageLibraryManager extends ReactContextBaseJavaModule {

  @Override
  public String getName() {
    return "ImageLibraryManager";
  }

}
The abstract class also requires us to add a constructor that calls the super class constructor:
package com.rnnyt;

import com.facebook.react.bridge.ReactApplicationContext;
import com.facebook.react.bridge.ReactContextBaseJavaModule;

public class ImageLibraryManager extends  ReactContextBaseJavaModule {

  public ImageLibraryManager(ReactApplicationContext reactContext) {
    super(reactContext);
  }

    @Override
    public String getName() {
        return "ImageLibraryManager";
    }

}
We now need to register the module and we'll do so by editing the ImageLibraryManagerPackage class. This class needs to implement the ReactPackage interface:
package com.rnnyt;

import com.facebook.react.ReactPackage;

public class ImageLibraryManagerPackage implements ReactPackage {
}
The ReactPackage interface requires us to implement several methods:
package com.rnnyt;

import com.facebook.react.ReactPackage;
import com.facebook.react.bridge.JavaScriptModule;
import com.facebook.react.bridge.NativeModule;
import com.facebook.react.bridge.ReactApplicationContext;
import com.facebook.react.uimanager.ViewManager;

import java.util.List;
public class ImageLibraryManagerPackage implements ReactPackage {
  @Override
  public List<NativeModule>  createNativeModules(ReactApplicationContext reactContext) {
    return null;
  }

  @Override
  public List<Class<? extends JavaScriptModule>> createJSModules()  {
    return null;
  }

  @Override
  public List<ViewManager>  createViewManagers(ReactApplicationContext reactContext) {
    return null;
  }
}
Our only goal for this package is to register a native module so that we can return empty lists for the createViewManagers and createJSModules methods:
package com.rnnyt;

import com.facebook.react.ReactPackage;
import com.facebook.react.bridge.JavaScriptModule;
import com.facebook.react.bridge.NativeModule;
import com.facebook.react.bridge.ReactApplicationContext;
import com.facebook.react.uimanager.ViewManager;

import java.util.Collections;
import java.util.List;

public class ImageLibraryManagerPackage implements ReactPackage {
  @Override
  public List<NativeModule> createNativeModules(ReactApplicationContext reactContext) {
    return null;
  }

  @Override
  public List<Class<? extends JavaScriptModule>> createJSModules() {
    return Collections.emptyList();
  }

  @Override
  public List<ViewManager> createViewManagers(ReactApplicationContext reactContext) {
    return Collections.emptyList();
  }
}
However, for the createNativeModules method, we will need to return a list containing an instance of our ImageLibraryManager class:
package com.rnnyt;

import com.facebook.react.ReactPackage;
import com.facebook.react.bridge.JavaScriptModule;
import com.facebook.react.bridge.NativeModule;
import com.facebook.react.bridge.ReactApplicationContext;
import com.facebook.react.uimanager.ViewManager;

import java.util.ArrayList;
import java.util.Collections;
import java.util.List;

public class ImageLibraryManagerPackage implements ReactPackage {
  @Override
  public List<NativeModule>  createNativeModules(ReactApplicationContext reactContext) {
    List<NativeModule> nativeModules = new ArrayList<>();
    nativeModules.add(new ImageLibraryManager(reactContext));
    return nativeModules;
  }

  @Override
  public List<Class<? extends JavaScriptModule>> createJSModules()  {
    return Collections.emptyList();
  }

  @Override
  public List<ViewManager>  createViewManagers(ReactApplicationContext reactContext) {
    return Collections.emptyList();
  }
}
Our final step in the registration process is to update the MainApplication class to add an instance of our ImageLibraryManagerPackage to the list of application packages:
@Override
protected List<ReactPackage> getPackages() {
  return Arrays.<ReactPackage>asList(
      new MainReactPackage(),
      new ImageLibraryManagerPackage()
  );
}
We have now gone through the setup process for an Android native module. This process could be repeated anytime we need to construct a native module. We are now ready to start developing the image picker for Android.
Exporting methods
To export a method in an Android module, we simply add an @ReactMethod annotation to any public method within the module class, ImageLibraryManager. We're going to start with the selectImage method that allows a user to select an image from their image library:
@ReactMethod
public void selectImage() {
  Activity currentActivity = getCurrentActivity();


  Intent libraryIntent = new Intent(Intent.ACTION_PICK,  android.provider.MediaStore.Images.Media.EXTERNAL_CONTENT_URI);


  currentActivity.startActivityForResult(libraryIntent, 1);
}
In this method, we start by getting the currently visible Android Activity:
Activity currentActivity = getCurrentActivity();
Next, we create an Intent instance that indicates we want to open the media library in order to select an image:
Intent libraryIntent = new Intent(Intent.ACTION_PICK, android.provider.MediaStore.Images.Media.EXTERNAL_CONTENT_URI);
Finally, we send this intent to the current Activity to open the media library:
currentActivity.startActivityForResult(libraryIntent, 1);
Now that we've opened the Activity media library, we need our class to be able to listen to when the image selection has been completed. To do this, we need our class to implement the ActivityEventListener interface:
public class ImageLibraryManager extends ReactContextBaseJavaModule implements ActivityEventListener {
This interface requires us to implement two methods. The first, onActivityResult, is the method we are primarily concerned with; it will be called when the image selection has completed. Here we will extract the image URL that was selected. The second, onNewIntent, we won't use, so we'll leave this method empty:
@Override
public void onActivityResult(Activity activity, int requestCode, int resultCode, Intent data) {
  String filePath = data.getDataString();
}

@Override
public void onNewIntent(Intent intent) {

}
Finally, now that the ImageLibraryManager class implements the ActivityEventListener interface, we need to update the constructor to set the instance as an activity listener. This is similar to the iOS delegate pattern that we used in the previous section:
public ImageLibraryManager(ReactApplicationContext reactContext) {
  super(reactContext);
  reactContext.addActivityEventListener(this);
}
We now have the basic method set up for our Android native module. The next step is to communicate the result of this selection back to JavaScript.
Communicating with callbacks
Like we saw in the iOS module, the first strategy we can use to communicate with JavaScript is by accepting a callback function into the native method. The first step in this process is to add a Callback as a parameter to the selectImage method. The Callback class is contained in the com.facebook.react.bridge package:
@ReactMethod
public void selectImage(Callback callback) {
We will call the callback function when the user has finished selecting the image, so once again, we will need to store the callback in an instance variable. In Android classes, instance variables are typically prefixed with the m character. First, we create the field at the top of the class:
private Callback mCallback;
Then we assign the value within the selectImage method:
@ReactMethod
public void selectImage(Callback callback) {
  mCallback = callback;
Now we can invoke that callback function when the selection has completed:
@Override
public void onActivityResult(int requestCode, int resultCode, Intent data) {
  String filePath = data.getDataString();
  mCallback.invoke(filePath);
}
The arguments passed to invoke need to be JSON serializable as they will be passed to the JavaScript callback. Now, we have a selectImage method in our Android native module that conforms exactly to the API of its iOS counterpart.
Communicating with promises
We can also use promises in the Android native module to communicate back to JavaScript. In Objective-C, to use a promise, you must add two parameters to the method: a resolver and a rejector. In Java, you only need a single parameter: a com.facebook.react.bridge.Promise. We'll create a new method selectImagePromise method that has this promise parameter:
@ReactMethod
public void selectImagePromise(Promise promise) {

}
Just like we stored the callback function in an instance variable, we will also store the promise in a new instance variable called mPromise:
private Promise mPromise;

...

@ReactMethod
public void pickImagePromise(Promise promise) {
    mPromise = promise;
}
Since the rest of the behavior for selectImagePromise is the same as the callback version, selectImage, we'll abstract that logic into an openPicker helper function:
@ReactMethod
public void selectImage(Callback callback) {
  mCallback = callback;
  openPicker();
}

@ReactMethod
public void selectImagePromise(Promise promise) {
  mPromise = promise;
  openPicker();
}

private void openPicker() {
  Activity currentActivity = getCurrentActivity();

  Intent libraryIntent = new Intent(Intent.ACTION_PICK,  android.provider.MediaStore.Images.Media.EXTERNAL_CONTENT_URI);

  currentActivity.startActivityForResult(libraryIntent, 1);
}
Finally, in the onActivityResult method, we need to check if the promise or callback instance variables have been set before calling them:
@Override
public void onActivityResult(Activity activity, int requestCode,  int resultCode, Intent data) {
    String filePath = data.getDataString();

  if (mCallback != null) {
    mCallback.invoke(filePath);
  } else if (mPromise != null) {
    mPromise.resolve(filePath);
  }
}
Since our JavaScript Profile component uses this selectImagePromise method in its
current form, we are close to being able to use this Android native module. However, our module isn't quite at parity yet as there is one more method of communication remains.
Communicating with events
The final way to communicate back to JavaScript is by sending events through the device event emitter. We use the ReactContext to emit these events, so the first thing we need to do is store a reference to the context in an instance variable:
private Callback mCallback;
private Promise mPromise;
private ReactContext mReactContext;

public ImageLibraryManager(ReactApplicationContext reactContext) {
  super(reactContext);

  reactContext.addActivityEventListener(this);

  mReactContext = reactContext;
}
We'll emit the start event in the openPicker method using the stored context:
private void openPicker() {
   mReactContext
     .getJSModule(DeviceEventManagerModule.RCTDeviceEventEmitter.class)
     .emit("ImageSelectionStarted", null);

  Activity currentActivity = getCurrentActivity();

  Intent libraryIntent = new Intent(Intent.ACTION_PICK,
  android.provider.MediaStore.Images.Media.EXTERNAL_CONTENT_URI);

  currentActivity.startActivityForResult(libraryIntent, 1);
}
In this line of code, we get the device event emitter from the react context and then use it to emit an event. The first argument passed to emit is the name of the event and the second is a data object. Since there is no additional data that we need to send for this event, we have left the second argument null:
mReactContext
.getJSModule(DeviceEventManagerModule.RCTDeviceEventEmitter.class)
.emit("ImageSelectionStarted", null);
We also need to emit an event after the image selection has completed. This time we will send the image's filePath along with the event:
@Override
public void onActivityResult(Activity activity, int requestCode, int resultCode, Intent data) {
  String filePath = data.getDataString();

  if (mCallback != null) {
    mCallback.invoke(filePath);
  } else if (mPromise != null) {
    mPromise.resolve(filePath);
  }

  mReactContext
  .getJSModule(DeviceEventManagerModule.RCTDeviceEventEmitter.class)
  .emit("ImageSelectionEnded", filePath);
}
Our native Android module will now emit an event just before the image library opens and another right when it ends.
Exporting constants
Before these will start working again in our React Native application, we will have to also export the names of the events as constants. In order to do this, we'll first create constants within the Java class:
private static final String START_EVENT = "ImageSelectionStarted";
private static final String END_EVENT = "ImageSelectionEnded";
We can now replace hard-coded strings in the class with these constants:
mReactContext
.getJSModule(DeviceEventManagerModule.RCTDeviceEventEmitter.class)
.emit(START_EVENT, null);
...
mReactContext
.getJSModule(DeviceEventManagerModule.RCTDeviceEventEmitter.class)
.emit(END_EVENT, filePath);
Finally, we can export these constants to JavaScript by implementing a method called getConstants that returns a map of constants:
@Nullable
@Override
public Map<String, Object> getConstants() {
  Map<String, Object> constants = new HashMap<>();
  constants.put("startEvent", START_EVENT);
  constants.put("endEvent", END_EVENT);
  return constants;
}
We've now completed our Android native module. Not only does it behave in the same way as the iOS module, but it also has the same application programming interface. This means that, in JavaScript, we can write code that is not platform aware. Let's take a look at the ImageLibraryManager in its entirety:
package com.rnnyt;

import android.app.Activity;
import android.content.Intent;

import com.facebook.react.bridge.ActivityEventListener;
import com.facebook.react.bridge.Callback;
import com.facebook.react.bridge.Promise;
import com.facebook.react.bridge.ReactApplicationContext;
import com.facebook.react.bridge.ReactContext;
import com.facebook.react.bridge.ReactContextBaseJavaModule;
import com.facebook.react.bridge.ReactMethod;
import com.facebook.react.modules.core.DeviceEventManagerModule;

import java.util.HashMap;
import java.util.Map;

import javax.annotation.Nullable;

public class ImageLibraryManager extends  ReactContextBaseJavaModule implements ActivityEventListener {

  private static final String START_EVENT =  "ImageSelectionStarted";
  private static final String END_EVENT = "ImageSelectionEnded";

  private Callback mCallback;
  private Promise mPromise;
  private ReactContext mReactContext;

  public ImageLibraryManager(ReactApplicationContext reactContext) {
    super(reactContext);

    reactContext.addActivityEventListener(this);

    mReactContext = reactContext;
  }

  @Override
  public String getName() {
    return "ImageLibraryManager";
  }

  @Nullable
  @Override
  public Map<String, Object> getConstants() {
    Map<String, Object> constants = new HashMap<>();
    constants.put("startEvent", START_EVENT);
    constants.put("endEvent", END_EVENT);
    return constants;
  }

  @ReactMethod
  public void selectImage(Callback callback) {
    mCallback = callback;
    openPicker();
  }

  @ReactMethod
  public void selectImagePromise(Promise promise) {
    mPromise = promise;
    openPicker();
  }

  private void openPicker() {
    mReactContext
    .getJSModule(DeviceEventManagerModule.RCTDeviceEventEmitter.class)
    .emit(START_EVENT, null);

    Activity currentActivity = getCurrentActivity();

    Intent libraryIntent = new Intent(Intent.ACTION_PICK,
    android.provider.MediaStore.Images.Media.EXTERNAL_CONTENT_URI);

    currentActivity.startActivityForResult(libraryIntent, 1);
  }

  @Override
  public void onActivityResult(Activity activity, int requestCode, int resultCode, Intent data) {
    String filePath = data.getDataString();
    if (mCallback != null) {
      mCallback.invoke(filePath);
    } else if (mPromise != null) {
      mPromise.resolve(filePath);
    }

    mReactContext
    .getJSModule(DeviceEventManagerModule.RCTDeviceEventEmitter.class)
    .emit(END_EVENT, filePath);
  }

  @Override
  public void onNewIntent(Intent intent) {

  }
}


