Search icon CANCEL
Arrow left icon
Explore Products
Best Sellers
New Releases
Books
Videos
Audiobooks
Learning Hub
Conferences
Free Learning
Arrow right icon
Arrow up icon
GO TO TOP
Master Apache JMeter - From Load Testing to DevOps

You're reading from   Master Apache JMeter - From Load Testing to DevOps Master performance testing with JMeter

Arrow left icon
Product type Paperback
Published in Aug 2019
Publisher
ISBN-13 9781839217647
Length 468 pages
Edition 1st Edition
Languages
Arrow right icon
Authors (3):
Arrow left icon
Bruno Demion (Milamber) Bruno Demion (Milamber)
Author Profile Icon Bruno Demion (Milamber)
Bruno Demion (Milamber)
Antonio Gomes Rodrigues Antonio Gomes Rodrigues
Author Profile Icon Antonio Gomes Rodrigues
Antonio Gomes Rodrigues
Philippe Mouawad Philippe Mouawad
Author Profile Icon Philippe Mouawad
Philippe Mouawad
Arrow right icon
View More author details
Toc

Table of Contents (14) Chapters Close

About the Book 1. Quick Start with JMeter FREE CHAPTER 2. JMeter Overview 3. Designing a Test Case 4. Important Concepts in JMeter 5. Preparing the Test Environment (Injectors and Tested Systems) 6. Being Productive with JMeter 7. Load Testing a Website 8. Load Testing Web Services 9. Load Testing a Database Server 10. Load Testing Message-Oriented Middleware (MOM) via JMS 11. Performing a Load Test 12. Visualizing and Analyzing the Load Testing Results 13. Integration of JMeter in the DevOps Tool Chain

Setup JMeter to Record Our Browsing Session

  1. Launch JMeter:
    Figure 1.1: JMeter
    Figure 1.1: JMeter
  2. Use the Templates… feature of JMeter:
    Figure 1.2: JMeter Templates… feature
    Figure 1.2: JMeter Templates… feature
  3. Choose Recording with Think Time model and click Create:
    Figure 1.3: Recording template
    Figure 1.3: Recording template
  4. The test plan is ready:
    Figure 1.4: Result of Recording template
    Figure 1.4: Result of Recording template
  5. To save time in the future, we will select the HTTP Request Defaults element and fill in the Server Name or IP and Port Number sections:
    Figure 1.5: Result of Recording template
    Figure 1.5: Result of Recording template

    Note

    With this trick, we will share these two fields in every element HTTP Request Defaults and JMeter will not put them in each HTTP Request during recording.

    Caution

    During the load test, you should avoid having the injector (JMeter) on the same server as the application under test.

    Otherwise, the injected load will be impacted by the application's bad performance, and the application could be impacted by the injector's bad performance.

    Our tree is ready; we must now start the proxy server of JMeter.

    But before doing that, let's look at the HTTP(S) Test Script Recorder element.

  6. For the name of recorded transactions, we have two options in Recorder:

    Transaction name, which allows you to fully name them as you wish.

    Prefix, which will just prepend the prefix to the default name given by JMeter, which is usually the URL path.

    Figure 1.6: Transaction naming strategy
    Figure 1.6: Transaction naming strategy
  7. Note that with the default configuration of the template, static resources (image, CSS file, JS file…) are not recorded:
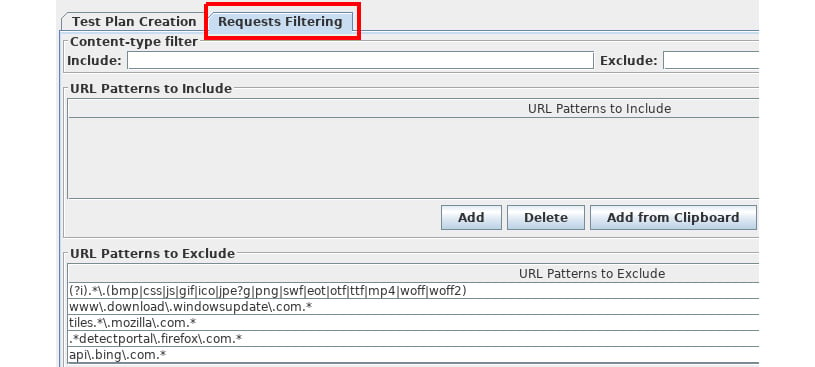
Figure 1.7: Exclude static resource capture

JMeter is now ready to record our navigation session.

You have been reading a chapter from
Master Apache JMeter - From Load Testing to DevOps
Published in: Aug 2019
Publisher:
ISBN-13: 9781839217647
Register for a free Packt account to unlock a world of extra content!
A free Packt account unlocks extra newsletters, articles, discounted offers, and much more. Start advancing your knowledge today.
Unlock this book and the full library FREE for 7 days
Get unlimited access to 7000+ expert-authored eBooks and videos courses covering every tech area you can think of
Renews at R$50/month. Cancel anytime