Licensing XenServer
XenServer is available in four editions but you can move towards virtualization (if you have not yet done this in your enterprise) with just the free edition. It can be used without time limits and restrictions. Citrix requires you only to activate the product within 30 days after you have installed it and then renew the free license on an annual basis.
Activating a free edition
To activate the free edition, follow this procedure:
Request an activation key from Citrix using XenCenter.
Click on the Tools menu and select License Manager.
Select one or more hosts that you wish to activate. Click on Activate Free XenServer and then select Request Activation Key, as shown in the following screenshot:

XenCenter opens a web browser and takes you to the Citrix XenServer Activation page as shown in the following screenshot:

If XenCenter is unable to connect to the activation page (because the Internet connection is down, for example), then XenCenter gives you the option to save a
.txtfile locally with the activation request information.Note
You can upload the
.txtfile to https://activate.vmd.citrix.com at a later date.
Enter your details in the activation form, and then click on Submit. An e-mail with the activation key
(.xslicfile extension) will be sent to you shortly afterwards.Save the attached activation key to a known location on the computer running XenCenter or xe CLI.
Apply the activation key to your XenServer host using XenCenter or xe CLI.
To apply an activation key using XenCenter:
Click on the Tools menu and select License Manager.
Note
You can also launch the XenCenter License Manager by double-clicking the activation key file in Windows Explorer.
Select the host you wish activate (you can only activate one host at a time). Click on Activate Free XenServer, and then select Apply Activation Key as shown in the following screenshot:

Browse to and select the activation key file, and select Open as shown in the following screenshot:

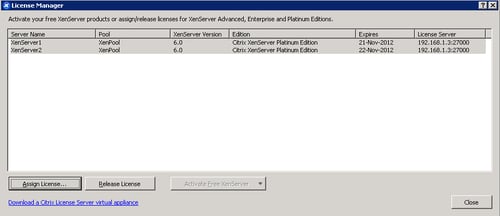
The information shown in the XenCenter License Manager will be updated as shown in the following screenshot:

To install an activation key using xe CLI, open a console on the host and run the following command:
xe host-license-add [license-file=<<path/license_filename>>]
Activating a non-free edition
XenServer Advanced, Enterprise, and Platinum editions use the same licensing model as other Citrix products.
XenServer Advanced editions and higher require a license for each XenServer host you use. All XenServer editions licenses must be added to and managed from a Citrix Licensing Server. If you are familiar with other Citrix products, you know this is the standard approach for licensing them. Citrix License Server stores licenses for all Citrix products and allocates them per users or devices.
Each XenServer host requires a license, but this does not limit the number of users that may connect to VMs on that host. While licensing must be configured for each XenServer host, the XenCenter License Manager allows you to apply the same settings to multiple hosts at once.
To license XenServer Advanced editions and higher:
Install the Citrix License Server and console on a Microsoft Windows Server machine.
Note
XenServer 6.0 requires Citrix Licensing 11.6.1 or higher. Refer to Citrix license server documentation for setup available at http://support.citrix.com/proddocs/topic/technologies/lic-library-node-wrapper.html.
Obtain your XenServer license files and load them onto the Citrix License Server.
Configure licensing for each XenServer host using XenCenter or xe CLI.
To configure licensing for XenServer hosts using XenCenter:
Click on Tools menu | License Manager.
Select one or more host(s) that you wish to assign a license to. Click on Assign License.
The Apply License dialog box opens.
In the Apply License dialog box, choose the XenServer license edition and then enter the Citrix Licensing Server details. 27000 is the port that the licensing server uses by default for communication with Citrix products. If you changed the default port on the licensing server, enter the new number in the Port number box as shown in the following screenshot:

XenCenter contacts the specified license server and checks out a license for the specified host(s). The information shown in the XenCenter License Manager will be updated.

To release a license (to set a licensed host to the free XenServer edition) from the License Manager, select a host, and then click on Release License.
You can use the CLI to configure licensing for XenServer hosts as well.
To assign a license, execute the following command:
xe host-apply-edition edition=advanced|enterprise|platinum|enterprise-xd license-server-address=<license_server_address> host-uuid=<uuid_of_host> license-server-port=<license_server_port>
where:
The
editionparameter is the edition of XenServer you have boughtThe
license-server-addressparameter is the IP address of the license serverThe
host-uuidparameter is the unique identifier/object reference of the XenServer hostThe
license-server-portparameter is the port number you have set on the license server configuration
We will run following command to assign a Platinum license to xenserver1:
xe host-apply-edition edition=platinum license-server-address=192.168.1.3 host-uuid=bdced52b-2228-4fb4-b02e-211f9aef1db6 license-server-port=27000
You only need to supply the license server IP address and port number parameters the first time you assign a license. The values are stored and used automatically if you do not specify the license server parameters in the future.
If no host UUID is specified, the license will be applied to the host that you are running the command on.


