Search icon CANCEL
Subscription
0
Cart icon
Your Cart (0 item)
Close icon
You have no products in your basket yet
Arrow left icon
Explore Products
Best Sellers
New Releases
Books
Videos
Audiobooks
Learning Hub
Newsletter Hub
Free Learning
Arrow right icon
timer SALE ENDS IN
0 Days
:
00 Hours
:
00 Minutes
:
00 Seconds
Arrow up icon
GO TO TOP
3D Printing with SketchUp

You're reading from   3D Printing with SketchUp Real-world case studies to help you design models in SketchUp for 3D printing on anything ranging from the smallest desktop machines to the largest industrial 3D printers with this book and ebook

Arrow left icon
Product type Paperback
Published in May 2014
Publisher
ISBN-13 9781783284573
Length 136 pages
Edition Edition
Concepts
Arrow right icon
Author (1):
Arrow left icon
Meir Gottesman Meir Gottesman
Author Profile Icon Meir Gottesman
Meir Gottesman
Arrow right icon
View More author details
Toc

Table of Contents (16) Chapters Close

3D Printing with SketchUp
Credits
About the Author
About the Reviewers
www.PacktPub.com
Preface
1. Concepts Every 3D Printing Designer Needs to Know FREE CHAPTER 2. Setting Up SketchUp for 3D Printing 3. From 2D Drawing to 3D Model 4. Understanding Model Resolution 5. Using Existing Models 6. Designing a Phone Cradle 7. Importing Terrain and Printing in Color 8. Modeling Architecture for 3D Printing Resources for Your 3D Printing Success Index

Modeling in SketchUp from a sketch


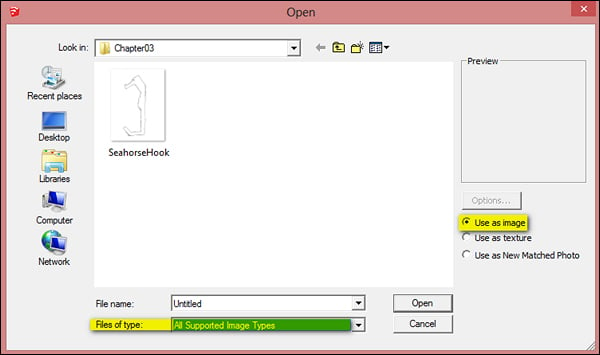
To get started, we need to import the image into SketchUp. Navigate to File | Import...; under Files of type, click on All Supported Image Types; and under Options, click on the Use as image radio button.

Double-click on the image or select the image and click on Open to close the Import dialog box, as shown in the following screenshot:
Click near the origin in SketchUp to set one corner of the image, and then move your cursor towards the upper-right side of the screen to set the size of the image. You want the image to be large enough to see but the exact scale isn't important now.

If you draw on the image right now, the SketchUp lines will be hard to see. Let's reduce the opacity of the image to make it easier to draw on. To do so, right-click on the image and click on Explode. Right away, double-click on the image to select it and its bounding edges, and then make it into a Group.

Open the Materials dialog box. Click on the home icon and then click on the...

lock icon The rest of the chapter is locked
Register for a free Packt account to unlock a world of extra content!
A free Packt account unlocks extra newsletters, articles, discounted offers, and much more. Start advancing your knowledge today.
Unlock this book and the full library FREE for 7 days
Get unlimited access to 7000+ expert-authored eBooks and videos courses covering every tech area you can think of
Renews at $19.99/month. Cancel anytime