Picking the controls
Before we start creating our game, we should decide how the player will play the game. The controls are one of the most key parts of a game.
Mapping the needed controls
For the game that we will create, we will need several controls. Some are already included in the input manager within Unity, while some are not. The following table shows what default controls we will be using, and what buttons we'll use for them:
|
Action |
Keyboard/mouse |
Xbox 360 Controller |
|---|---|---|
|
Movement |
WASD keys |
Left thumbstick |
|
Rotate camera |
Mouse |
Right thumbstick |
|
Item bar buttons |
1234 keys |
Directional pad |
|
Inventory |
The I key |
The A button |
|
Pause game |
The Esc key |
The Start button |
|
Attack / use an item |
The left mouse button |
The right trigger |
|
Aim |
The right mouse button |
The left trigger |
Checking the input manager
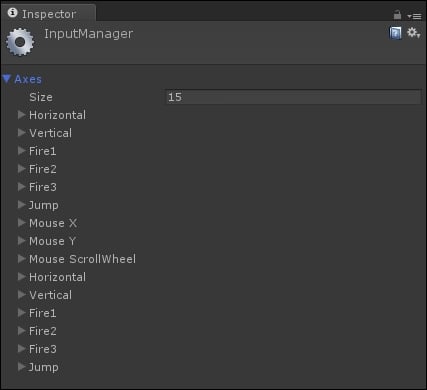
In the following screenshot, you can see that there are default inputs already implemented, which we can use for the movement, rotate camera, attack/use item, and aim actions:

As you can see, we still need to add inputs for the inventory, pause game, and item bar buttons. We will also need to make sure that the inputs we enter will support inputs from the Xbox 360 Controller.
Checking the Xbox 360 Controller inputs
Before we add stuff into the input manager, we should take a look at what the inputs are on the Xbox 360 Controller. This will help us integrate the controller inputs in the input manager, as well as give us an insight on how to code the controller inputs.

Adding additional controller inputs
To get started, access your input manager by navigating to the Edit menu, hovering over Project Settings, and clicking on Input. Open up the Axes dropdown by clicking on the arrow next to it and change the number in the Size parameter to be a value higher. This will add another input at the bottom of the list, which we can use for one of our types of inputs.
By default, by creating a new type of input, the input manager duplicates the bottom input. So open it and we'll make our changes. Follow these steps to create our new input:
- Change the value of the Name parameter to
A_360. - Change the value of the Positive Button parameter to
joystick button 0.
Adding a start button and trigger inputs
As you can see, it's fairly easy to add an Xbox 360 input in the input manager. You can follow the same steps to add the start button; just change the value of the Name parameter to Start_360 and the value of the positive button to joystick button 7. For the two triggers, you will need to follow slightly different steps:
- Change the value of the Name parameter to
Triggers_360. - Change the value of the Sensitivity parameter to
0.001. - Check the Invert parameter.
- Change the value of the Type parameter to Joystick Axis.
- Change the value of the Axis parameter to 3rd Axis (Joysticks and Scrollwheel).
Adding directional pad inputs
For the directional pad, we'll need to make the horizontal buttons and vertical buttons separately, but these will both be similar to how we set up the triggers. First, we will create the horizontal directional pad input:
- Change the value of the Name parameter to
HorizDpad_360. - Change the value of the Sensitivity parameter to
1. - Change the value of the Type parameter to Joystick Axis.
- Change the value of the Axis parameter to 6th Axis (Joysticks).
For the vertical directional pad input, you can follow the exact same steps as we did for the horizontal directional pad input; just change the value of Name to VertDpad_360 and change the value of Axis to 7th Axis (Joysticks). This completes the Xbox 360 Controller inputs; all that's left are the PC inputs.
Adding PC control inputs
Most of our PC control inputs are already integrated into the input manager; all that is left are the number keys, I key, and Esc key.
You can actually follow the same steps as at the beginning of this chapter, when we added the Xbox 360 buttons. For the number keys you'll want to change each of their names to num1, num2, num3, and num4. As for their positive button parameters, change their names to 1, 2, 3, and 4, accordingly.
The I key name will be I_Key and its positive button parameter will be i. For the Esc key, we will want the Name parameter to be Esc_Key and its positive button parameter will be escape.


