Search icon CANCEL
Subscription
0
Cart icon
Your Cart (0 item)
Close icon
You have no products in your basket yet
Save more on your purchases now! discount-offer-chevron-icon
Savings automatically calculated. No voucher code required.
Arrow left icon
Explore Products
Best Sellers
New Releases
Books
Videos
Audiobooks
Learning Hub
Conferences
Free Learning
Arrow right icon
Arrow up icon
GO TO TOP
The SketchUp Handbook for Interior Design

You're reading from   The SketchUp Handbook for Interior Design A step-by-step visual approach to planning, designing, and presenting interior spaces

Arrow left icon
Product type Paperback
Published in Jun 2024
Publisher Packt
ISBN-13 9781837631872
Length 598 pages
Edition 1st Edition
Concepts
Arrow right icon
Authors (2):
Arrow left icon
Rebecca Terpstra Rebecca Terpstra
Author Profile Icon Rebecca Terpstra
Rebecca Terpstra
Dana Hoffman Dana Hoffman
Author Profile Icon Dana Hoffman
Dana Hoffman
Arrow right icon
View More author details
Toc

Table of Contents (23) Chapters Close

Preface 1. Part 1: Applying the Basics to Interior Design
2. Chapter 1: Using Essential Tools and Shortcuts for Space Planning FREE CHAPTER 3. Chapter 2: Becca’s Hierarchy of Modeling and the Designer’s Modeling Approach 4. Chapter 3: Extruding along Curves and Other Timesavers 5. Part 2: Working with Floor Plans
6. Chapter 4: Importing and Exporting a Drawing 7. Chapter 5: Creating the As-Built Floor Plan 8. Chapter 6: Building Exterior Elements and Using the Extension Warehouse 9. Part 3: Adding Designer Details to a SketchUp Model
10. Chapter 7: Adding Interior Elements and 3D Warehouse Furnishings 11. Chapter 8: Modeling Furniture – From the Basics to Intricacy 12. Chapter 9: Applying and Customizing Colors and Materials 13. Chapter 10: Enhancing a Model with Details for Final Presentation 14. Part 4: Presenting SketchUp Designs
15. Chapter 11: Exporting Images and Animations 16. Chapter 12: SketchUp LayOut Part I – The Interface 17. Chapter 13: SketchUp LayOut Part II – Paper Space Content 18. Chapter 14: Photorealistic Rendering with SU Podium 19. Part 5: Bonus Tips for Quicker Modeling
20. Chapter 15: Tips and Tricks to Up Your SketchUp Game 21. Index 22. Other Books You May Enjoy

Using camera views for 2D space planning

You are already familiar with SketchUp’s interface, so we will bypass the overview of the modeling window. Let’s jump into the menu bar options to set up a view for two-dimensional (2D) space planning:

Figure 1.1: Menu bar in SketchUp 2024 (Windows)

Figure 1.1: Menu bar in SketchUp 2024 (Windows)

When space planning in 2D, it is best to model using the Camera setting Top view to ensure we are modeling on top of the ground plane.

In the menu bar, click Camera, then go down to Standard Views. A flyout will give you seven view options: Top, Bottom, Front, Back, Left, Right, and Iso. These views are based on the original drawing coordinates (x, y, z):
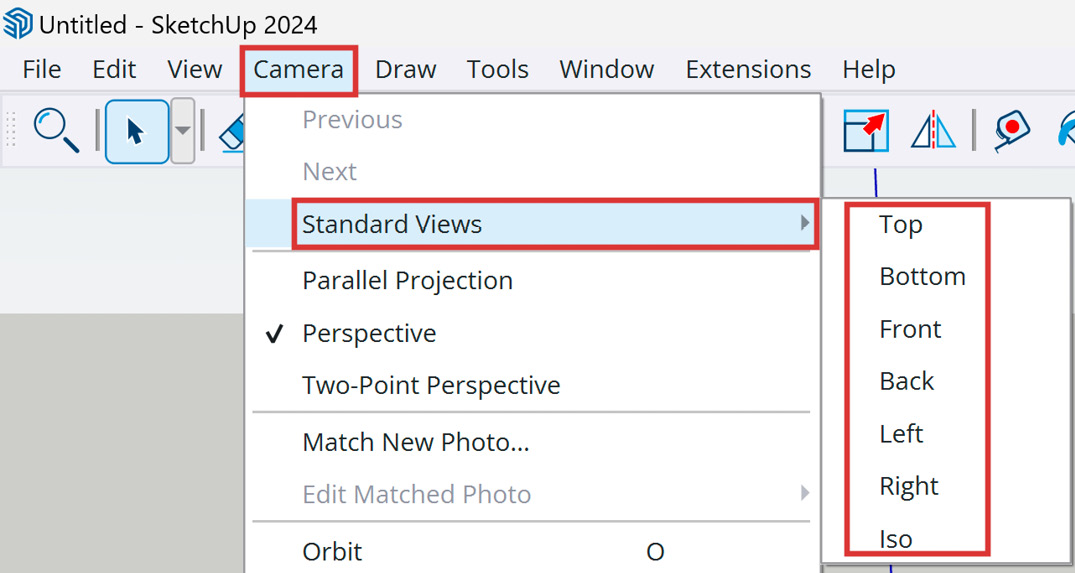
Figure 1.2: Standard Views flyout under Camera menu

Figure 1.2: Standard Views flyout under Camera menu

Click on Top to choose a top-down look at the ground plane.

SketchUp modelers using a Windows computer have access to a toolbar called Views, which has icons for each of the seven views, and it can save a bit of time by single-clicking the icon. Figure 1.3 shows this toolbar:

Figure 1.3: Views toolbar in Windows OS (from left to right) Iso, Top, Front, Right, Left, Back, and Bottom

Figure 1.3: Views toolbar in Windows OS (from left to right) Iso, Top, Front, Right, Left, Back, and Bottom

MacOS users will discover identical icons within the Tools menu, presented individually rather than as a lengthy toolbar.

Finding tools

Can’t remember where to find additional toolbars? A quick way to access toolbars is by right-clicking in the gray toolbar area (underneath the Menu bar), which produces a list of available toolbars. Find the toolbar you want to use and click once on its name for it to open.

A second way to access toolbars is in the menu bar. For Windows users, click View, choose Toolbars, check the box next to the toolbar(s) you want to use, then click Close. On macOS, click View | Tool Palettes | and select the tool palette you want to use.

You can also use the search function or command for any type of tool or command (available in 2022 and later versions) by clicking the Search icon (or the shortcut Shift + S), typing top view, and clicking on the correct selection.

Now, looking down at the ground plane, check the upper-left corner of your modeling window. It should read Top, which is one of those helpful SketchUp inferences to let us know how we are oriented in our model:
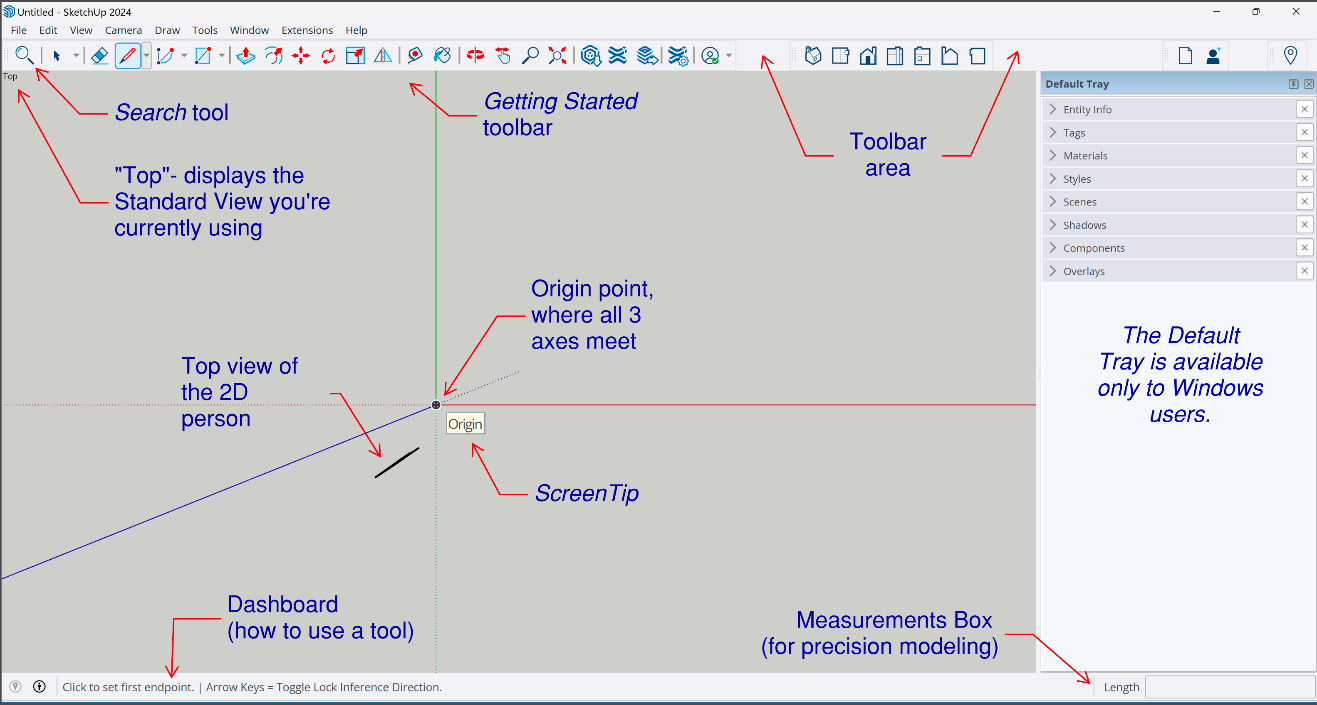
Figure 1.4: Top view, looking down on the ground plane (Windows)

Figure 1.4: Top view, looking down on the ground plane (Windows)

In this section, we set up our modeling window to draw two-dimensionally. Let’s go to the next section for a list of tools and commands to help us draft precision-based objects.

You have been reading a chapter from
The SketchUp Handbook for Interior Design
Published in: Jun 2024
Publisher: Packt
ISBN-13: 9781837631872
Register for a free Packt account to unlock a world of extra content!
A free Packt account unlocks extra newsletters, articles, discounted offers, and much more. Start advancing your knowledge today.
Unlock this book and the full library FREE for 7 days
Get unlimited access to 7000+ expert-authored eBooks and videos courses covering every tech area you can think of
Renews at €18.99/month. Cancel anytime