Focusing on data preparation
Tableau can be used effectively with various data preparation phases. Unfortunately, a single chapter is not sufficient to thoroughly explore how Tableau can be used in each phase. Indeed, such a thorough exploration may be worthy of an entire book! Our focus, therefore, will be directed to ward data preparation, since that phase has historically accounted for up to 60% of the data mining effort. Our goal will be to learn how Tableau can be used to streamline that effort.
Surveying data
Tableau can be a very effective tool for simply surveying data. Sometimes in the survey process, you may discover ways to clean the data or populate incomplete data based on existing fields. Sometimes, regretfully, there are simply not enough pieces of the puzzle to put together an entire dataset. In such cases, Tableau can be useful to communicate exactly what the gaps are, and this, in turn, may incentivize the organization to more fully populate the underlying data.
In this exercise, we will explore how to use Tableau to quickly discover the percentage of null values for each field in a dataset. Next, we’ll explore how data might be extrapolated from existing fields to fill in the gaps.
Establishing null values
The following are the steps to survey the data:
- If you haven’t done so just yet, navigate to https://public.tableau.com/profile/marleen.meier to locate and download the workbook associated with this chapter.
- Navigate to the worksheet entitled
Surveying&ExploringDataand selectHappiness Reportdata source. - Drag Region and Country to the Rows shelf. Observe that in some cases the Region field has Null values for some countries:
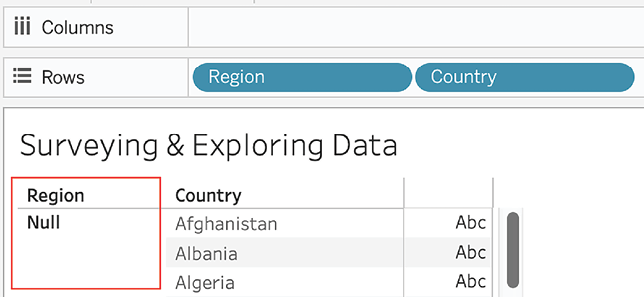
Figure 2.1: Null regions
- Right-click and Edit the parameter entitled
Select Field. Note that the Data Type is set to Integer and we can observe a list that contains an entry for each field name in the dataset:
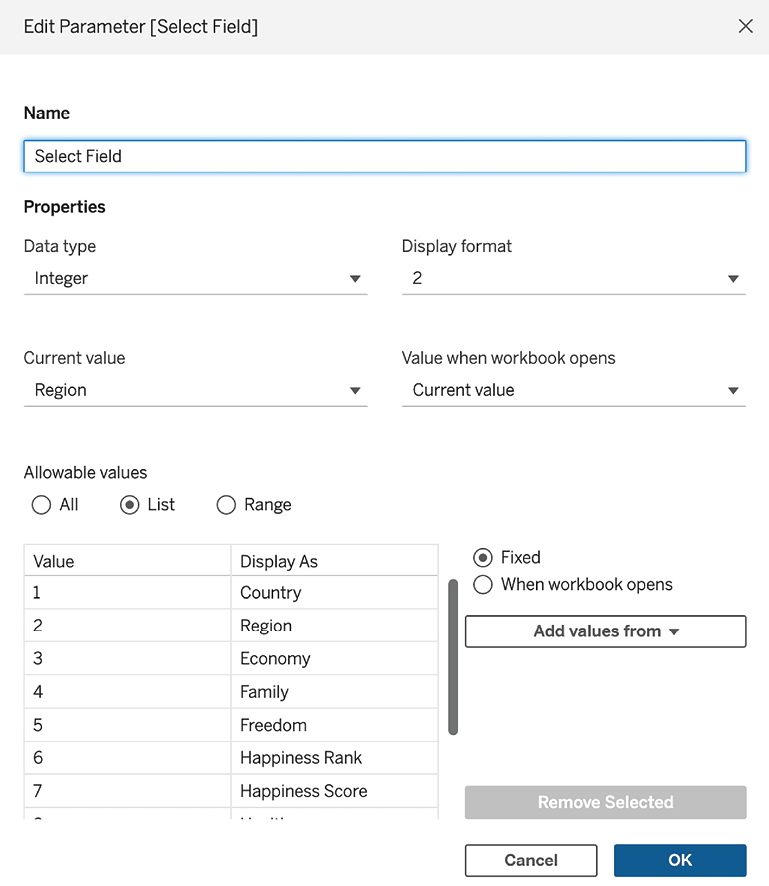
Figure 2.2: Editing a parameter
- In the Data pane, right-click on the parameter we just created and select Show Parameter Control.
- Create a calculated field entitled
% Populatedand write the following calculation:SUM([Number of Records]) / TOTAL(SUM([Number of Records])) - In the Data pane, right-click on % Populated and select Default Properties | Number Format…:
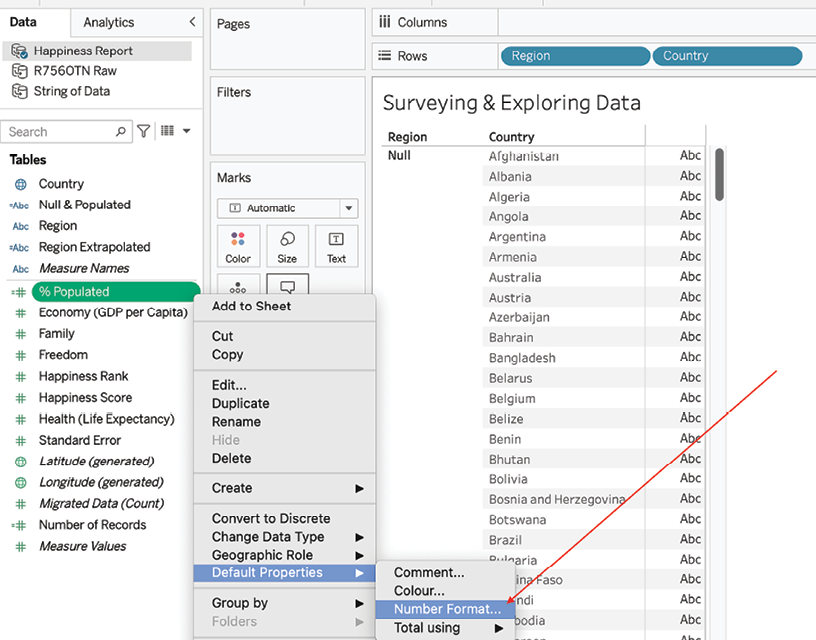
Figure 2.3: Adjusting default properties
- In the resulting dialog box, choose Percentage.
- Create a calculated field entitled
Null & Populatedand add the following code. Note that the complete case statement is fairly lengthy but also repetitive.In cases requiring a lengthy but repetitive calculation, consider using Excel to more quickly and accurately write the code. By using Excel’s
CONCATENATEfunction, you may be able to save time and avoid typos.In the following code block, the code lines represent only a percentage of the total but should be sufficient to enable you to produce the whole block:
CASE [Select Field]
WHEN 1 THEN IF ISNULL ([Country]) THEN 'Null Values' ELSE
'Populated Values' END
WHEN 2 THEN IF ISNULL ([Region]) THEN 'Null Values' ELSE
'Populated Values' END
WHEN 3 THEN IF ISNULL ([Economy (GDP per Capita)]) THEN 'Null Values' ELSE
'Populated Values' END
WHEN 4 THEN IF ISNULL ([Family]) THEN 'Null Values' ELSE
'Populated Values' END
WHEN 5 THEN IF ISNULL ([Freedom]) THEN 'Null Values' ELSE
'Populated Values' END
WHEN 6 THEN IF ISNULL ([Happiness Rank]) THEN 'Null Values' ELSE
'Populated Values' END
WHEN 7 THEN IF ISNULL ([Happiness Score]) THEN 'Null Values' ELSE
'Populated Values' END
WHEN 8 THEN IF ISNULL ([Health (Life Expectancy)]) THEN 'Null Values' ELSE
'Populated Values' END
WHEN 9 THEN IF ISNULL ([Standard Error]) THEN 'Null Values' ELSE
'Populated Values' END
END
- Remove Region and Country from the Rows shelf.
- Place Null & Populated on the Rows and Color shelves and % Populated on the Columns and Label shelves:

Figure 2.4: Populated values
- Change the colors to red for Null Values and green for Populated Values if desired. You can do so by clicking on Color in the Marks card and Edit Colors.
- Click on the arrow in the upper-right corner of the Select Field parameter on your sheet and select Single Value List.
- Select various choices in the Select Field parameter and note that some fields have a high percentage of null values. For example, in the following diagram, 32.98% of records do not have a value for Region:

Figure 2.5: Comparing null and populated values
Building on this exercise, let’s explore how we might clean and extrapolate data from existing data using the same dataset.
Extrapolating data
This exercise will expand on the previous exercise by cleaning existing data and populating some of the missing data from known information. We will assume that we know which country belongs to which region. We’ll use that knowledge to fix errors in the Region field and also to fill in the gaps using Tableau:
- Starting from where the previous exercise ended, create a calculated field entitled
Region Extrapolatedwith the following code block:CASE [Country] WHEN 'Afghanistan' THEN 'Southern Asia' WHEN 'Albania' THEN 'Central and Eastern Europe' WHEN 'Algeria' THEN 'Middle East and Northern Africa' WHEN 'Angola' THEN 'Sub-Saharan Africa' WHEN 'Argentina' THEN 'Latin America and Caribbean' WHEN 'Armenia' THEN 'Central and Eastern Europe' WHEN 'Australia' THEN 'Australia and New Zealand' WHEN 'Austria' THEN 'Western Europe' //complete the case statement with the remaining fields in the data set ENDAs an alternative to a
CASEstatement, you could use anIFstatement like:If [Country] = 'Afghanistan' then 'Southern Asia' ELSEIF [Country] = 'Albania' then … ENDTo speed up the tedious creation of a long calculated field, you could download the data to an Excel file and create the calculated field by concatenating the separate parts, as shown here:

Figure 2.6: Compiling a calculation in Excel
You can then copy them from Excel into Tableau. However, for this exercise, I have created a backup field called
Backup, which can be found in the Tableau workbook associated with this chapter, which contains the full calculation needed for theRegion Extrapolatedfield. Use this at your convenience. The Solutions dashboard also contains all of the countries. You can therefore copy theRegion Extrapolatedfield from that file too.
- Add a Region Extrapolated option to the Select Field parameter:
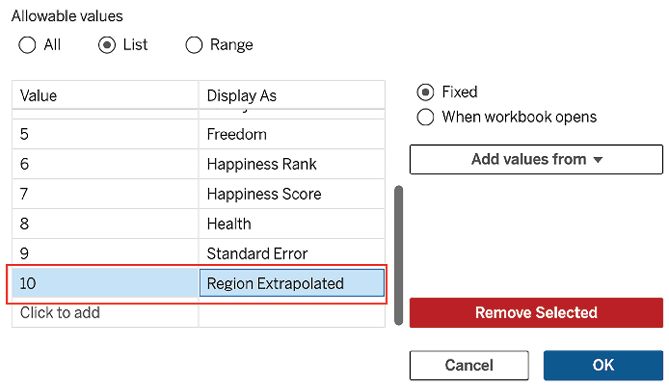
Figure 2.7: Adding Region Extrapolated to the parameter
- Add the following code to the
Null & Populatedcalculated field:WHEN 10 THEN IF ISNULL ([Region Extrapolated]) THEN 'Null Values' ELSE 'Populated Values' END - Note that the Region Extrapolated field is now fully populated:

Figure 2.8: Fully populated Region Extrapolated field
Now let’s consider some of the specifics from the previous exercises.
Let’s look at the following code block.
Note that the complete CASE statement is several lines long. The following is a representative portion:
CASE [% Populated]
WHEN 1 THEN IF ISNULL ([Country]) THEN 'Null Values' ELSE
'Populated Values' END
...
This case statement is a row-level calculation that considers each field in the dataset and determines which rows are populated and which are not. For example, in the representative line of the preceding code, every row of the Country field is evaluated for nulls. The reason for this is that a calculated field will add a new column to the existing data—only in Tableau, not in the data source itself—and every row will get a value. These values can be N/A or null values.
The following code is the equivalent of the quick table calculation Percent of Total:
SUM([Number of Records]) / TOTAL(SUM([Number of Records]))
In conjunction with the Null & Populated calculated field, it allows us to see what percentage of our fields are actually populated with values.
It’s a good idea to get into the habit of writing table calculations from scratch, even if an equivalent quick table calculation is available. This will help you more clearly understand the table calculations.
The following CASE statement is an example of how you might use one or more fields to extrapolate what another field should be:
CASE [Country]
WHEN 'Afghanistan' THEN 'Southern Asia'
... END
For example, the Region field in the dataset had a large percentage of null values, and even the existing data had errors. Based on our knowledge of the business (that is, which country belongs to which region), we were able to use the Country field to achieve 100% population of the dataset with accurate information.
Nulls are a part of almost every extensive real dataset. Understanding how many nulls are present in each field can be vital to ensuring that you provide accurate business intelligence. It may be acceptable to tolerate some null values when the final results will not be substantially impacted, but too many nulls may invalidate results. However, as demonstrated here, in some cases, one or more fields can be used to extrapolate the values that should be entered into an underpopulated or erroneously populated field.
As demonstrated in this section, Tableau gives you the ability to effectively communicate to your data team which values are missing, which are erroneous, and how possible workarounds can be invaluable to the overall data mining effort. Next, we will look into data that is a bit messier and not in a nice column format. Don’t worry, Tableau has us covered.
Cleaning messy data
The United States government provides helpful documentation for various bureaucratic processes. For example, the Department of Health and Human Services (HSS) provides lists of ICD-9 codes, otherwise known as International Statistical Classification of Diseases and Related Health Problems codes. Unfortunately, these codes are not always in easily accessible formats.
As an example, let’s consider an actual HHS document known as R756OTN, which can be found at https://www.cms.gov/Regulations-and-Guidance/Guidance/Transmittals/downloads/R756OTN.pdf.
Cleaning the data
Navigate to the Cleaning the Data worksheet in the workbook accompanying this chapter and execute the following steps:
- Within the Data pane, select the R756OTN Raw data source:
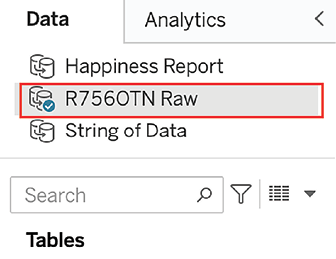
Figure 2.9: Selecting the raw file
- Drag Diagnosis to the Rows shelf and choose Add all members. Click on the AZ sign to sort the Diagnosis column. Note the junk data that occurs in some rows:
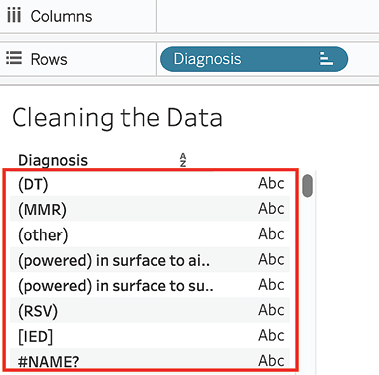
Figure 2.10: Adding Diagnosis to Rows
- Create a calculated field named
DXwith the following code:SPLIT([Diagnosis], " ", 1) - Create a calculated field named
Null Huntingwith the following code:INT(MID([DX],2,1)) - In the Data pane, drag
Null Huntingfrom Measures to Dimensions. - Drag Diagnosis, DX, and Null Hunting to the Rows shelf. Observe that Null is returned when the second character in the Diagnosis field is not numeric:
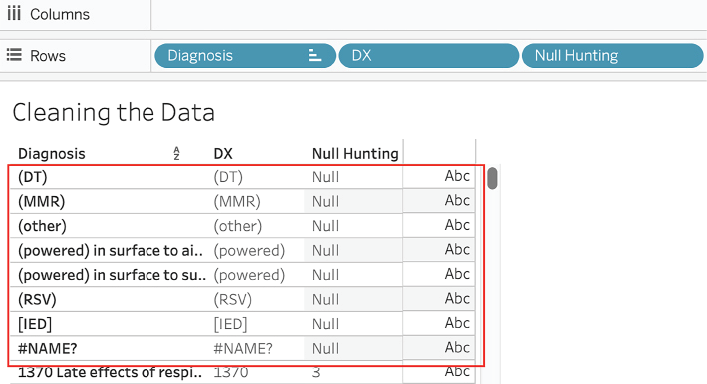
Figure 2.11: Ordering fields on Rows
- Create a calculated field named
Exclude from ICD codescontaining the following code:ISNULL([Null Hunting]) - Clear the sheet of all fields, as demonstrated in Chapter 1, Reviewing the Basics, and set the Marks card to Shape.
- Place Exclude from ICD Codes on the Color, and Shape shelves, and then place DX on the Rows shelf. Observe the rows labeled as True:
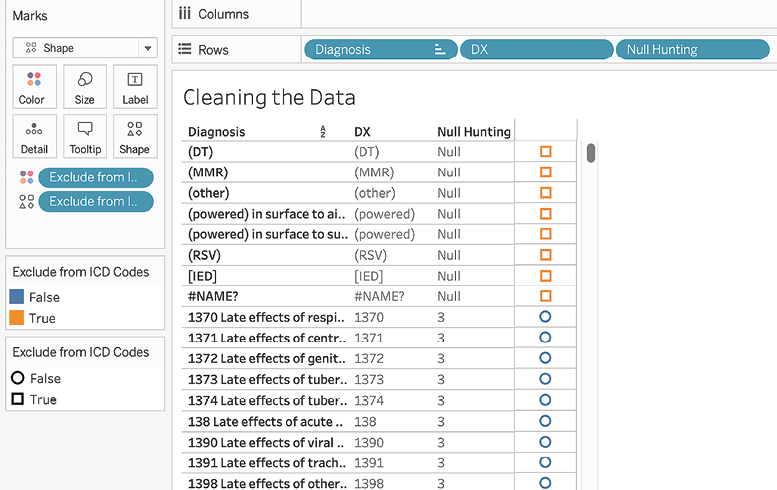
Figure 2.12: Excluding junk data
- In order to exclude the junk data (that is, those rows where
Exclude from ICD Codesequates toTrue), placeExclude from ICD Codeson the Filter shelf and deselect True. - Create a calculated field named
Diagnosis Textcontaining the following code:REPLACE([Diagnosis],[DX] + "","") - Place Diagnosis Text on the Rows shelf after DX. Also, remove Exclude from ICD Codes from the Rows shelf and the Marks card, and set the mark type to Automatic:
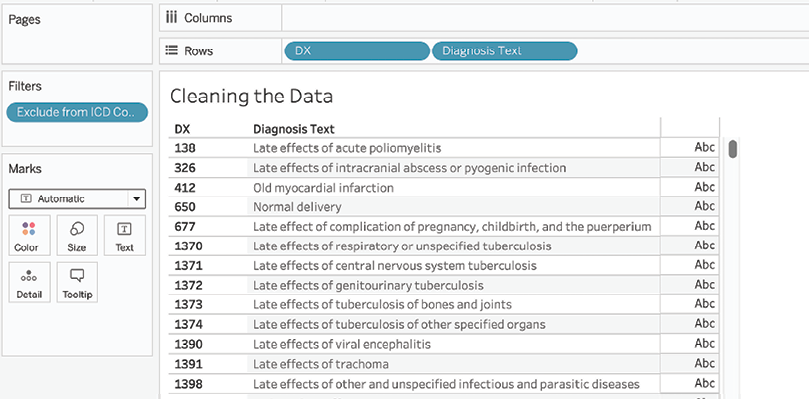
Figure 2.13: Observing the cleaned data
Now that we’ve completed the exercise, let’s take a moment to consider the code we have used:
- The
SPLITfunction was introduced in Tableau 9.0:SPLIT([Diagnosis], " ", 1) - As described in Tableau’s help documentation about the function, the function does the following:
Returns a substring from a string, as determined by the delimiter extracting the characters from the beginning or end of the string.
- This function can also be called directly in the Data Source tab when clicking on a column header and selecting Split. To extract characters from the end of the string, the token number (that is, the number at the end of the function) must be negative.
- Consider the following code, which we used to create the
Null Huntingfield:INT(MID([DX],2,1)) - The use of
MIDis quite straightforward and much the same as the corresponding function in Excel. The use ofINTin this case, however, may be confusing. Casting an alpha character with anINTfunction will result in Tableau returningNull. This satisfactorily fulfills our purpose, since we simply need to discover those rows not starting with an integer by locating the nulls.
ISNULLis a Boolean function that simply returnsTRUEin the case ofNull:ISNULL([Null Hunting])- The
REPLACEfunction was used while creating theDiagnosis Textfield:REPLACE([Diagnosis],[DX] + "","") - This calculated field uses the ICD-9 codes isolated in
DXto remove those same codes from theDiagnosisfield and thus provides a fairly clean description. Note the phrase fairly clean. The rows that were removed were initially associated with longer descriptions that thus included a carriage return. The resulting additional rows are what we removed in this exercise. Therefore, the longer descriptions are truncated in this solution using thereplacecalculation.
The final output for this exercise could be to export the data from Tableau as an additional source of data. This data could then be used by Tableau and other tools for future reporting needs. For example, the DX field could be useful in data blending.
Does Tableau offer a better approach that might solve the issue of truncated data associated with the preceding solution? Yes! Let’s turn our attention to the next exercise, where we will consider regular expression functions.
Extracting data
Although, as shown in the previous exercise, Cleaning the data, the SPLIT function can be useful for cleaning clean data, regular expression functions are far more powerful, representing a broadening of the scope from Tableau’s traditional focus on visualization and analytics to also include data cleaning capabilities.
Let’s look at an example that requires us to deal with some pretty messy data in Tableau. Our objective will be to extract phone numbers.
The following are the steps:
- If you have not already done so, please download the workbook from https://public.tableau.com/profile/marleen.meier and open it in Tableau.
- Select the
Extracting the Datatab. - In the Data pane, select the String of Data data source and drag the String of Data field to the Rows shelf. Observe the challenges associated with extracting the phone numbers:
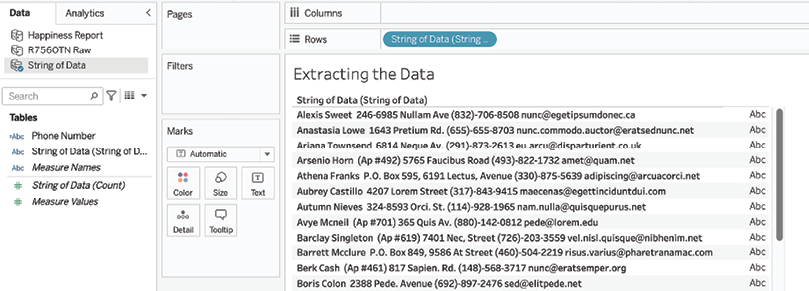
Figure 2.14: Extracting data from a messy data format
- Access the underlying data by clicking the View data button and copying several rows:
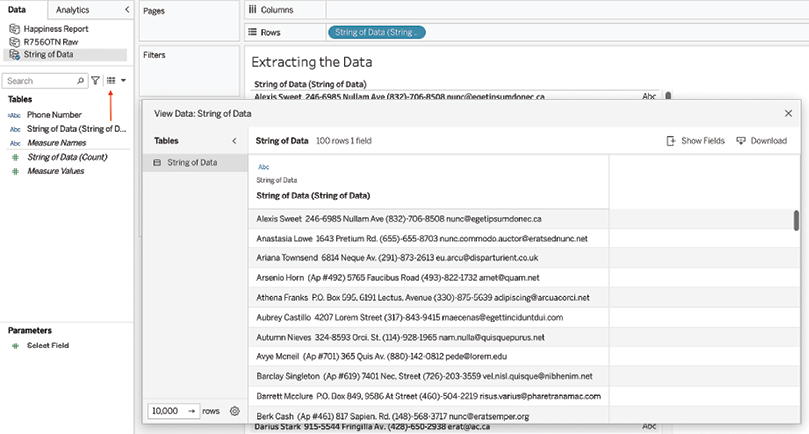
Figure 2.15: Accessing underlying data
- Navigate to http://regexpal.com/ and paste the data into the pane labeled Test String—that is, the second pane:
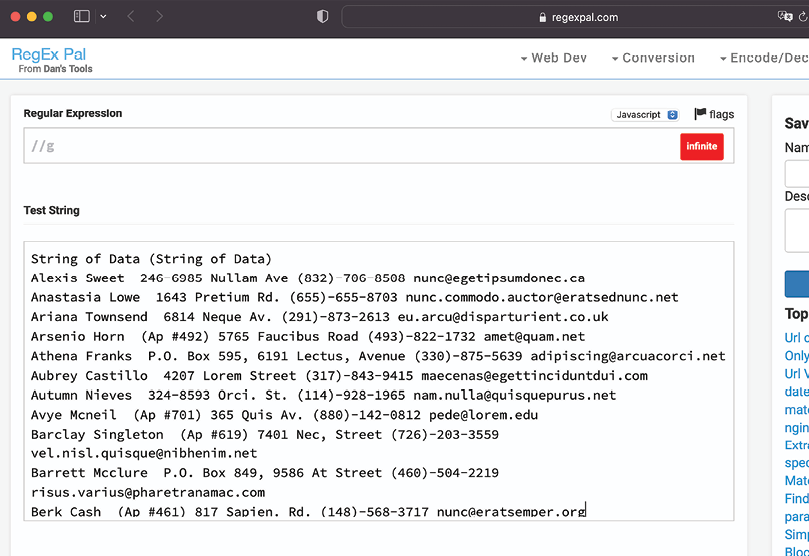
Figure 2.16: Regexpal
- In the first pane (the one labeled Regular Expression), type the following:
\([0-9]{3}\)-[0-9]{3}-[0-9]{4} - Return to Tableau and create a calculated field called
Phone Numberwith the following code block. Note the regular expression nested in the calculated field:REGEXP_EXTRACT([String of Data (String of Data)],'(\([0-9]{3}\)-[0-9]{3}-[0-9]{4})') - Place Phone Number on the Rows shelf, and observe the result:
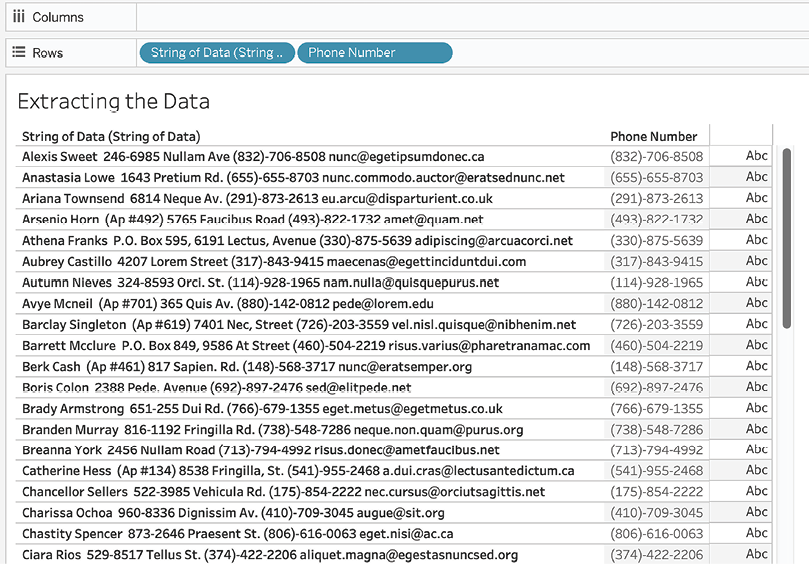
Figure 2.17: Extracting data final view
Now let’s consider some of the specifics from the preceding exercise in more detail:
- Consider the following code block:
REGEXP_EXTRACT([String of Data],'()') - The expression pattern is purposely excluded here as it will be covered in detail later. The ‘
()' code acts as a placeholder for the expression pattern. TheREGEXP_EXTRACTfunction used in this example is described in Tableau’s help documentation as follows:
Returns a substring of the given string that matches the capturing group within the regular expression pattern.
- Note that as of the time of writing, the Tableau documentation does not communicate how to ensure that the pattern input section of the function is properly delimited. For this example, be sure to include ‘
()' around the pattern input section to avoid a null output. - Nesting within a calculated field that is itself nested within a
VizQLquery can affect performance (if there are too many levels of nesting/aggregation). - There are numerous regular expression websites that allow you to enter your own code and help you out, so to speak, by providing immediate feedback based on sample data that you provide. http://regexpal.com/ is only one of those sites, so search as desired to find one that meets your needs!
- Now, consider the expression:
\([0-9]{3}\)-[0-9]{3}-[0-9]{4}
In this context, the \ indicates that the next character should not be treated as special but as literal. For our example, we are literally looking for an open parenthesis. [0-9] simply declares that we are looking for one or more digits. Alternatively, consider \d to achieve the same results. The {3} designates that we are looking for three consecutive digits.
As with the opening parenthesis at the beginning of the pattern, the \ character designates the closing parentheses as a literal. The - is a literal that specifically looks for a hyphen. The rest of the expression pattern should be decipherable based on the preceding information.
After reviewing this exercise, you may be curious about how to return just the email address. According to http://www.regular-expressions.info/email.html, the regular expression for email addresses adhering to the RFC 5322 standard is as follows:
(?:[a-z0-9!#$%&'*+/=?^_'{|}~-]+(?:\.[a-z0-9!#$%&'*+/=?^_'{|}~-
]+)*|"(?:[\x01-\x08\x0b\x0c\x0e-\x1f\x21\x23-\x5b\x5d-
\x7f]|\\[\x01-\x09\x0b\x0c\x0e-\x7f])*")@(?:(?:[a-z0-9](?:[a-z0-9-
]*[a-z0-9])?\.)+[a-z0-9](?:[a-z0-9-]*[a-
z0-9])?|\[(?:(?:25[0-5]|2[0-4][0-9]|[01]?[0-9][0-9]?)\.){3}(?:25[0-
5]|2[0-4][0-9]|[01]?[0-9][0-9]?|[a-z0-9-]*[a-z0-9]:(?:[\x01-
\x08\x0b\x0c\x0e-\x1f\x21-\x5a\x53-\x7f]|\\[\x01-\x09\x0b\x0c\x0e-
\x7f])+)\])
Emails do not always adhere to RFC 5322 standards, so additional work may be required to truly clean email address data.
Although I won’t attempt a detailed explanation of this code, you can read all about it at http://www.regular-expressions.info/email.html, which is a great resource for learning more about regular expressions. Also, YouTube has several helpful regular expression tutorials.
The final output for this exercise should probably be used to enhance existing source data. Data dumps such as this example do not belong in data warehouses; however, even important and necessary data can be hidden in such dumps, and Tableau can be effectively used to extract it.


