In this book, we will cover the three steps of the process requiring the use of Captivate. You will discover that Captivate has specific tools to handle each of these three steps.
Before you start reading this section, it is important that you download the sample files we refer to throughout this book. You can download the sample files for all Packt Publishing books that you have purchased from your account at http://www.packtpub.com. If you purchased this book elsewhere, you can visit http://www.packtpub.com/support and register to have the files emailed directly to you.
You will now discover the Adobe Captivate interface using the following steps:
- Open Captivate.
- If needed, click the Recent tab at the top of the Welcome screen.
- Click the Browse button at the bottom of the Recent tab of the Welcome screen.
- Open the Chapter01/encoderDemo_800.cptx file in the exercise folder.
Your screen should look similar to this screenshot:
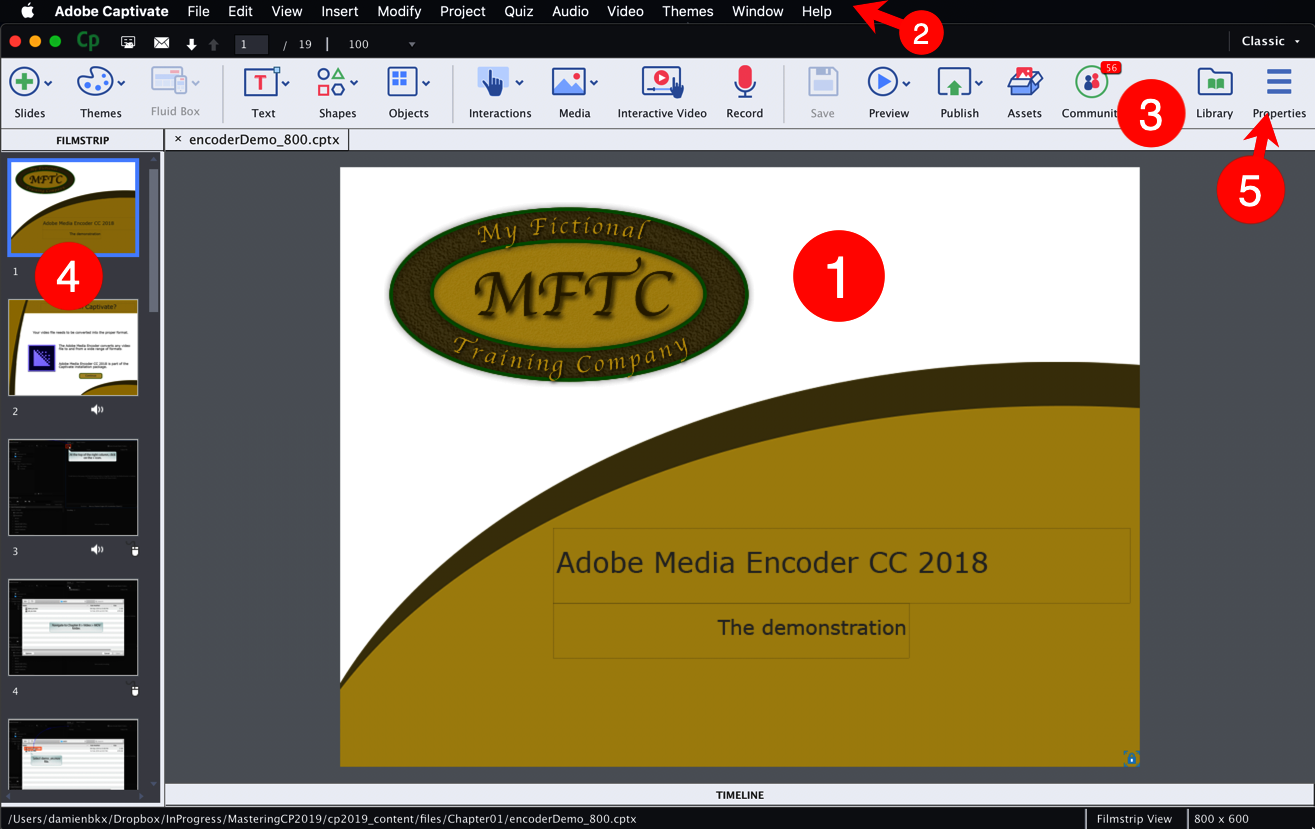
The above screenshot assumes that you have not changed any default of Adobe Captivate 2019. If Captivate does not look the same as in the above screenshot, you can clean your preferences and reset everything to default with the CleanPreferencesMac (if you are using a Mac) or the CleanPreferencesWin.bat (if you are on Windows) script located in the /utils folder of your Captivate installation. This process is described in the following blog article by our friend, Kevin Siegel, available at https://blog.iconlogic.com/weblog/2013/08/adobe-captivate-fastest-cleaned-prefs-in-the-west.html
The default Captivate screen looks very simple and clean. The main area is covered by the Stage (1). The Stage is where you lay out the objects that make up each slide of the project. The objects on the Stage will appear in your course. The objects in the Scrap Area (the grey area around the slide) will not be visible when taking the course. This makes the Scrap Area very useful! It is the perfect place to put instructions, reminders, color schemes, etc. that are used by the teacher when creating the course, but that should not be displayed to the student.
At the very top of the screen is the Menu bar (2). The Menu bar gives you access to a wide range of Captivate features.
Below the Menu bar is the main Toolbar of Captivate 2019 (3). The Toolbar is primarily used to insert new slides and new objects into the project, but it also contains important tools for operations, such as previewing, publishing, and saving.
On the left side of the screen is the Filmstrip (4). It shows the sequence of slides in your Captivate project. The primary use of the Filmstrip is to let you select the slide(s) you want to work with, but it can also be used to perform basic operations on the slides, such as reordering or deleting slides.
- At the far right side of the Toolbar, click the Properties icon (5).
This action reveals the Properties inspector. The Properties inspector is one of the most important components of Captivate. It is used to control and adjust the properties of the selected object.
- Click the Properties button on the Toolbar again to hide the Properties inspector.
- Click the Library icon located just next to the Properties icon to open the Library panel.
The Library is another very important component of Captivate. It maintains a list of all the assets (such as images, audio clips, animations, and so on) included in the current project.
- Click the Library button on the Toolbar to close the Library.
- Click the Timeline button that stretches across the bottom of the screen. This action reveals the Timeline panel.
The Timeline panel is used to arrange the sequence of objects on the current slide. In short, you use the Timeline panel to decide when an object appears on the stage and how long it stays visible. This panel is also used to set up the stacking order of the objects. You will learn more about the Timeline in Chapter 4, Working with the Timeline and Other Useful Tools.
It is possible to open many panels at the same time.
- Click the Properties button on the Toolbar to reopen the Properties inspector.
Both the Timeline and the Properties inspector should now be open.
Because the Properties inspector, Library, and Timeline are the most important panels of Captivate, they are only one mouse-click away on the default user interface. However, Captivate contains many other panels that give you access to a myriad of interesting tools. To get the most out of Captivate, you should know how to turn panels on and off.
- Open the Window menu.
The Window menu displays a list of all the panels that are available in Adobe Captivate. Note the checkmark in front of the Filmstrip, Timeline, and Library entries of the Window menu. This reminds you that these panels and icons are currently visible on the interface.
- Click the Library menu item of the Window menu. This action removes the Library icon from the Toolbar.
- Click the Window | Library menu item again to reactivate the Library icon of the Toolbar and open the Library panel.
- Click the Window | Slide Notes menu item to open the Slide Notes panel.
The Slide Notes panel appears at the bottom of the screen next to the Timeline panel, as shown in the following screenshot:

Let's now open one more panel.
- Use the Window | HTML5 Tracker menu item to open the HTML5 Tracker panel.
The HTML5 Tracker panel lists the features and objects used in the current project that are not supported in HTML5. There should be one unsupported feature listed in the HTML5 Tracker panel (because the transitions between slides are not supported in HTML5).
Note that this panel is floating on top of the interface. This is very different from the Slide Notes panel you opened earlier that was attached (docked) at the bottom of the interface. Each panel of Captivate is either docked or floating. Also note that in Captivate 2019, it is not possible, by default, to dock a floating panel or undock a docked panel.
The interface is now very different from what it was when you first opened Captivate.
- Quit Captivate without saving any changes made to the open file.
- Reopen Captivate.
When Captivate reopens, you should see the Recent tab of the Welcome screen by default. There is a thumbnail showing the last open project(s).
- Double-click the encoderDemo_800 thumbnail to reopen the project.
When the project reopens, note that the default Captivate interface is displayed, even though many more panels were open when you exited Captivate.
Thanks to these little experiments, you were exposed to some important basic concepts about the Captivate interface. Before moving on, let's summarize what you have learned so far:
- The Captivate interface is composed of panels laid out around the main editing area called the Stage.
- The grey area around the Stage is called the Scrap Area. Objects on the Scrap Area do not show in the online course.
- By default, most of the panels are hidden, making the interface simple and clean.
- The Properties inspector, the Library panel, and the Timeline are the most important and most commonly used components of Captivate. This is why they are easily accessible from the default interface.
- Some panels of Captivate are not immediately available on the default interface. You must use the Window menu to show and hide these panels.
- The panels of Captivate are either docked on the interface or floating on top of it.
- When you close and restart Captivate, the interface returns to its default layout.


