Signing your Pass (Simple)
Now that you have built and customized your Pass, you will need to digitally sign the Pass package contents, so that it will be accepted by the Passbook app.
We will make use of the certificate and keys generated previously. This will sign the Pass with your developer identity, allowing your Pass to be validated and used with the Passbook app:

Getting ready
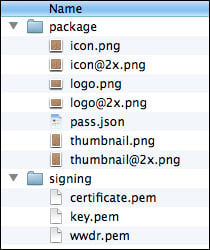
The graphical assets for your Pass and the pass.json file should be in their own folder, with the .pem files created earlier, in a higher level folder.
Here is an example of the folder structure:
How to do it…
Save the following JSON code into a file called
manifest.json.{ "pass.json":"4f5cef0afe8171f736de367b202ca054abfb3663", "icon.png":"8c58c1fbf11f944c03b5cd5e41dc6d301263c1f7", "icon@2x.png":"ae3395b5e252610b02d51d52a534c700837ced2d" }
This file should contain a JSON dictionary, where each key is the filename of a contained in your Pass package, and the value is the SHA1 hash of that file. To determine the SHA1 value, open your Terminal App, and enter the following commands:
cd [Path to the folder containing the Pass package]
opensslsha1 *
Place the resulting hash values into the
manifest.jsonfile.The manifest file then needs to be digitally signed, to produce a signature file, which will verify that the contents of the Pass have not been modified. This can be done using the following Terminal command. (Note that this requires administrator privileges, so you will need to enter your administrator password.):
sudo open sslsmime -binary -sign -certfile ../signing/wwdr.pem -signer ../sgning/certificate.pem -inkey ../signing/key.pem -in manifest.json -out signature -outform DER -passin pass:[Pass phrase provided when creating the key.pem]If your folder differs from the preceding suggestion, you will need to alter the paths to the
.pemfiles accordingly.Your package folder should now include:
Graphical assets
pass.jsonmanifest.jsonThe
signaturefile
Place the files in your package folder into a ZIP file. This can be done by selecting all the files and navigating to File | Compress from the Finder menu.
Rename the resulting ZIP file to change the file extension to
.pkpass. If you have filenames set to be hidden, you may be changing the filename and not the extension. To show filename extensions, select Finder | Preferences from the menu and enable Show all filename extensions.
Congratulations! You now have a customized and signed Pass.
How it works…
The goal of the signing process is to prevent the Pass from being modified by a third party between leaving your servers and being received by the user. When the manifest.json file is created, each file in the Pass package has its hash value calculated and stored. If the contents of any of the files were to change, its hash value would also change, therefore this manifest.json file represents an easy way of checking that the Pass package files have not been modified.
However, this on it's own is not enough, as a third party could modify the manifest.json file when they modify other files in the package. To guard against this, public/private key encryption is used to produce a signature file from the manifest.json. Your private key, to which only you have access, was used to generate the file, but anyone with access to the public key can use it to verify that the manifest file hasn't been tampered with.
Using this process, the user's device can be sure that the source of the Pass it receives is genuine and hasn't been altered in transit.
Because of this verification, it is important that only files specified in the manifest.json file are included in the zipped file. Individually selecting the files in Finder, and then choosing compress from the menu, is a good way to ensure this. Be careful if you choose to zip the entire contents of a folder, possibly through a Terminal command, as this can include additional hidden files like .DS_Store.
Changing the file extension tells the system that it should be treated as a Pass instead of a regular ZIP file.
There's more…
It's important to understand the process and steps involved in signing a Pass, however it is unlikely that it will be feasible to manually perform these steps for every Pass that you create. Instead they should form part of an automated system for producing your user's Passes.
Pre-built Pass creation implementations are starting to emerge, including this PHPserver code:


