Creating and deploying an Azure App Service resource
To get started with Azure App Service, you must learn how to create that service and deploy your code. Throughout the chapter, you will see how many ways Azure provides for doing so. Depending on your current needs and the specification of your application, each path can be easier or harder; still, the strength of a cloud and Platform-as-a-Service (PaaS) offering lies in the straightforward and intuitive process of provisioning new components of your system.
Note
PaaS is one of the several cloud infrastructure models available. In general, it stands between Infrastructure-as-a-Service (IaaS) and Software-as-a-Service (SaaS), offering a balance between the ability to manage underlying infrastructure and abstraction over used components.
Let's now check the different ways to deploy your very first Azure App Service resource.
Creating an Azure App Service resource using the Azure portal
To begin, you will deploy your service using the Azure portal. All you will need is a browser with access to the internet. Enter https://portal.azure.com to get started.
Selecting Azure Web Apps from the available services
To create an Azure App Service resource in the Azure portal, you must first find the option to do so in the list of available services. The easiest way to do so is to click on the + Create a resource button and then click on Web App, as shown in the following screenshot:
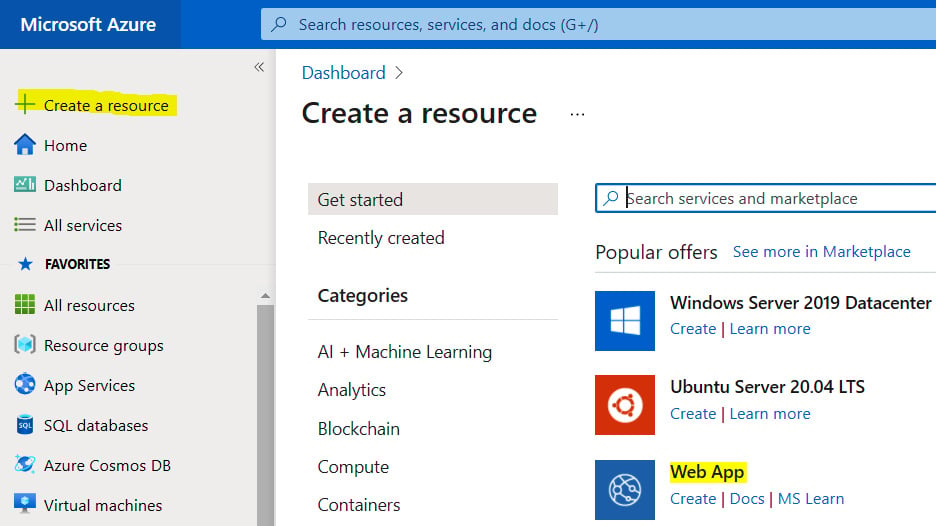
Figure 1.1 – Create a resource screen
Alternatively, you can utilize the search box at the top of the screen to quickly access any service, as shown in the following screenshot:
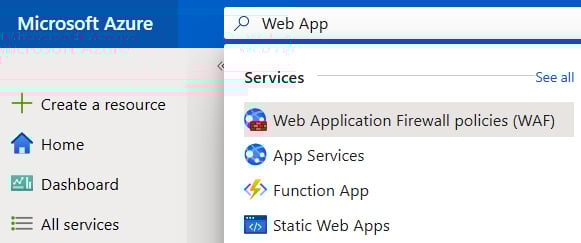
Figure 1.2 – Searching for a resource via the search box
As you can see, the Azure portal already displays the most popular services. If for some reason the Web App/App Service resource is not displayed, use the search box by entering the name of a service you are looking for.
When you click on the Web App item, you will see the first step of a resource creator, which will guide you through the process of provisioning your application. Now, we will go through all the steps and describe in detail the different parameters that are available to you.
Tip
Here, we are using the raw version of Azure App Service, which comes without any additional tools installed. When you gain more experience and become more familiar with the available services, you will see that Azure offers many useful preconfigured setups (such as an integrated Web Apps and Structured Query Language (SQL) Database instance), which can be used to shorten development and configure all services in one place.
Configuring an Azure web app
Provisioning any Azure service requires going through creators consisting of different steps. In general, not all fields will be required. It is worth remembering that all the mandatory parameters are marked with an * (asterisk) symbol.
The first tab available is the Basics tab, which is divided into three different sections: Project Details, Instance Details, and App Service Plan. The very first thing is entering a combination of Subscription and Resource Group details. Remember that in Azure, resources cannot exist in a vacuum—they require a container for logical separation. Here, you can use any combination you have access to (or you were asked to choose). The process is illustrated in the following screenshot:
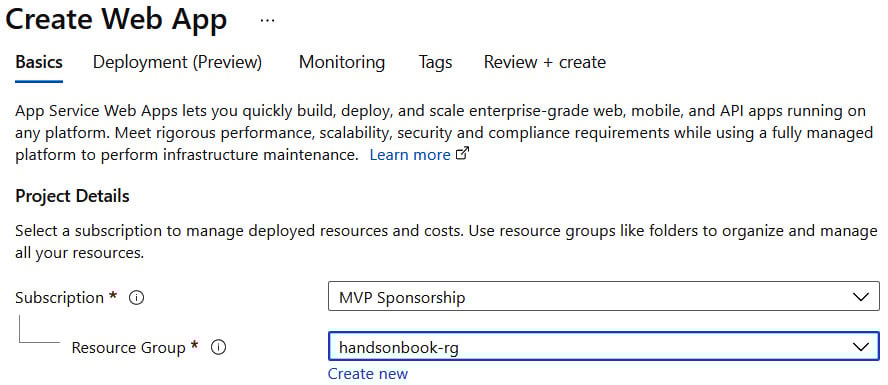
Figure 1.3 – Project Details section
Next, we have the Instance Details section, which requires a few more details to be provided. Here, we need to enter the name of our web application (it has to be globally unique), the method used to publish it (Code versus Docker Container), and Runtime stack, Operating System, and Region details, as illustrated in the following screenshot. While the Publish/Runtime stack/Operating System parameters seem self-explanatory and depend on your technology stack, let's talk a little bit about regions next:
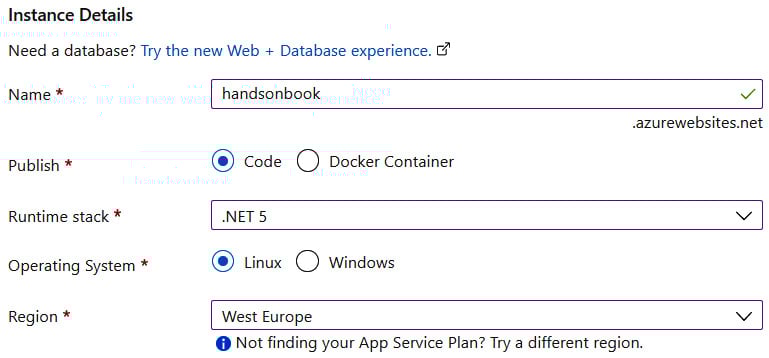
Figure 1.4 – Instance details section
In Azure, each region represents a co-located set of data centers and directly affects the geographic location of your cloud resources. That also has some legal implications (if you are about to process users' data, it is often forbidden to store it outside the user's origin). Each instance of an Azure service must be deployed to one of the available regions.
Tip
One of Azure's best practices is to deploy resources to the same region as the resource group they are in. This allows for the best performance and reliability.
The last section of the Basics tab is App Service Plan. Since you are just starting with Azure, you probably do not have any App Service plans created. As we cannot create an App Service resource without an App Service plan, we will sort this now. Note that if you have an existing App Service plan, the Azure portal may automatically choose it here based on the chosen region. It will also generate a random name if there is no App Service plan available.
Creating an App Service plan
When you click on Create new, you will see a popup allowing you to enter the plan name. Click on it, enter the name of your new plan, and then click the OK button. It should look like this:
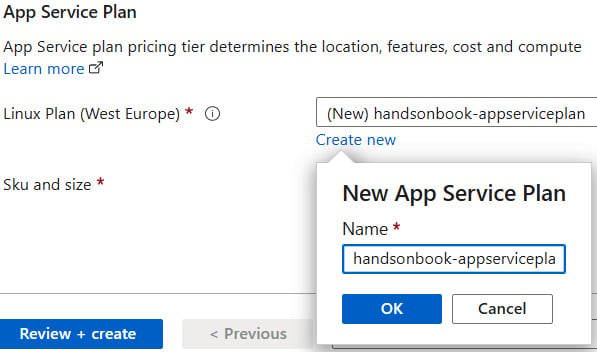
Figure 1.5 – Configuring an App Service plan
The last thing required here is to select the Sku and size option. This parameter will directly affect the features available for your web application, its performance, and finally, the price. To make a choice, click on Change size. Now, the Spec Picker screen should appear, presenting you with the options available, as illustrated in the following screenshot:
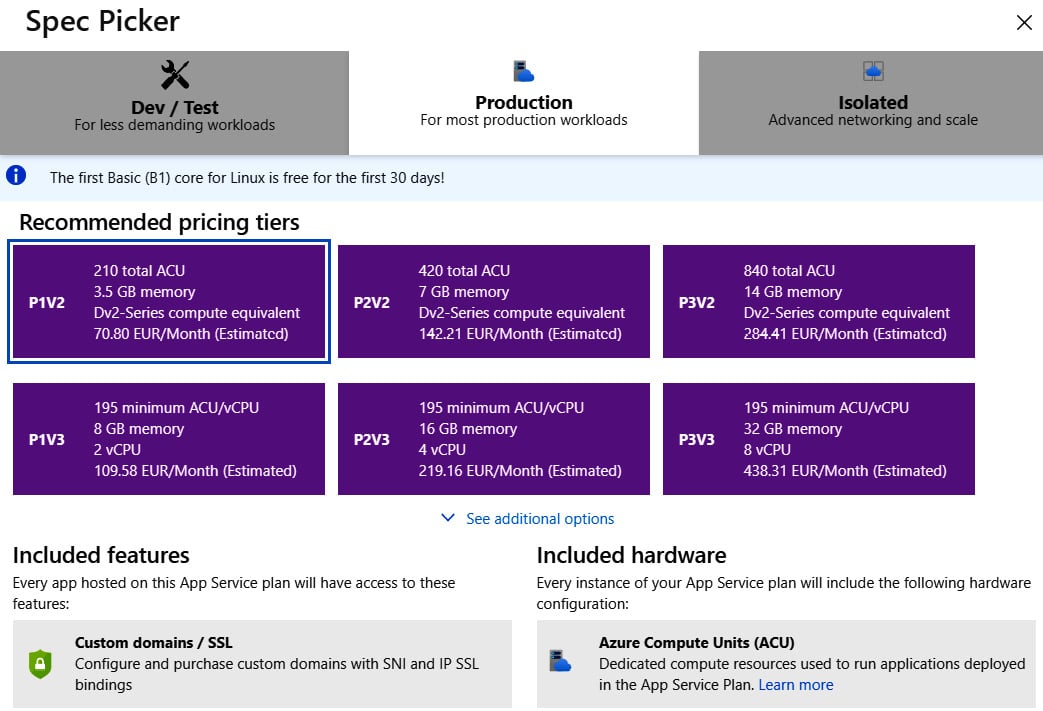
Figure 1.6 – Spec Picker for App Service plan
As you can see in the preceding screenshot, we have three categories of App Service plans, as follows:
- Dev / Test: This contains F, D, and B tiers (which stand for free, shared, and basic). They are designed for simple development/test (dev/test) scenarios and lightweight web applications that do not need features such as autoscaling or backups. Note that the shared tier is unavailable for Linux.
- Production: This offers powerful machines and advanced features that are useful in many day-to-day scenarios, such as application programming interfaces (APIs), e-commerce, and popular portals.
- Isolated: This uses the same hardware as the Production tier, but with even more features and possibilities to isolate your web apps on the hardware level. This is the most expensive category but can be helpful when creating systems that cannot be made available publicly.
Tip
It is important to remember that tiers F and D have a limited amount of computing time per day. That means that once you exceed the limit (60 minutes for the F tier, and 240 minutes for the D tier) of your processing time, your application will become unavailable and be suspended until the next day.
For this exercise, let's select any tier from the Dev / Test category. Once you are satisfied with the option you've selected, you can click the Apply button. My configuration, for example, looks like this:
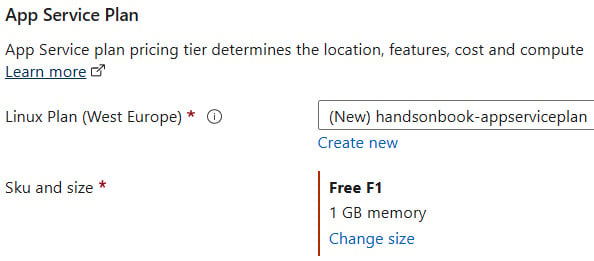
Figure 1.7 – Configure App Service plan with a free tier
Tip
Remember that you can always upgrade (or scale up) the instance of your App Service plan. For example, if you need a specific feature, or the popularity of your application has grown, revisit the Spec Picker screen and choose the options that suit you the most. This is one of the biggest advantages of cloud over on-premises, where you would have to buy and set up new machines on your own.
Now, you can click Next: Deployment (Preview), which will bring us to the next tab in our creator, as follows:
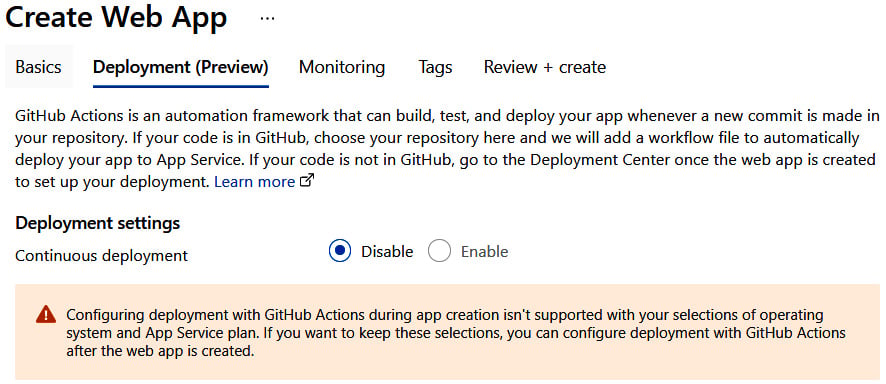
Figure 1.8 – Deployment tab
This tab allows us to configure the Continuous deployment setting for our application using GitHub Actions. Unfortunately, that kind of automated deployment is beyond the scope of this book. If you want to learn more, you can read about it here: https://docs.microsoft.com/en-us/azure/app-service/deploy-github-actions?tabs=applevel. For now, we can skip this and click the Next: Monitoring button to enable monitoring of our Web Apps resource using Azure Application Insights, as illustrated in the following screenshot:
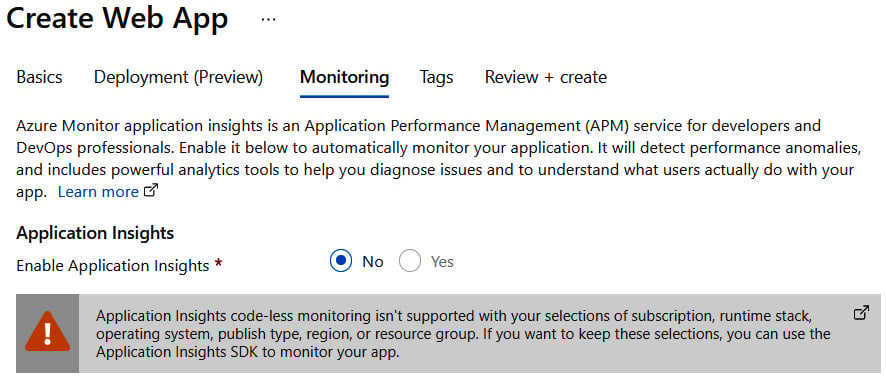
Figure 1.9 – Monitoring tab
Here, depending on the platform we chose, we can decide whether we want to enable monitoring by choosing the Yes option. Unfortunately, because my choice was Linux, the creator disables that for me (although it will be available to you if you selected Windows). Azure Application Insights will be described in detail further in this book, so to keep things simple, let's choose No.
We will skip the last tab, Tags, for now, so the only thing left is to click on the Review + create button and, after confirming all the details are correct, click on Create. If Azure detects that something is wrong with your input, it will highlight all the invalid fields and block the process of provisioning a resource.
Now, wait several seconds for the creation of a new resource. During this time, Azure will validate the template and parameters, and orchestrate multiple underlying controllers to create a service. Once a new resource is created, you should see a notification and be able to see your resources. To quickly validate this, click on the All resources button on the left and filter all of them using, for example, the name of the App Service resource you have created. The process is illustrated in the following screenshot:
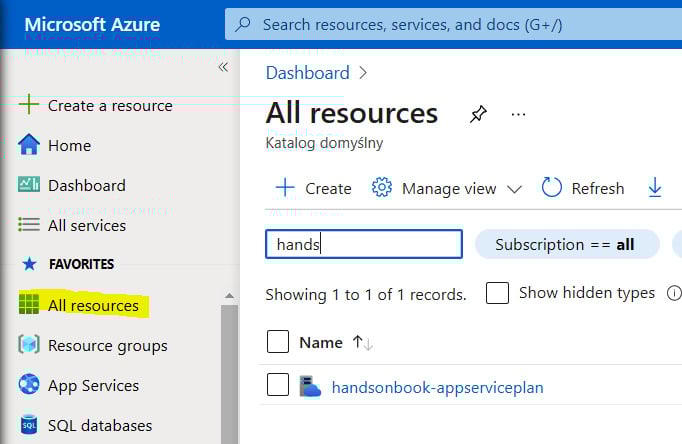
Figure 1.10 – Created App Service plan visible in the Azure portal
Let's now switch our focus to creating an Azure App Service resource using a different toolset.
Creating an Azure App Service resource using Visual Studio
If you do not want to create your web apps using the Azure portal, you can use Microsoft Visual Studio, which has built-in integration for many different Azure services. As Visual Studio is an integrated development environment (IDE) designed mostly for .NET application development, all the exercises will use .NET as a development platform. For a more generic approach, please look at the next section, where we will describe working with VS Code as an alternative.
Note
This exercise was created using Microsoft Visual Studio Community 2019 (16.8.4) with Azure workloads installed. If you want to configure your instance and ensure everything is set up correctly, please follow the short tutorial available at https://docs.microsoft.com/en-us/dotnet/azure/configure-visual-studio.
In Visual Studio, click on File | New | Project. This will display a Create a new project window, where you can find plenty of different templates for starting with a new application. Because we are aiming at deploying a web application, let's choose a template for ASP.NET Core Web Application, as illustrated in the following screenshot:

Figure 1.11 – Creating a new project in Visual Studio
When a template is selected, click on the Next button in the bottom-right corner of the window. All that's left to do now is enter a project name and its location on our hard drive, as follows:
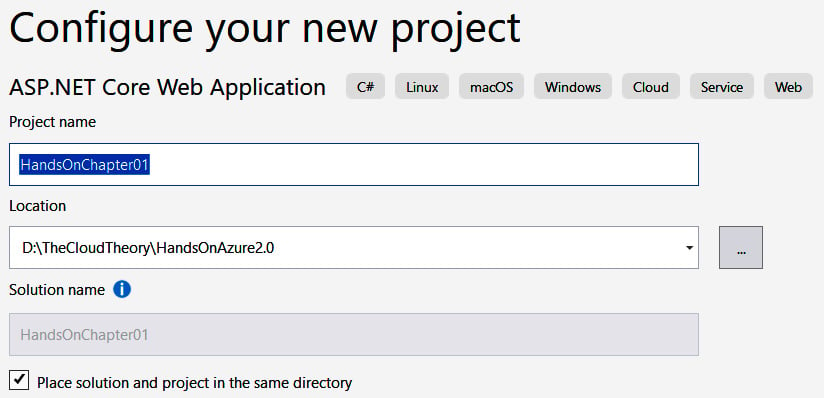
Figure 1.12 – Configuring a new project
Enter any name you feel works for you and select a location where the files will be created. When everything is ready, click the Create button. The last step is choosing a template for this application. To make things easier, we will go for Web Application as this will give us some content to work with. You can see the available templates in the following screenshot:
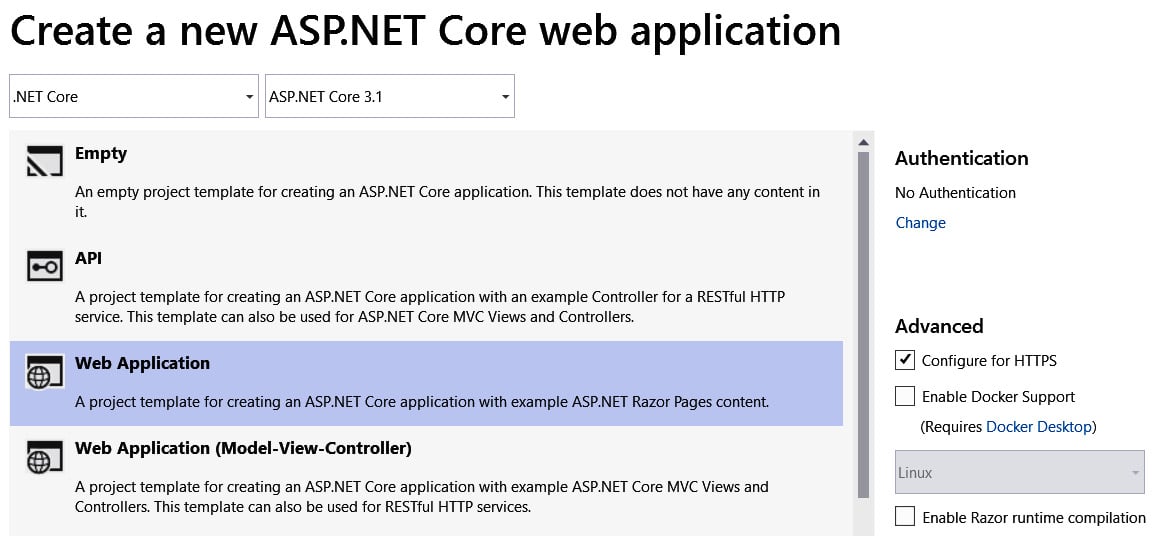
Figure 1.13 – Creating an ASP.NET application
Tip
You have probably noticed an Authentication section, which I have not described. It allows you to select the method used for authenticating access to your web application. We will cover that feature in the Securing App Service resources using different security providers section.
Let's leave all other options with their default values and click Create. After several seconds, Visual Studio should generate your new application, which is ready to work. To ensure that everything is correct, press the F5 button to run your website locally. After a few seconds, you should see a screen like mine here:

Figure 1.14 – Locally working application
If everything works as expected, there is one question remaining: how can we deploy it to Azure to have our website working in the cloud? Let's go back to Visual Studio for a moment and close the debugger. When you right-click on a project in Solution Explorer, you will see a context menu. There, between various menu options, click on Publish..., as illustrated in the following screenshot:
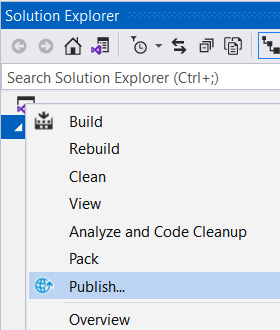
Figure 1.15 – Context menu of a project
As we are building a web application hosted in a cloud environment, our choice for the publish location will be Azure, as illustrated in the following screenshot:
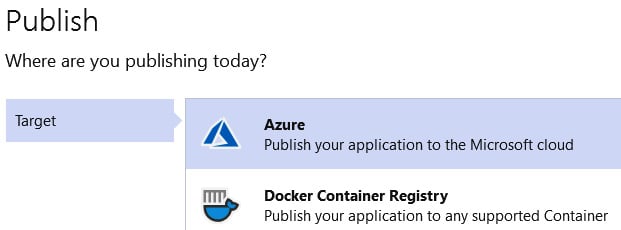
Figure 1.16 – Selecting a publish target
Now, click the Next button to select a particular Azure service used for our deployment. Currently, we are getting started with Azure App Service, so options for containerization will be a no-go. You will learn more about them in the next chapters. However, depending on your desired platform, you can choose between Linux and Windows machines. If you do not have specific requirements related to your hosting environment, I recommend using Linux for our deployment. The Linux service is shown in the following screenshot:
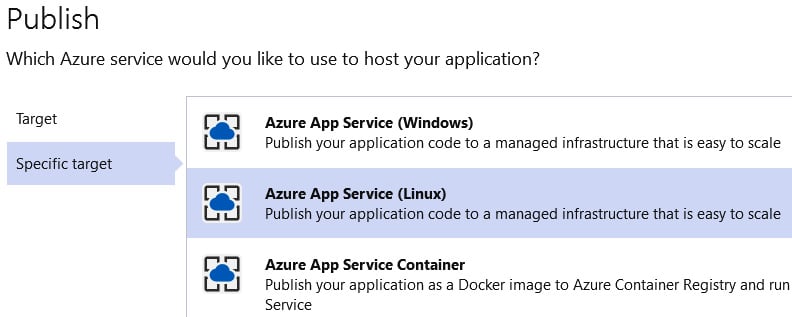
Figure 1.17 – Publish
Let's click Next one more time. The last step is selecting an actual Azure App Service resource for the application. If you do not have one, look at the beginning of this chapter, where we went through the process of creating one in detail. After selecting the desired instance, use the Finish button to complete deployment. The process is illustrated in the following screenshot:
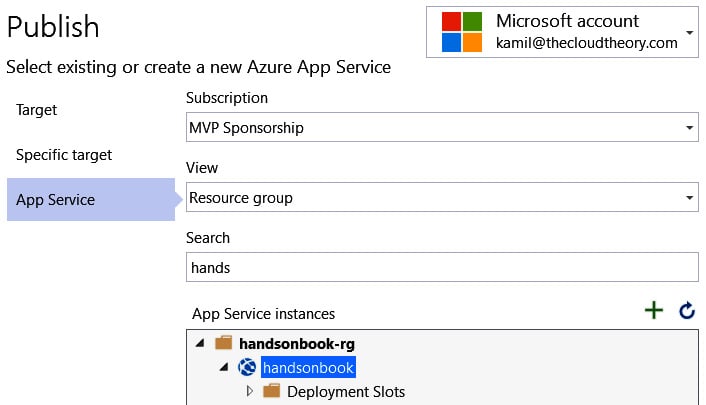
Figure 1.18 – Specifying a publish target
Note
If you do not see any Azure subscription, you may need to authenticate first to your cloud environment. Use the dropdown in the top right of the Publish window to select an alternative account or sign in to a new one.
Before Visual Studio sends our files, it will display a summary of the whole process. This is the last moment to reconfigure things such as target framework, deployment mode, or runtime. If everything seems fine, use the Publish button, as illustrated in the following screenshot, to publish the site to the selected Azure App Service resource:

Figure 1.19 – Publish screen summary
Once deployment is completed, you should see your web application open automatically on your default browser, as follows:
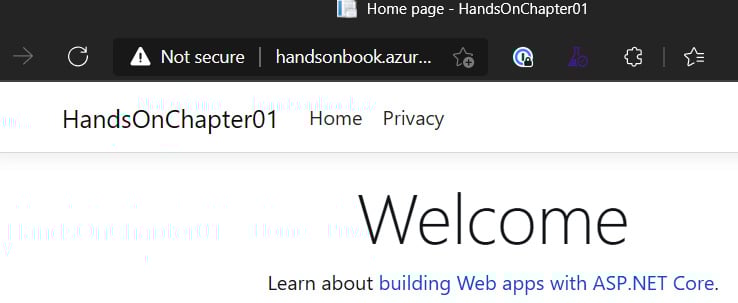
Figure 1.20 – Working application in Microsoft Azure
Congratulations! You have just created and deployed your very first App Service resource. If you look at the Uniform Resource Locator (URL), you'll see that it contains the name you set in the Visual Studio wizard. All web apps in Azure can be accessed using the following URL format: http(s)://{appservicename}.azurewebsites.net.
This also explains why a name must be unique: since, by default, all web applications hosted as Azure Web Apps resources are available publicly, you must select a name that is not already in use in another URL. In the next section, we will use the Azure CLI to deploy our application, as an alternative to using Visual Studio.
Deploying Azure App Service resources using the Azure CLI
Using Visual Studio for deployments is a good idea for testing things and for development, but for sure, it cannot be used for deploying production environments. An alternative, which can be also used on our build agents (if you are using a continuous integration/continuous deployment (CI/CD) approach), is to leverage the Azure CLI. As you will see, it allows for a variety of different deployment options that should satisfy most setups.
Deploying Azure App Service resources with a ZIP file
One of the easiest options for deployment is archiving your application package as a ZIP file and sending it to Azure. To use it, you will have to prepare your application using the following structure (this is just an example; in reality, your structure will be more specific to your project):
Root
|---- Dir1
|---- Dir2
| entry_file (index.html / index.php / app.js / …)
| package_management_file (project.json / bower.json / package.json / …)
Tip
Consider using build automation instead of packaging all the dependencies into an archive. This will save both time and bandwidth when deploying an application and will make the process much safer. See the rest of this section for more details.
Once you have described the structure, you can package it using any kind of archiving tool (this can be a desktop application or a CLI command)—the important thing is to have a <filename>.zip archive that we can send using the Azure CLI. To do so, we will need to execute the following command:
az webapp deployment source config-zip --resource-group <group-name> --name <app-name> --src <filename>.zip
You will have to provide the name of your Azure App Service resource, its resource group, and the path to the archive you created. The following screenshot shows the result of running that command:
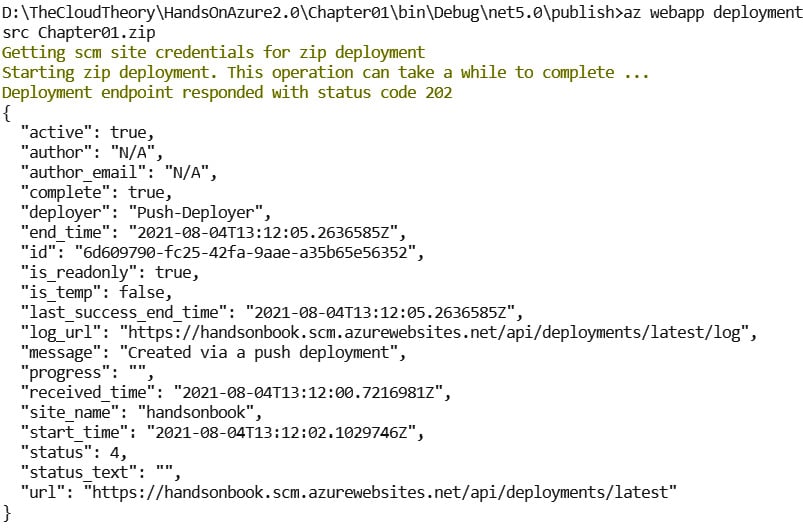
Figure 1.21 – Result of publishing a web app via Azure CLI
Once your code is pushed and extracted, a new version of your application should be available and ready to serve the newest content.
Enabling build automation
A caveat of the preceding method of deployment is the need to prepare all the build artifacts upfront and send them to Azure. There are pros and cons to that approach, as outlined here:
- You are sending the final structure of your application and there are no additional steps needed, so any kind of process debugging should be minimal.
- Your application artifacts may be big, which can make the whole process slower as you need to pass all the files and wait until they are uploaded.
As an alternative, you can enable a feature called build automation. This instructs Azure to use your project/package files and run commands such as npm install or dotnet build before running an application. To enable automation, use the following command:
az webapp config appsettings set --resource-group <group-name> --name <app-name> --settings SCM_DO_BUILD_DURING_DEPLOYMENT=true
If you enable automation, remember not to build your application on your side to avoid duplicated work.
Running from the package
There are some caveats of deploying your application as a ZIP file and then extracting files. As it is running, the extraction and overwriting of files may cause some undesired side effects such as locking or partial updates of the content. To avoid such artifacts, you can use a feature called Run from Package. First, you will have to enable the feature using the Azure CLI, like this:
az webapp config appsettings set --resource-group <group-name> --name <app-name> --settings WEBSITE_RUN_FROM_PACKAGE="1"
Then, we can once again use the command you are already familiar with, as shown here:
az webapp deployment source config-zip --resource-group <group-name> --name <app-name> --src <filename>.zip
Because Run from Package is enabled, instead of extracting your files, Azure App Service will mount the whole package as a read-only directory and run your application from it. As the application will be restarted, all the side effects should be mitigated.
Creating Azure App Service resources using VS Code
Microsoft Visual Studio is not the only available IDE that allows you to work with Azure App Service resources. Because this Azure service supports different technology stacks, including .NET, JavaScript (JS), PHP, Java, and so on, you can easily leverage its capabilities to host different websites using different runtimes. For instance, let's assume that we have the following PHP code that displays a Hello World message:
<?php
echo('Hello world from Azure App Service - PHP here!');
?>
Such a simple PHP application can be easily created in any available IDE that supports the PHP language. For this exercise, I chose VS Code, an open source editor, as it can easily be extended using many different plugins. As you can see in the following screenshot, all you need is a single file within your project directory:

Figure 1.22 – PHP project structure
To make things easier, you can install the following extensions:

Figure 1.23 – Extensions screen in VS Code
With the Azure App Service plugin installed, you will be able to easily deploy your applications from within the IDE, without the need to go to the portal or use other methods.
Note
Before the first use of these extensions, you may need to authenticate them. Follow the displayed instructions, and VS Code will connect to your subscriptions.
Before we deploy our simple PHP application, we must create an Azure App Service resource. Go to the AZURE tab (you can also use the Ctrl + Shift + A shortcut) and find the APP SERVICE section. After that, click on the Create New Web App... button, as illustrated in the following screenshot:
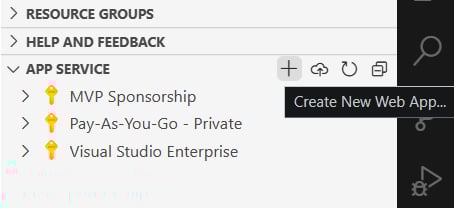
Figure 1.24 – AZURE extension tab with app services
The wizard is a little bit different than in Microsoft Visual Studio, as it acts similarly to a command line, where you provide all fields and information one after another. In VS Code, you will have to enter the following:
- Subscription where an app should be deployed
- The Azure App Service resource name
- Runtime stack (.NET/Node.js/Python/PHP/Ruby/Java)
- App Service plan tier
Note
Using the creator described previously will not give the option to select a resource group and other, more advanced settings. If you want to have full control over the provisioning process, use Command Palette (Ctrl + Shift + P) and search for the Azure App Service: Create New Web App (advanced) option.
In this example, I specified the following:
- Name:
handsonchapter01-code - PHP 8.0
- Free tier
Once the provisioning is complete, VS Code will ask you whether to deploy the application. Select Deploy, and then choose a folder to deploy from, as illustrated in the following screenshot:

Figure 1.25 – Selecting a folder to deploy from
Next, you will have to select a subscription and the exact instance of the web application in Azure (VS Code may not ask you for that input if it saved your previous choices). The following screenshot illustrates this:

Figure 1.26 – Selecting a web app as a deployment target
Select the instance and confirm the new deployment. Once everything is set and ready, you will see a notification informing you that you are now able to browse the website, as illustrated in the following screenshot:

Figure 1.27 – Deployment confirmation
When you click on the Browse Website button, you will be forwarded to the web application you have just deployed. Here, you can see a working example:

Figure 1.28 – Working application in Azure
Note that this extension allows you to directly manage the service from within the IDE and gives you access to different features, including application settings, deployment slots, and even streaming logs.
The important thing here is that by using the same path, you will be able to host a variety of different runtimes inside different Azure App Service resources. It doesn't matter whether it is a Java application, a Python script, or a Node.js backend—they are all supported and can be easily developed using IDEs such as VS Code.


