Search icon CANCEL
Subscription
0
Cart icon
Your Cart (0 item)
Close icon
You have no products in your basket yet
Save more on your purchases! discount-offer-chevron-icon
Savings automatically calculated. No voucher code required.
Arrow left icon
Explore Products
Best Sellers
New Releases
Books
Videos
Audiobooks
Learning Hub
Free Learning
Arrow right icon
Arrow up icon
GO TO TOP
Arduino for Kids

You're reading from   Arduino for Kids A cool guide to help kids develop robots and electronics

Arrow left icon
Product type Paperback
Published in Mar 2017
Publisher Packt
ISBN-13 9781785884818
Length 218 pages
Edition 1st Edition
Tools
Concepts
Arrow right icon
Authors (3):
Arrow left icon
Rishi Gaurav Bhatnagar Rishi Gaurav Bhatnagar
Author Profile Icon Rishi Gaurav Bhatnagar
Rishi Gaurav Bhatnagar
Priya Kuber Priya Kuber
Author Profile Icon Priya Kuber
Priya Kuber
Vijay Varada Vijay Varada
Author Profile Icon Vijay Varada
Vijay Varada
Arrow right icon
View More author details
Toc

Table of Contents (11) Chapters Close

Preface 1. The World around Us FREE CHAPTER 2. Systems and Logic 3. Components and Connections 4. The Magic Wand 5. Hello World! 6. Safety Box 7. Make a Friend 8. Save Energy 9. High 5! 10. Plant, Meet Arduino!

Make some noise!


Congratulations! You now have the basic concepts needed to get our safe working! There is only one thing left to do: to figure out how to output sound for an alarm.

We are going to use an output sound using a device called a buzzer:

Image source: https://www.robomart.com/image/cache/catalog/RM0338/piezo-buzzer-b-10n-piezo-electric-buzzers-rm0338-by-robomart-399-500x500.jpg

A buzzer is a two-terminal device, meaning it has to have two connections going up to it. This buzzer also has polarity, meaning it should be connected with one particular terminal of the two connected to 5V or HIGH, and the other connected to ground or LOW.

Let's hook up a circuit and make some noise!

Connect the components to the breadboard as shown. Make sure the pin of the buzzer near the + sign of the buzzer goes into the I/O pin of the Arduino. This pin is usually the longer one of the two.

The other pin would be connected to the Arduinos ground:
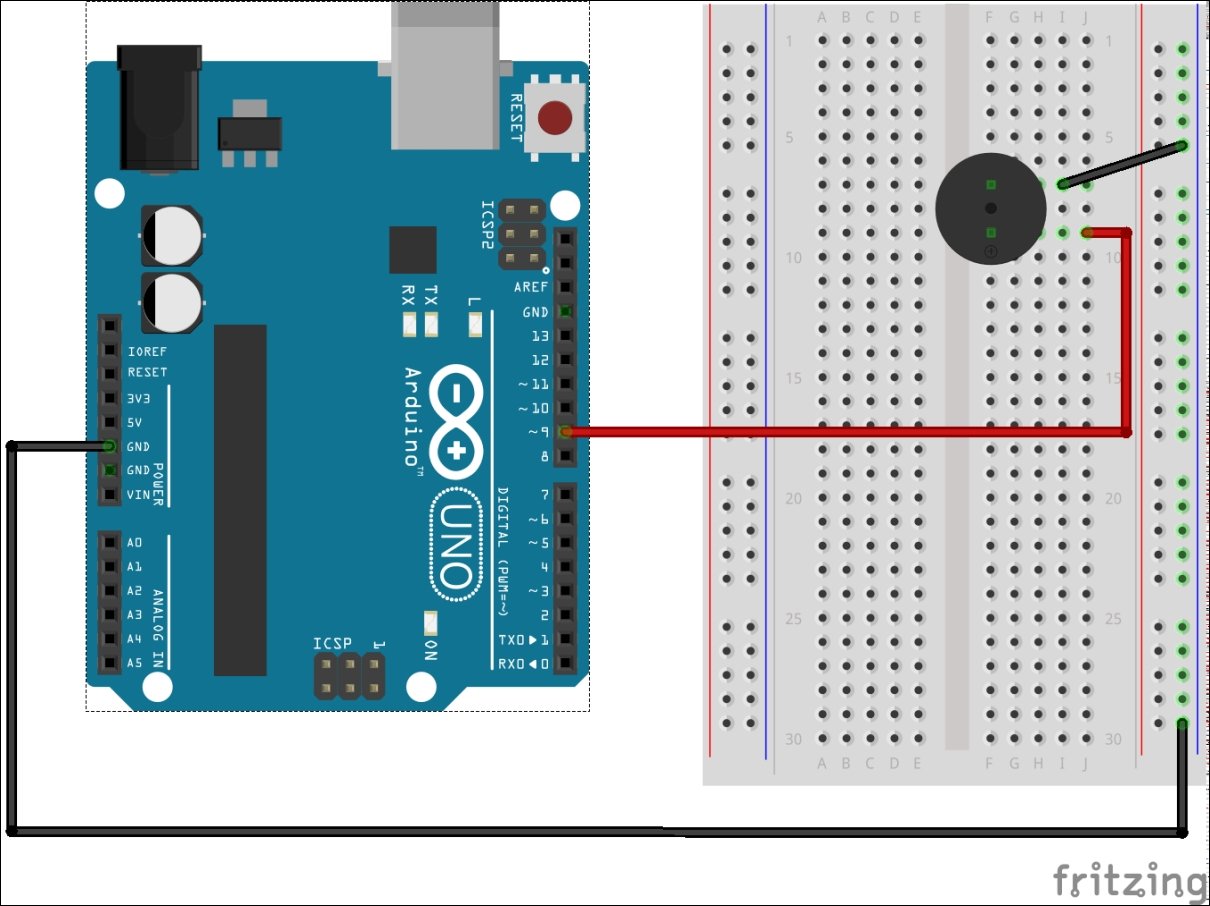
We shall now write a code that will bring the buzzer...

lock icon The rest of the chapter is locked
Register for a free Packt account to unlock a world of extra content!
A free Packt account unlocks extra newsletters, articles, discounted offers, and much more. Start advancing your knowledge today.
Unlock this book and the full library FREE for 7 days
Get unlimited access to 7000+ expert-authored eBooks and videos courses covering every tech area you can think of
Renews at $19.99/month. Cancel anytime
Banner background image