Setting up our Unity project
Things can get messy quickly in a project if we don't manage our files correctly by placing them in the allocated folders. If you want to structure your folders your own way, or during the book, you decide to stray away from how I'm doing it, that's also fine. Just try and be conscious of your future self or other people working on this project when it comes to finding and organizing files.
Open the project up if you haven't already and create the following folders:
Modelcontains 3D models (the player ship, enemies, bullets, and so on).Prefabholds instances of game objects (these are created within Unity).Scenestores our first-level scene as well as other levels.Scriptcontains all of our code.Materialstores our game object materials.Resourcesstores assets and objects to load into our game.ScriptableObjectare data containers that are capable of storing large amounts of data.Tip
You should know what a prefab is, as it's one of the main parts of what makes Unity so quick and easy to use. However, if you don't: it's typically your game object with its settings and components stored in an instance. You can store your game objects in your Project window as prefabs by dragging the game object from the Hierarchy window. A blue box icon will be generated following the game object's name, and if you select the prefab in the Project window, its Inspector window details will show all its stored values. If you would like to know more about prefabs, you can check out the documentation at https://docs.unity3d.com/Manual/Prefabs.html.
The following screenshot shows you how to create these folders:
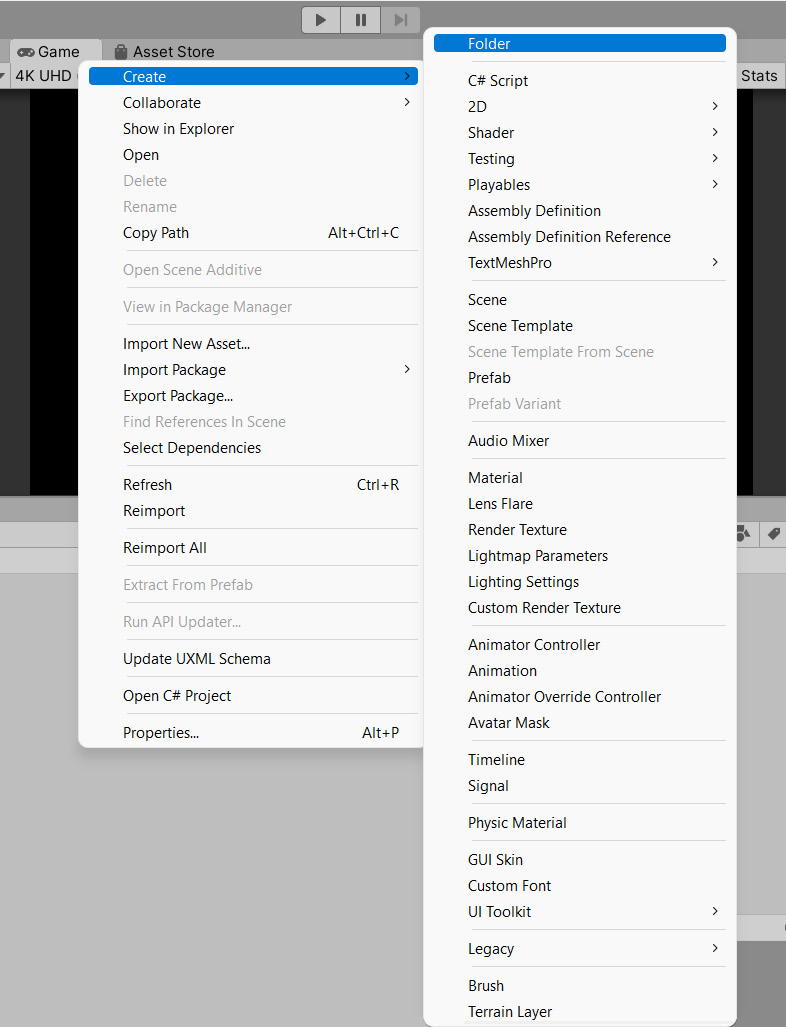
Figure 2.1 – Creating a folder in the Unity Editor
Next, we will create subfolders; we need to do the following:
- Within our
Prefabfolder, create another two folders,EnemiesandPlayer:
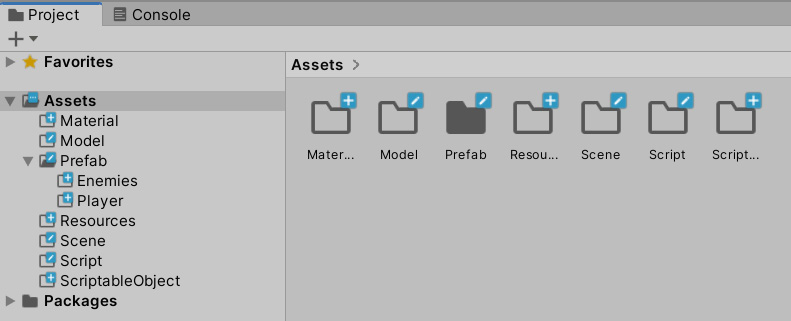
Figure 2.2 – Folders created in the Unity Editor
Resources is a special folder that Unity recognizes. It will allow us to load assets while the game is running. For more information about the Resources folder, check the documentation at https://docs.unity3d.com/Manual/BestPracticeUnderstandingPerformanceInUnity6.html.
Further Information
It's worth mentioning the StreamingAssets folder at this point. Even though we aren't using it in this project, it relates well to how similar (and how different) it is to the Resources folder.
The Resources folder imports assets and converts them into internal formats that will be compatible with the target platform. So, for example, a PNG file will get converted and compressed when the project is being built.
The StreamingAssets folder will hold the PNG file, not convert or compress it. For more information on Streaming Assets, check out the following link: https://docs.unity3d.com/Manual/StreamingAssets.html.
Provided in the Technical requirements section is the download link for the GitHub repository of this chapter. Once downloaded, double-click the Chapter2.unitypackage file, and we will be given a list of assets to import into our Unity project:
Player_ship.fbxenemy_wave.fbx
The following screenshot shows the Import window of the assets we are about to bring into our project:
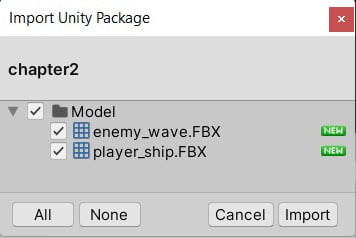
Figure 2.3 – Importing assets into your project
Make sure all assets are ticked and click the Import button at the bottom-right corner of the window. We can now move on to organizing our files and folders in the Project window in the next section.
Creating prefabs
In this section, we are going to create three prefabs: the player, the player's bullet, and the enemy. These prefabs will hold components, settings, and other property values for our game that we can instantiate throughout our game.
Let's start by making our player_ship.fbx file into a prefab instance by doing the following.
Sometimes, when importing any three-dimensional file, it may contain extra data that we might not need. For example, our player_ship model comes with its own material and animation properties. We don't require any of these, so let's remove these properties before continuing to import our models fully into our Unity project.
To remove the Animation and Material properties from our player_ship model, we need to do the following:
- In the Project window, navigate to
Assets/Modeland select theplayer_shipfile. - In the Inspector window, select the Materials button.
- Make sure the Material Creation Mode is set to None from the drop-down list, and then click the Apply button.
- Now, click the Animation button next to the Materials button.
- Untick the Import Animation checkbox, followed by clicking the Apply button.
- Select the Rig button next to the Animation button.
- Select the current value in the Animation Type drop-down menu and select None, followed by the Apply button.
- That's all of the Material and Animation information removed from our
player_shipmodel.Important Information
Throughout the book, whenever we select a three-dimensional model, make sure to run through the same process, as we will not require imported extras such as the ones we just removed. This means I would like you now to repeat the process we have just gone through with the
enemy_wave.fbxmodel.
Let's continue preparing our player_ship model for our game:
- Click and drag
player_shipfromAssets/Modelinto the Hierarchy window. - Select the
player_shipin the Hierarchy window and set its name and Transform properties to the following values:- Game Object name:
player_ship - Tag: Player (easier to detect when colliding with enemies or other collisions)
- Transform: All values set to
0apart from Scale, which is set to1on all axes
- Game Object name:
The following screenshot shows the player_ship values in the Inspector window:
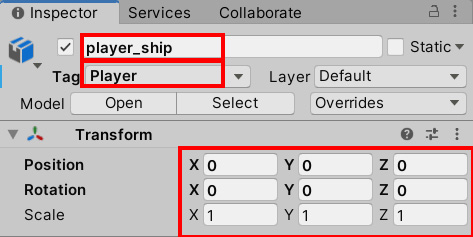
Figure 2.4 – The player_ship values in the Inspector window
- Click and drag the
player_shipfrom the Hierarchy window into theAssets/Prefab/Playerfolder.
When creating a prefab, sometimes you might be asked if this is an Original or Variant:
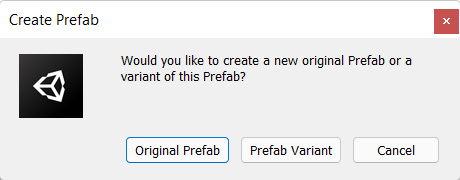
Figure 2.5 – The Create Prefab Dialog
A variant prefab will be a copy of an original prefab but will also carry any changes made from the prefab it originates from. So, for example, if the original prefab was a car with 4 wheels, the variant will have the same. If the original prefab changes it's numbers from 4 to 3, the variant will copy the original prefab.
Note that player_ship in the Hierarchy window has turned blue, which means it has become a prefab.
- Delete the
player_shipfrom the Hierarchy window.
We are going to use a similar process to create our enemy_wave prefab, but we will also need to create its own name tag because there isn't an Enemy tag... yet.
An Enemy prefab and custom tags
In this section, we are going to create an enemy_wave prefab along with a custom tag. The tag will be used to identify and categorize all related enemies under one tag.
To create an enemy_wave prefab and custom name tag, follow these instructions:
- In the Project window, drag the
enemy_wave.fbxfile fromAssets/Modelinto the Hierarchy window. - With the
enemy_wavefile selected in the Hierarchy window, update the following values in the Inspector window:- Game Object name:
enemy_wave. - Transform: All values set to
0apart from Scale, which is set to1on all axes:
- Game Object name:
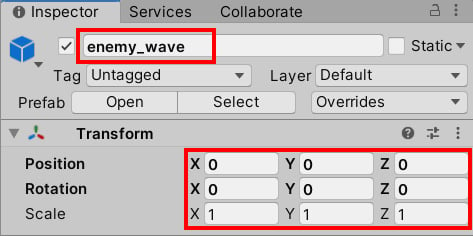
Figure 2.6 – The enemy_wave values in the Inspector window
Now, let's create a new tag for the enemy_wave game object by doing the following:
- Choose the Untagged parameter in the Inspector window.
- From the Tag drop-down menu, select Add Tag....
- The Inspector window will now show the Tags & Layers window.
- Click the + to add a new tag, as circled in the following screenshot.
- Enter
Enemyin the pop-up window, as shown in the following screenshot, and then click the Save button:
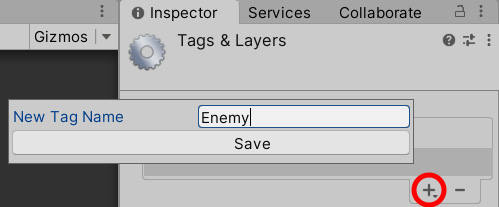
Figure 2.7 – Add a tag to the Tags & Layers list
- Back in the Hierarchy window, select the
enemy_wavegame object to bring back our Inspector window details. - Click the Untagged parameter again.
- We can now see Enemy in our drop-down list, so select it.
- Drag the
enemy_wavegame object from the Hierarchy window intoAssets/Prefab/Enemies. - Delete
enemy_wavefrom the Hierarchy window
We now move on to our third prefab creation – the player's bullet. But this time, we won't import a three-dimensional model – we are going to create one in the Unity Editor, and then create a prefab from it in the next section.
Creating the player's bullet prefab
Next, we are going to create the visuals for the player's bullet in the Unity Editor. We will make a blue sphere and give it a surrounding light source. Let's start by creating a three-dimensional sphere game object.
In the Hierarchy window, right-click, and from the drop-down list, select 3D Object | Sphere.
With the newly created Sphere in the Hierarchy window still selected, make the following changes to the Inspector window:
- Change the game object name from
Spheretoplayer_bullet. - Change Tag from Untagged to Player. The tag name makes it easier to identify later on in the chapter.
- The Transform parameters are all set to
0, apart from the Scale values for the bullets, which should be slightly larger, with a Scale value of2on all axes.
The following screenshot shows all three changes:
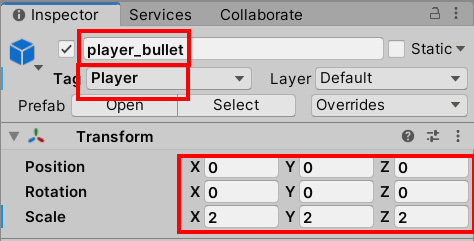
Figure 2.8 – The player_bullet values in the Inspector window
Next, we will give the player_bullet game object a new blue material.
Creating and applying a material to the player's bullet
In this section, we will be creating a simple unlit material that will not take up much of the device's performance, thanks to the simplicity of the material. To create a basic material and apply it to the player_bullet object, do the following:
- In the Project window, navigate to the
Assets/Materialfolder. - Inside the
Materialfolder, make a new folder (the same way we did in the Setting up our Unity project section) and name the folderPlayer. That way, any material related to the player can be stored inside. - Double click the newly created
Playerfolder and right-click in the Project window (in the open space in the right section of the window) again, and from the drop-down list, select Create | Material. - A new material file will be made. Rename it
player_bullet. - Select the
player_bulletmaterial, and in the Inspector window, change the material from a Standard shader to Unlit | Color by following the three steps in the following screenshot:
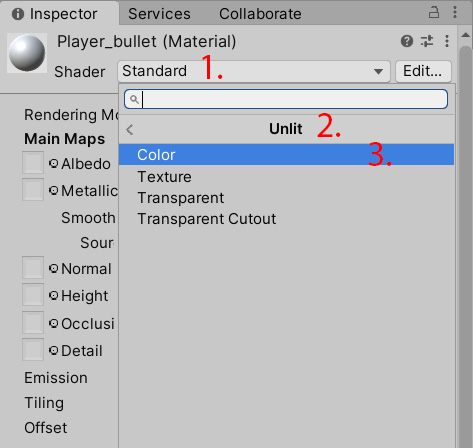
Figure 2.9 – Creating an Unlit Color Material
The Inspector window will remove the majority of the properties and strip the material back to something simpler and easier to perform on any device.
- Still in the Inspector window, click the Main Color swatch parameter and change it to a cyan color with the following values: R:
0, G:190, B:255, and A:255.
We have created and calibrated our player's bullet, so now, we can apply the material to the player_bullet prefab by doing the following:
- Select the
player_bulletprefab in the following location of the Project window:Assets/Prefab/Player. - In the Inspector window, under the Mesh Renderer component, click the small round radio button to the right of the Element 0 parameter and type
player_bulletin the drop-down list until you see the material, and then select it.
The following screenshot shows the player_bullet prefab's Mesh Renderer component updated to our new unlit material:
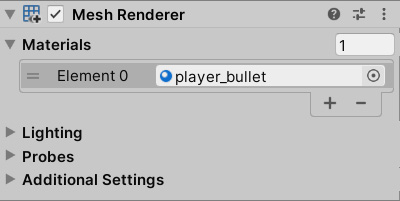
Figure 2.10 – player_bullet now has a player_bulletMat material
In Chapter 4, Applying Art, Animation, and Particles, we will return to materials and art in general, which will be of note if you found this interesting. We will also play around with particle systems to create a fleet of stars rushing past the player's ship.
The last component we will add to our player's bullet is a surrounding light to give our bullet an energy glow.
Adding a light to the player's bullet
In this section, we will be adding a light component to the player's bullet to hide the impression that all that we are doing is firing spheres. It will also introduce us to Unity's point light, which acts as a glowing ball.
To add and customize a ball of light to the player's bullet, we need to do the following:
- In the Project window, navigate to the
Assets/Prefab/Playerfolder, select theplayer_bulletprefab, and drag it into the Hierarchy window (if it isn't in the Hierarchy window already). - In the Inspector at the bottom of the components listed, click the Add Component button and select Light from the drop-down list.
The player_bullet prefab will now have a Light component attached to it. We just need to change three property values to make the light suit the game object more.
- Change the following property values in the
player_bulletfile's Light component:- Range:
50 - Color: R:
0, G:190, B:255, and A:255 - Intensity:
20
- Range:
The following screenshot shows the Light component after the values have been updated:
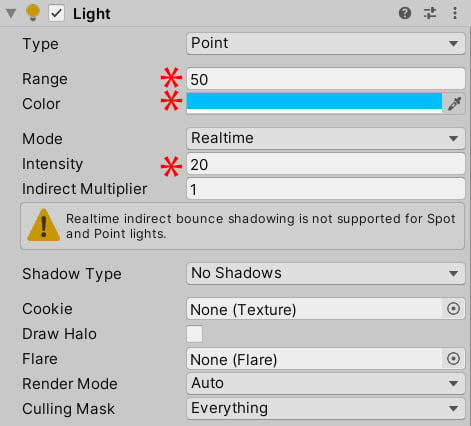
Figure 2.11 – The Light component values in the Inspector window
Before moving onto the next section, because we have taken an existing prefab and added a material and a light component, we need to click the Override button to confirm the new changes.
The following screenshot shows the Overrides button at the top-right corner of the Inspector window for our player_bullet prefab:
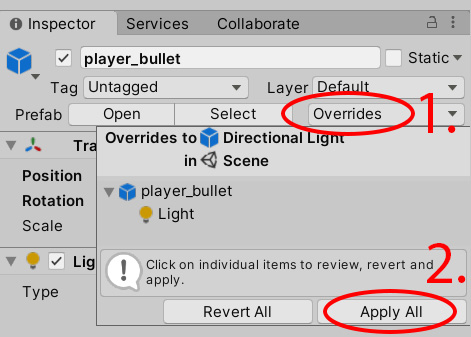
Figure 2.12 – Updating the player_bullet prefab
- Finally, click on Apply All to accept our updated light settings and then delete the
player_bulletfrom the Hierarchy.
In the next section, we will continue to update our three prefabs by applying Unity's own physics system, the Rigidbody component, to help detect collisions.
Adding Rigidbody components and fixing game objects
Because this game involves collisions with game objects, we need to apply collision detection to the player, the player's bullets, and the enemy. Unity offers a range of different shapes to wrap around a game object that functions as an invisible shield; we can set our code to react to contact being made with the shield.
Before we add colliders to the player and enemy game objects (the Sphere game object automatically comes with a collider), we need to add a Unity component called Rigidbody. If a game object is going to collide with at least one other game object, it requires a Rigidbody component, which can affect a game object's mass, gravity, drag, constraints, and more. If you would like to know more about Rigidbody components, check out the documentation at https://docs.unity3d.com/Manual/class-Rigidbody.html.
Rigidbody Joints
Unity has other physics types apart from the collider. Joints also require the Rigidbody system, and they come in different forms, such as Hinge, Spring, and others.
These Joints will simulate at a fixed point; for example, the Hinge Joint would be good at making a door swing back and forth around a door hinge's pivot point.
If you would like to know more about Joints, check the documentation at https://docs.unity3d.com/Manual/Joints.html.
Let's add the Rigidbody component to the player_ship and player_bullet prefabs in one go:
- In the Project window, navigate to Prefab | Player.
- Hold Ctrl (command on a Mac) and click on the
player_shipandplayer_bulletfiles. - In the Inspector window, click the Add Component button.
- From the drop-down menu, type
Rigidbody. - Select Rigidbody (not Rigidbody 2D).
- The Rigidbody component has now been assigned to our two game objects.
- With the two game objects still selected in the Inspector window, under Rigidbody, make sure that the Gravity checkbox isn't ticked. If it was, our game objects would begin to sink into the scene while the game is being played.
Now, we can add colliders to our player_ship and enemy_wave game objects (our player_bullet already has a SphereCollider). We will be adding a SphereCollider to our game objects because it's the cheapest collider to use, relative to performance costs:
- Click and drag the
player_shipprefab from the Project window location ofAssets/Prefab/Playerinto the Hierarchy window. - With the
player_shipstill selected in the Hierarchy window, click the Add Component button in the Inspector window and typeSphere Colliderin the drop-down menu. - As soon as you see SphereCollider in the list, click it to add it to the
player_shipgame object.
You will notice a green wireframe around the player_ship in the Scene window (with the player_ship still selected in the Hierarchy window, hover your mouse in the Scene window and press F on the keyboard to zoom in on the ship if you can't see it). This is the player_ship collider that will be used to detect hits. It may be too big for the purpose of a hitbox, so let's reduce its size.
- With the
player_shipprefab still selected in the Hierarchy window, alter the Radius of the SphereCollider component to0.3in the Inspector window, as shown in the following screenshot:
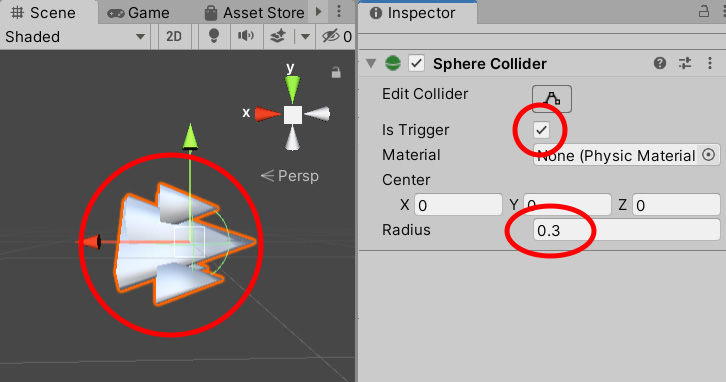
Figure 2.13 – The triggered sphere collider added to the player_ship prefab
- Also, while we still have the
player_shipprefab selected, check the Is Trigger box, as shown in the previous screenshot. This will make theplayer_shipprefab look for another collider without causing any form of potential physics collision. - Click Override at the top-right corner followed by Apply All in the Inspector window to update the modifications we've made to our prefab with its Rigidbody and SphereCollider components.
- We can now select the
player_shipprefab in the Hierarchy window and press Delete on our keyboard, as we no longer need it in our Scene.
We now need to apply the same methodology to the SphereCollider component of our player_bullet:
- In the Project window, click and drag the
player_bulletprefab fromAssets /Prefab/Playerinto the Hierarchy window. - Check the Is Trigger box and adjust the Radius in the SphereCollider component in the Inspector window.
- Click Overrides and then Apply All at the top-right corner of the Inspector window to confirm the
player_bulletchanges, and delete theplayer_bulletprefab from the Hierarchy window.
The last game object we need to update is the enemy_wave prefab. We have already covered the steps with the player_ship and player_bullet prefabs, so it's not ideal to repeat the instructions in full; however, we need to do the following:
- Briefly, I want you to drag and drop the
enemy_waveprefab from its location atAssets/Prefab/Enemiesin the Project window into the Hierarchy window.. - Add a SphereCollider component to the
enemy_waveprefab in the Inspector window. - Adjust the SphereCollider component so that Is Trigger is checked and the Radius value fits around the
enemy_waveprefab with the correct proportions, as we did withplayer_ship. - The
enemy_waveprefab doesn't require a Rigidbody component, as it will be colliding with relevant game objects that hold one themselves. - Finally, Override, Apply All the prefab changes and remove the
enemy_waveprefab from the Hierarchy window.
Use the following screenshot as a reference for the preceding mini-brief, and if you get stuck, use the previous steps that we discussed in this section:
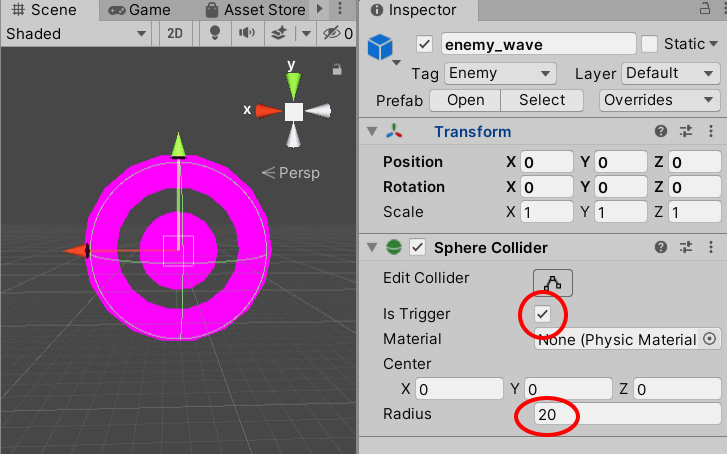
Figure 2.14 – The trigger collider added and scaled to the enemy_wave prefab
Hopefully, that went well for you. If you get stuck at any point, refer to the https://github.com/PacktPublishing/Unity-Certified-Programmer-Exam-Guide-Second-Edition/blob/main/Chapter_02/ProjectFIles/Chapter-02-Complete.unitypackage folder containing all the completed files to check them out and compare.
Before moving on, note that if a game object is pink, such as our enemy_wave object in the previous screenshot, it simply means that it doesn't have a material attached. In other cases, it can also mean there is something wrong with the shader attached to the material.
We can fix this pink issue by doing the following:
- In the Project window, navigate to
Assets/Prefab/Enemies. - Drag and drop enemy_wave into the Hierarchy window. Expand the drop down next to
enemy_wavein the Hierarchy window.. - Select the first game object, titled
enemy_wave_core. - In the Inspector window, select the small remote circle next to the Element 0 parameter in the Mesh Renderer component (denoted by 1 in the following screenshot), and then select Default-Material (denoted by 2) from the drop-down list, as shown in the following screenshot:
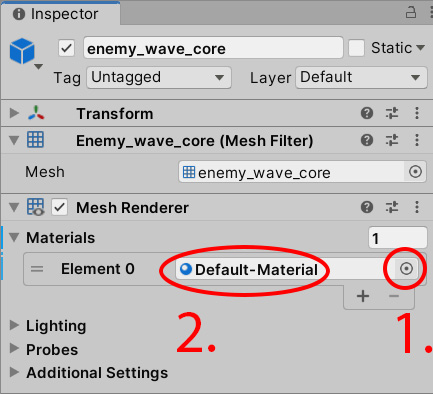
Figure 2.15 – Adding a Default Material to the enemy_wave_core gameobject
- Follow the same steps for its sibling game object,
enemy_wave_ring.
The enemy_wave object will now have a default material applied.If any changes were made to the prefab be sure to click Override, Apply All.
Attributes
If a game object requires a component such as Rigidbody, we can place, above the class name, what is effectively a reminder to the script that the game object needs it:
[RequireComponent(typeof(Rigidbody))]
If the game object doesn't have the component, the script will create one, and if we try to remove the Rigidbody component, we will receive a message in the Unity Editor that it is a required component.
This code isn't a requirement as such, more of a good practice with components in general.
If you would like to know more about the RequireComponent attribute, check the documentation at https://docs.unity3d.com/ScriptReference/RequireComponent.html.
So, now we have our colliders and Rigidbody components applied to our game objects. This gives us the ability to create a reaction when colliders come into contact with each other.
Because we are starting to build up our project, let's quickly discuss saving our scenes, projects, and so on.
Saving and publishing our work
It's easy to get stuck into our project, but as a brief reminder, save your work as often as possible. That way, if anything bad happens, you can always revert back.
Because we have created and saved our testLevel scene from the previous chapter, we can also add this scene to the Build Settings window. The reason for this is so that Unity is aware of what scenes we want to include in our project. It is also a requirement when it comes to packaging up our game as a build for deployment.
To add our scene to Build Settings, do the following:
- At the top of the Unity Editor, click File | Build Settings. The Build Settings window will appear.
- Click the Add Open Scenes button to add the
testLevelscene. - The following screenshot shows the Add Open Scenes button circled, as well as an arrow pointing to the number index of our
testLevelscene. When we add more scenes later, each scene will be numbered:
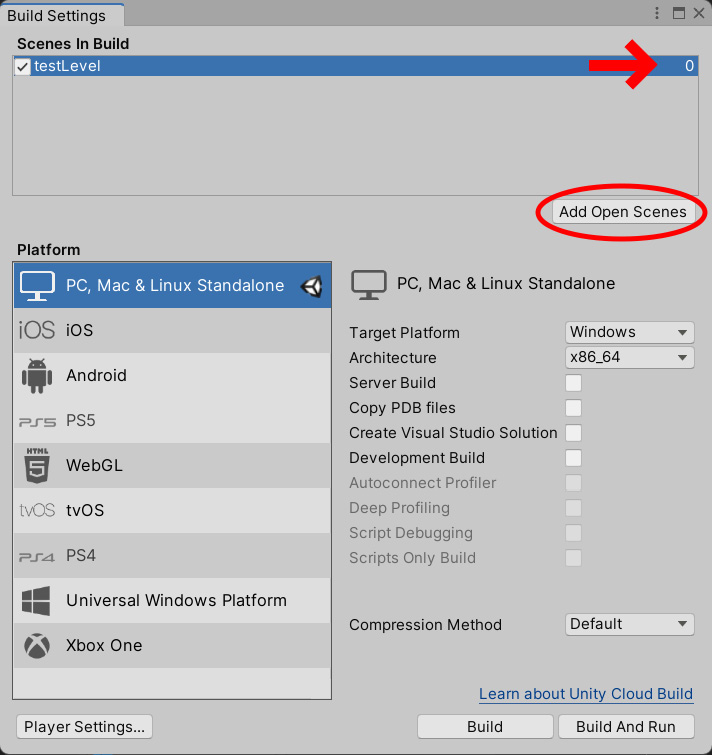
Figure 2.16 – Adding the testLevel scene to the Scenes In Build list
- Close the Build Settings window. We will come back to this when we have more scenes to add in the next chapter.
- It's a good habit to save the project by clicking File | Save Project.
Let's now continue with setting up our scene camera in the Unity Editor.
Unity Editor Layout
For our side-scrolling shooter game Killer Wave, we need control over a camera to display the aspect ratio and visible depth of the scene, and to make sure we show the correct amount of our game's environment.
Let's get started and decide on the screen ratio of our game. We'll create our own resolution, which will be fairly common across most platforms.
To change the Game window's screen ratio to a custom aspect, do the following:
- Click the current aspect ratio under the Game window tab and select the + symbol.
- Enter the custom aspect ratio values shown in the following screenshot.
- Click OK once done, and select the
1080resolution we have just made:

Figure 2.17 – Setting a custom Game window resolution
It is good to be aware of the need to make our game's artwork support (or to give it the scope to extend to) as many screen ratios as possible, especially if we ever wanted to make a game for portable devices such as tablets or mobile phones. This is because nearly every major brand of phone and tablet comes in different ratio sizes, and we don't want to start squashing and squeezing our content, as it won't look right. It's also possible that our small mobile games will become successful and could later be ported to a console or PC. If that's the case, we need to make the game screen support these ratios too. The main point to take from all of this is that we are targeting our game to cover all possible common screen ratios. The more platforms (consoles, portable devices, and so on) we can cover with flexible screen ratios, the easier it will be to extend our game out to those devices without requiring extra work. We explain more about screen size ratios in Chapter 8, Adding Custom Fonts and UI, and Chapter 9, Creating a 2D Shop Interface and In-Game HUD, where we discuss UI display settings. Additionally, in Chapter 13, Effects, Testing, Performance, and Alt Controls, we will explain how to display our game screen on a raw image component.
Before we continue any further with our project, it's probably a good time to confirm our understanding of Unity's own UI layout. The following screenshot shows the Unity Editor, where I have outlined and labeled the relevant windows:
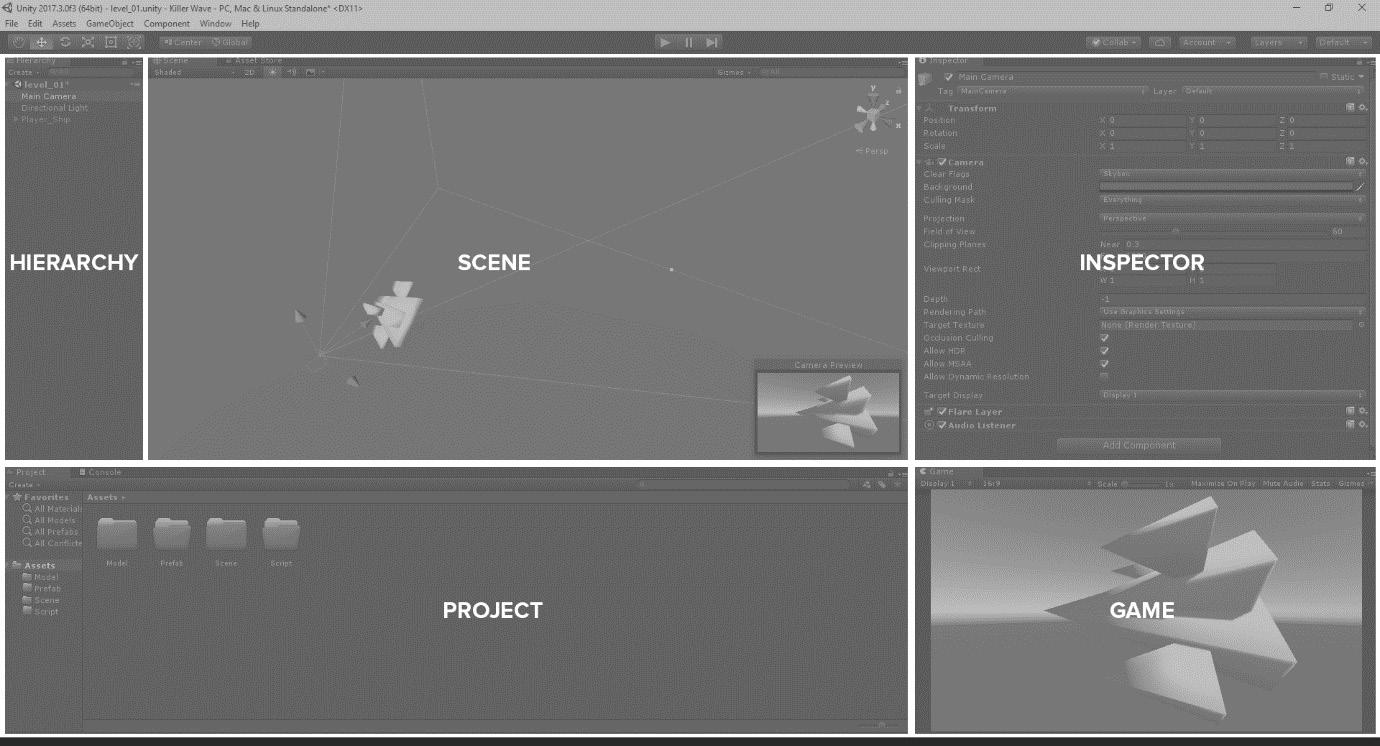
Figure 2.18 – The Unity Editor window layout
Typically, the Unity Editor window is made up of five main windows:
- Scene: This is our two-/three-dimensional workspace.
- Game: This window is what the end user will see. By default, the Game tab shares the same space as the Scene window.
- Hierarchy: All game objects in our scene will be listed here.
- Inspector: When an object is selected, information about it will be displayed here.
- Project: This is our Unity project folder. Consider it a structure of files and folders that we can use in our game.
Tip
To drag each window around individually, left-click and drag the name of the tab, and it will then snap into different locations.
My Game window is set to 1080, and because I don't have the luxury of a second screen, I've clicked its name tab (Game) and pulled it down in the bottom-right corner. The window is small, but as you can see at the top of the Game window, the scale is set to 1x, which means I have a full picture; nothing is hidden or cut out of view.
To check that we have the main camera's Transform properties reset to their default settings, make sure that Position, Rotation, and Scale are all set to 0. We can also reset the Transform option as follows:
- With the main camera selected in the Hierarchy window, click the three dots at the top-right corner of the Transform panel in the Inspector window, as shown in the following screenshot:
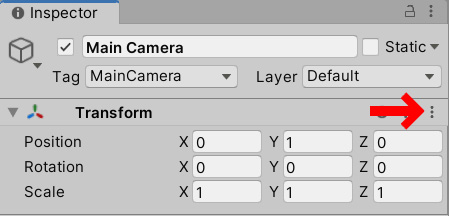
Figure 2.19 – The Transform settings cog location
- When the dropdown appears, click Reset.
Continuing with setting up our main camera, let's get rid of the landscape background in our Scene/Game window by changing its Background setting:
- Click the Main Camera in the Hierarchy window.
- In the Inspector window, we have the Camera component with a property called Clear Flags. Click the Skybox value.
- A dropdown will appear. Click Solid Color, as shown in the following screenshot:
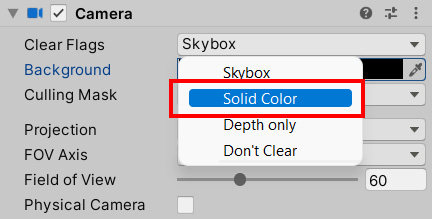
Figure 2.20 – Changing Background to a Solid Color
- We will now be presented with a blue background, which is less distracting.
- If you don't like blue, you can change it to any color in the Background property. I'm going to make mine black by changing the Red, Green, Blue, and Alpha (RGBA) values to R:
0, G:0, B:0, and A:255, as shown in the following screenshot:
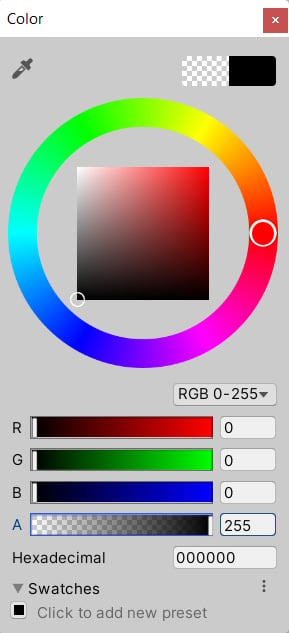
Figure 2.21 – Setting Background color values
Great, now let's move on to coding these properties for our main camera.
Updating our camera properties via a script
We now have our main camera's behavior set in our Scene. Next, we need to code this into a script so that whenever a scene is loaded, Unity will read the script and understand how the main camera should be set up.
Observing our framework again, let's see where the camera script should be placed:
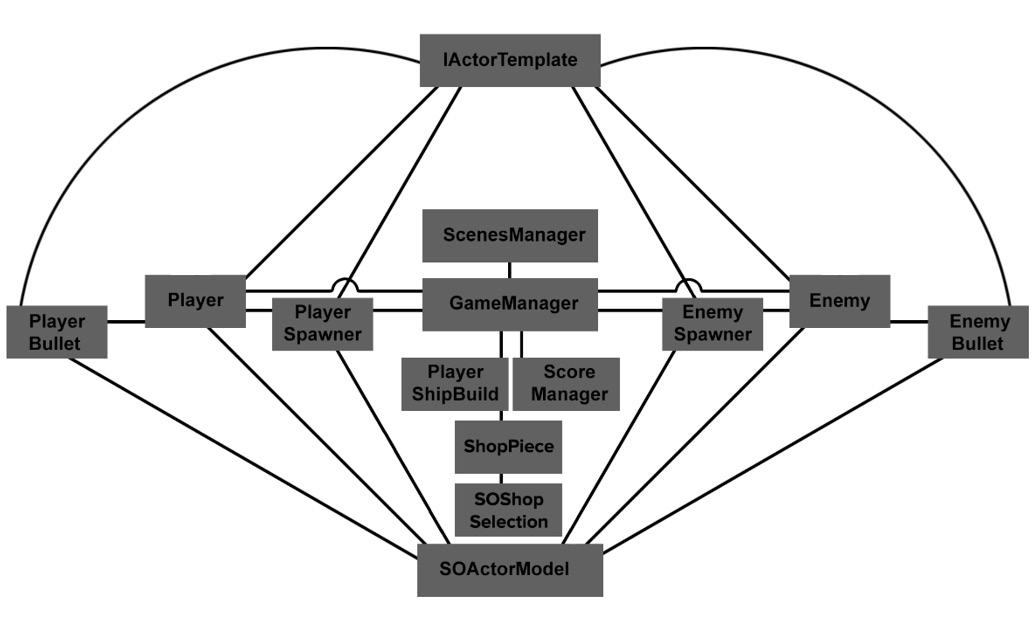
Figure 2.22 – Killer Wave UML
As you can see in the diagram, there is no reference to the camera, so should we make a script to support this? Arguably, the only reason to make a script based on the camera would be if the camera had a complex purpose filled with multiple properties and functions. The camera in our game, however, is put in place when the game starts. Later on, on the third level, the camera will move from left to right with a simple component script, but it doesn't hold any other complexity. It would, therefore, be more ideal to use the GameManager, as it only takes up a small role. If the game became bigger and the camera took on more of a role, then this might justify the camera having a class of its own. Others might disagree based on personal preference, but this is the approach we'll take.
Let's make the GameManager script, as follows:
- Create a script in the same way that we created a folder. Right-click the open space area in the Project window, and a dropdown will appear. Click Create | C# Script, as follows:
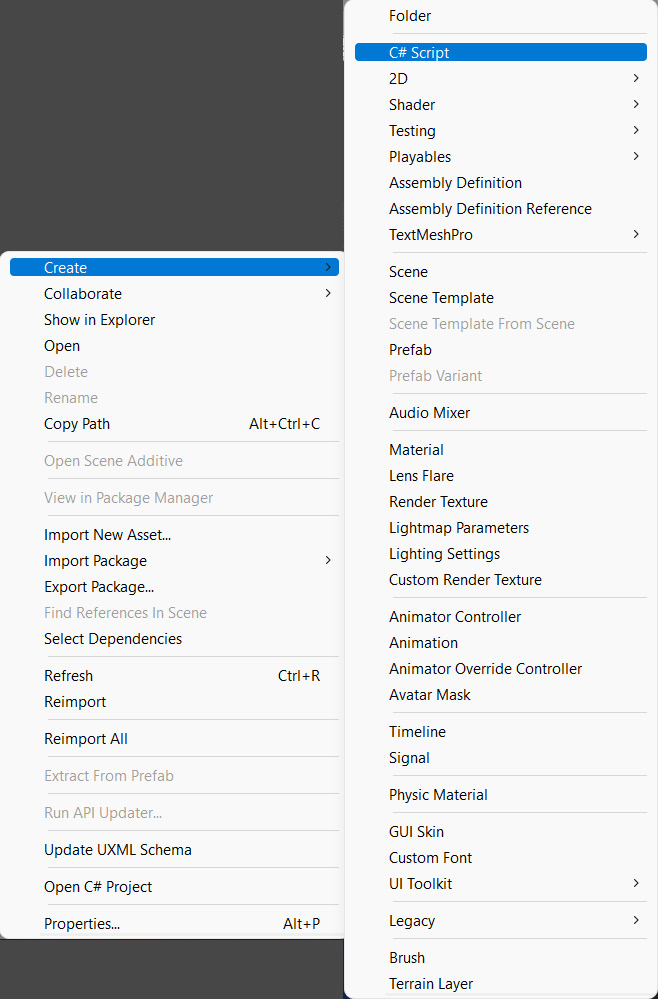
Figure 2.23– Creating a C# script in the Unity Editor
- The script appears with the title
NewBehaviourScript. We don't want to call it that, so type (in camel case)GameManager.What's camel casing?
Camel casing is a way to avoid spacing between words. This is fairly common with programming, as spaces are typically not welcomed for various reasons. Each new word starts with a capital letter, so in this case, the M in
GameManageris the hump of the camel. However, variables typically start with lowercase, as you will see shortly.
We now have our GameManager script. Notice how Unity is trying to be helpful by changing the icon to a silver cog because what we are doing is a recognized method with Unity:
Figure 2.24 – The GameManager icon
As we did when placing our three-dimensional models into the Model folder, move the GameManager into the Script folder.
Good. Now, before we open our script to code in it, we need to attach it to a game object in our scene so that when the scene runs, the script attached to the game object also runs.
To create our GameManager game object, we need to do the following:
- Right-click in an open space in the Hierarchy window.
- From the drop-down menu, select Create Empty.
- Right-click the newly created game object and select Rename from the drop-down menu.
- Rename this game object
GameManager. - Finally, with the
GameManagergame object still selected, click the Add Component button in the far-right Inspector window. - Type
GameManagerfrom the drop-down menu until you see theGameManagerscript and select it.Tip
Whenever we make an empty game object, we must be sure that all of its Transform property values are reset to their default values unless we are specifically changing them.
To reset a game object's Transform value, make sure that the game object we are resetting is selected. Click the metal cog at the top-right corner of the Inspector window, and then select Reset.
Double-click the GameManager script to open it up in your IDE (Visual Studio or whatever IDE you use), and then proceed as follows:
- Inside the
GameManagerscript, we will be faced with theUnityEnginelibrary being imported into our script to add extra functionality to Unity's own components:using UnityEngine; public class GameManager : MonoBehaviour {
Also in the preceding code, we have the name of our script along with MonoBehaviour being inherited yet again to add more functionality to our script. MonoBehaviour is also required if the game object that attaches to this script needs to be used in the Unity Editor.
Let's start adding some of our own code into our GameManager script.
- Create an empty method,
CameraSetup, and then run this method in theStartfunction:void Start() { CameraSetup(); } void CameraSetup() { } - Inside the
CameraSetupmethod, add a reference to the camera and set the position and angle of the camera to zero apart from its z axis. We'll setZto-300, which will move the camera back and ensure all game objects are in the shot:GameObject gameCamera = GameObject.FindGameObjectWithTag("MainCamera"); //Camera Transform gameCamera.transform.position = new Vector3(0,0,-300); gameCamera.transform.eulerAngles = new Vector3(0,0,0); - Next, we will change the properties of the camera within our
CameraSetupmethod://Camera Properties gameCamera.GetComponent<Camera>().clearFlags = CameraClearFlags.SolidColor; gameCamera.GetComponent<Camera>().backgroundColor = new Color32(0,0,0,255); }
This does the following:
- Removes the sky background and replaces it with a solid color
- Changes the solid color from the default blue to black
- Finally, save the script.
Now, you should have something like this:
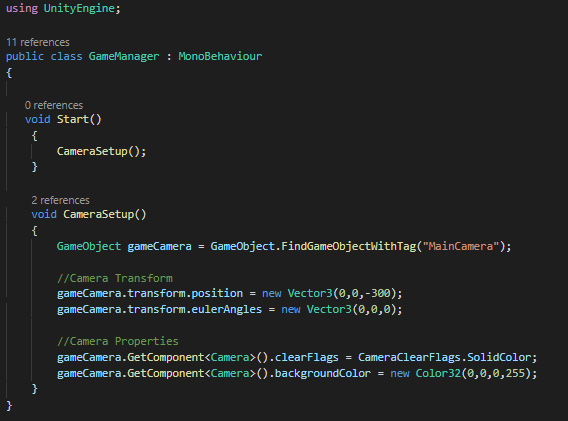
Figure 2.25– The current code layout for the GameManager script
Tip
If you would like to change other settings relating to the camera, you can find out about them at https://docs.unity3d.com/ScriptReference/Camera.html.
Press the Play button in the upper middle of the editor window, or by using the shortcut Ctrl + P (Command + P on the Mac). The following screenshot shows where the Play button is located:

Figure 2.26 – The Play, Pause, and Step button locations
With the scene in play mode, we can now check out the Main Camera game object's properties by doing the following:
- In the Hierarchy window, select Main Camera.
Observe the Inspector window in the next screenshot to see the following changes our script has made.
- In the Transform component of the Inspector window, we can see that the Position and Rotation properties are set to the same values set in our script (denoted by 1 in the following screenshot).
- In the Camera component of the Inspector window, we can see that the Clear Flags and Background values are also set to the same values set in our script (denoted by 2i and 2ii).
The following screenshot shows the Main Camera component properties being updated in Play mode:
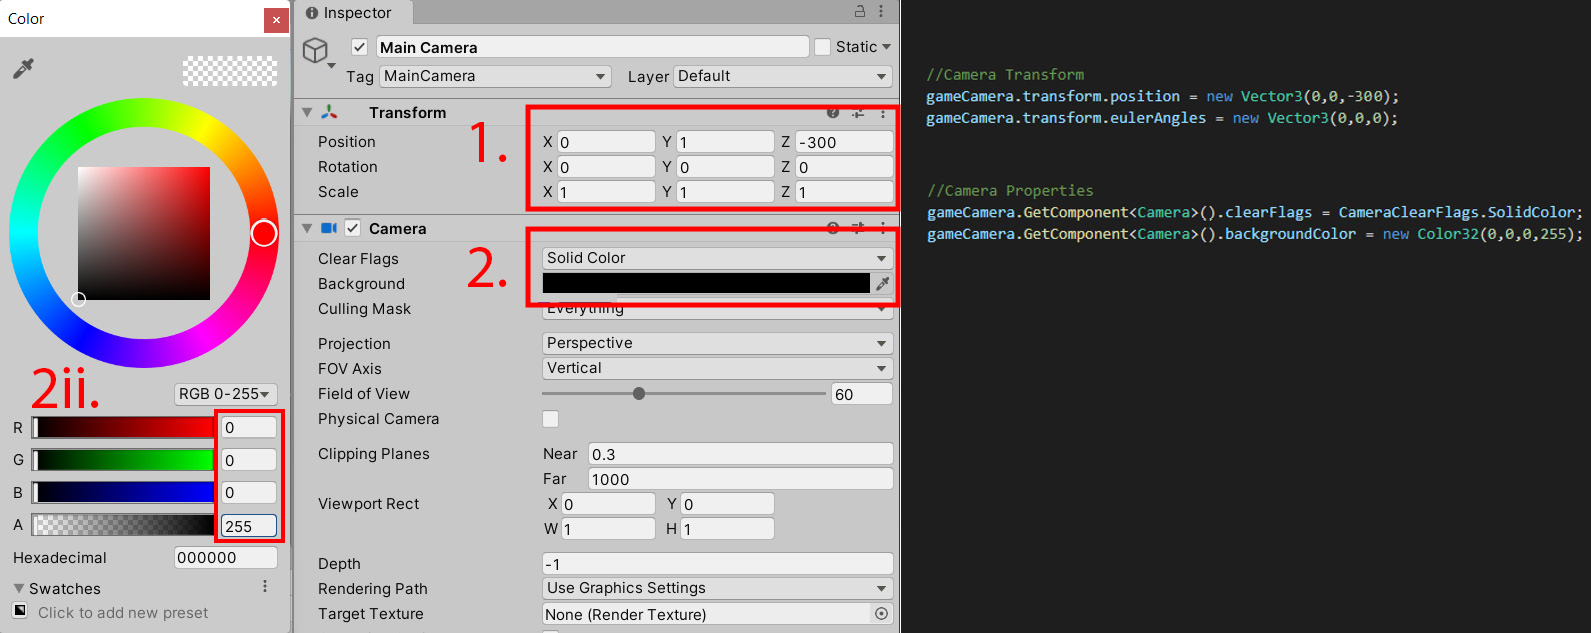
Figure 2.27 – Main Camera values changing with our script
Now, hopefully, our properties should be the same as what we have scripted (with no errors). If not, you will likely have an error message in the Console window. If there is an error, it will likely tell you what line the error is on. You can also double-click the error, and it will take you to the line the error is on.
To double-check everything has worked, change the Position and Rotation of the camera in the editor, and then press the Play button. The properties for the camera should now be set to our script's Position and Rotation properties.
At this point, while the editor is still playing, we can also make a prefab of the camera:
- Click and drag the Camera from the Hierarchy window down into the Project window, and we will generate a blue cube with the camera's name or an empty icon. Depending on the scale of our icons, the size of the icon can be altered by moving the slider shown in the following screenshot:
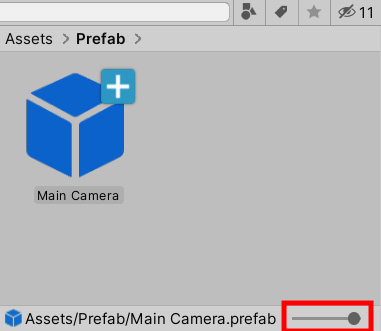
Figure 2.28 – The slider in the bottom right of the Project window zooms in and out of thumbnails
- Move this camera prefab into the
Prefabfolder.
You might be thinking, why didn't we just make a prefab of the camera in the first place instead of fiddling with its property settings in code? However, two key things are important here: firstly, we are studying for an exam that is likely to cover such properties; and secondly, you now know how to change these settings dynamically through code.
Tip
Another benefit to scripting Unity's components is that we can sometimes be offered more functionality than what is displayed in the Editor. For example, the Camera component has a layerCullDistances property that is only accessible via scripting. This can offer functionality such as skipping the rendering of smaller game objects in the far distance to increase a game's performance.
To read more about layerCullDistances, check the documentation at https://docs.unity3d.com/ScriptReference/Camera-layerCullDistances.html.
This brings this section to a close. So far, we have covered the following:
- Setting up a ratio for our game camera
- Setting up our Unity Editor with individual windows
- Changing the properties of our Camera component in the Unity Editor
- Repeating the changes we made to our camera in the
GameManagerscript - Adding our
GameManagerscript to our scene as a game object
As a programmer, the importance of being able to understand and change the settings in the Unity Editor (but also being able to do the same in code) can be expanded to other components that are in the editor. This is what we will do next, with a focus on directional light.
Setting up our light
As a default setup, each scene comes with a directional light, and currently, this is all we need to get going; ideally, we want the scene to be well lit.
With the directional light already present in the scene as the default light, select it in the Hierarchy window. In the Inspector window, set the Directional Light's Transform Rotation values to the following: X: 50, Y: -30, and Z: 0.
When we put our player ship into the scene, this will light it up well, as shown in the following screenshot:
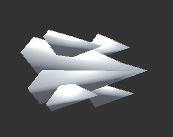
Figure 2.29 – The player ship lit up
Different Lights
Unity provides three different types of real-time lights. As well as the directional light we mentioned, it also provides a point light, which is like a 360° glow that we will cover in Chapter 4, Applying Art, Animation, and Particles. The third type of light is a spotlight or, as Unity refers to it, a spot. The spot can also have masks applied, so it can project images known as cookies.
For more information about the three types of lights, check out https://docs.unity3d.com/Manual/Lighting.html.
We can now make sure these settings stay in place by adding them to the GameManager script. We can also alter the light's color.
Updating our light properties via a script
In the GameManager, we will set the Transform Rotation values and change the color tint from a light yellow to a cold blue:
- Open the
GameManagerscript and enter the following method:void LightSetup() { GameObject dirLight = GameObject.Find("Directional Light"); dirLight.transform.eulerAngles = new Vector3(50,-30,0); dirLight.GetComponent<Light>().color = new Color32(152,204,255,255); } - Add
LightSetup();in the scope of theStartfunction. - Save the script.
The LightSetup method does three things:
- It grabs the light from the scene and stores it as a reference.
- It sets the rotation of the light with
EulerAngles. - Finally, it changes the light's color.
EulerAngles
eulerAnglesallows us to giveVector3coordinates instead ofQuaternionvalues.eulerAnglesmakes rotations less complicated to work with. More information abouteulerAnglescan be found at https://docs.unity3d.com/ScriptReference/Transform-eulerAngles.html.
That's all we need to do with our light. As with the camera, we can access the light and change its properties via a script.
We have become familiar with our light by changing its settings in the Unity Editor and the GameManager script. Next, we will set up our interface for the majority of our game objects.


