Play testing and the Game tab
The environment created thus far for the coin collection game has been assembled using only the mesh assets included with the native Prototyping package. My environment, as shown in Figure 1.40, features two main floor islands with houses, and the islands themselves are connected together by a stepping-stone bridge. Your version may be slightly different, and that's fine:

Figure 1.40: The scene created so far contains two island areas
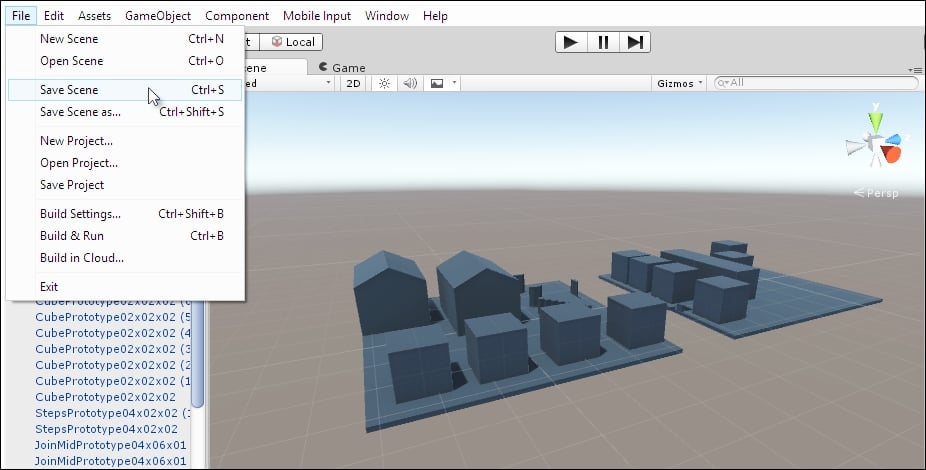
Overall, the scene is good work. It's well worth saving (remember to save regularly!). To save the scene, press Ctrl + S on the keyboard or else choose File | Save Scene from the application menu. See Figure 1.41.
If you're saving the scene for the first time, Unity displays a pop-up Save dialog, prompting you to name the scene descriptively (I called it Level_01):

Figure 1.41: Saving a scene
After saving the scene, it becomes scene asset of the project and appears in the Project panel. See Figure 1.42. This means that the scene is now a genuine and integral part of the project and not just a temporary work-in-progress as it was before. Notice also that saving a scene is conceptually different from saving a project. For example, the application menu has entries for Save Scene and Save Project. Remember, a Project is a collection of files and folders, including assets and scenes. A scene, by contrast, is one asset within the project and represents a complete 3D map that may be populated by other assets, such as meshes, textures, and sounds. Thus, saving a project saves the configuration between files and assets, including scenes. Saving a scene, in contrast, just retains the level changes within that specified scene.

Figure 1.42: Saved scenes are added as assets within your project
Tip
You can see from Figure 1.42 that I've saved my scene in a folder named Scenes. Folders can be created in your project by right-clicking on any empty area in the Project panel and choosing New Folder from the context menu, or else choose Assets | Create | Folder from the application menu. You can easily move and rearrange assets among folders by simply dragging and dropping them.
Now, the level, as it stands, contains nothing really playable. It's simply a static, lifeless, and non-interactive 3D environment made using the Editor tools. Let's correct this by making our scene playable, allowing the player to wander around and explore the world in first-person mode, controlled using the standard WASD keys on the keyboard. To achieve this, we'll add a first-person character controller to the scene. This is a ready-made asset included with Unity, which contains everything necessary to create quick and effective first-person controls. Open the Standard Assets | Characters | FirstPersonCharacter | Prefabs folder. Then drag and drop the FPSController asset from the Project panel in the scene. See Figure 1.43:

Figure 1.43: Adding an FPSController to the scene
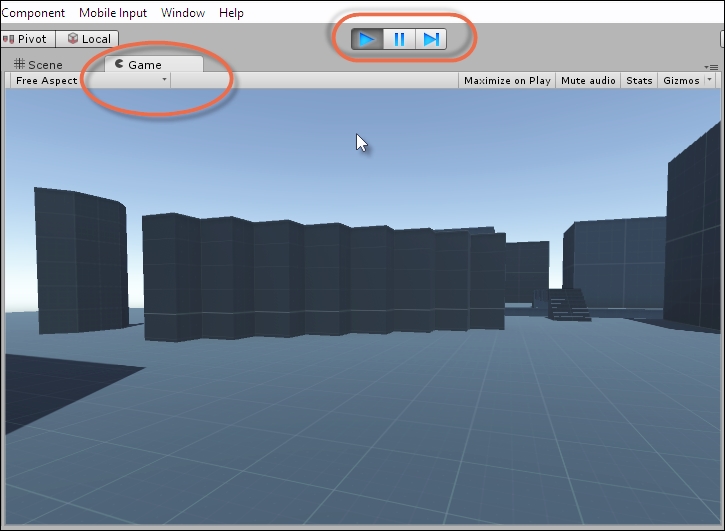
After adding the first-person controller, click on the play button from the Unity toolbar to play test the game in first-person mode. See Figure 1.44:

Figure 1.44: Unity scenes can be play tested by clicking on the play button from the toolbar
On clicking play, Unity typically switches from the Scene tab to the Game tab. As we've seen, the Scene tab is a director's-eye view of the active scene; it's where a scene is edited, crafted, and designed. In contrast, the Game tab is where the active scene is played and tested from the perspective of the gamer. From this view, the scene is displayed through the main game camera. While play mode is active, you can play test your game using the default game controls, provided that the Game tab is in focus.
The first-person controller uses the WASD keys on the keyboard and mouse movement controls head orientation. See Figure 1.45:

Figure 1.45: Play testing levels in the Game tab
Tip
You can switch back to the Scene tab while in play mode. You can even edit the scene and change, move, and delete objects there too! However, any and all scene changes made during play mode will automatically revert back to their original settings when play mode ends. This behavior is intentional. It lets you edit properties during gameplay to observe their effects and debug any issues without permanently changing the scene.
Congratulations! Your level should now be walkable in first-person mode. When completed, you can easily stop playback by clicking on the play button again or by pressing Ctrl + P on the keyboard. Doing this will return you to the Scene tab.
Tip
Unity also features a Toggle-Pause button to suspend and resume gameplay.
You should notice that, on playing the level with a first-person controller, you receive an information message printed to the Console window. By default, this window appears at the bottom of the Unity Editor, docked beside the Project panel. This window is also accessible manually from the application menu, Window | Console. The Console window is where all encountered errors or warnings are displayed for your review as well as information messages. Errors are printed in red and warnings in yellow, and information messages appear as a default grey. Sometimes, a message appears just once, or sometimes it appears many times repeatedly. See Figure 1.46:

Figure 1.46: The Console outputs information, warnings, and errors
As mentioned, the Console window outputs three distinct types of message: information, warnings, and errors. Information messages are typically Unity's way of making best practice recommendations or suggestions based on how your project is currently working. Warnings are slightly more serious and represent problems either in your code or scene, which (if not corrected) could result in unexpected behaviors and suboptimal performance. Finally, errors describe areas in your scene or code that require careful and immediate attention. Sometimes, errors will prevent your game from working altogether and sometimes errors happen at runtime and can result in game crashes or freezes. The Console window, therefore, is helpful because it helps us debug and address issues with our games. Figure 1.46 has identified an issue concerning duplicated audio listeners.
An audio listener is a component attached to a camera object. Specifically, each and every camera, by default, has an audio listener component attached. This represents an ear point, that is, the ability to hear sound within the scene from the position of the camera. Unfortunately, Unity doesn't support multiple active audio listeners in the same scene, which means that you can only hear audio from one place at any one time. This problem happens because our scene now contains two cameras, one that was added automatically when the scene was created, and the other that is included in the first-person controller. To confirm this, select the first-person controller object in the Hierarchy panel and click on the triangle icon beside its name to reveal more objects underneath, which are part of the first-person controller. See Figure 1.47:

Figure 1.47: Finding the camera on a first-person controller
Select the FirstPersonCharacter object, which is underneath the FPSController object (as shown in Figure 1.47). The FirstPersonCharacter object is a child of the FPSController, which is the parent. This is because FPSController contains or encloses the FirstPersonCharacter object in the Hierarchy panel. Child objects inherit the transformations of their parents. This means that as parent objects move and rotate, all transformations will cascade downwards to all children. From the Object Inspector, you can see that the object has an Audio Listener component. See Figure 1.48:

Figure 1.48: The FirstPersonController object contains an AudioListener component
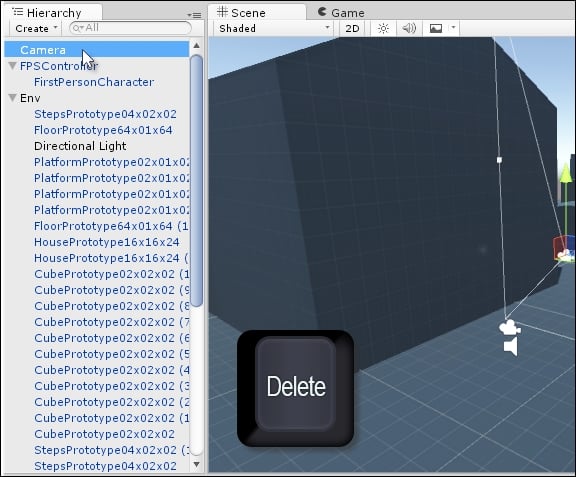
We could remove the Audio Listener component from the FPSController, but this would prevent the player hearing sound in first-person perspective. So, instead, we'll delete the original camera created by default in the scene. To do this, select the original camera object in the hierarchy and press Delete on the keyboard. See Figure 1.49. This removes the Audio Listener warning in the Console during gameplay. Now, give the game a play test!

Figure 1.49: Deleting a camera object


