In this recipe, we will create three radio button widgets. We will also add some code that changes the color of the main form, depending upon which radio button is selected.
Using radio button widgets
Getting ready
This recipe extends the previous recipe, Creating a check button with different initial states.
How to do it...
We add the following code to the previous recipe:
- Start with the GUI_checkbutton_widget.py module and save it as GUI_radiobutton_widget.py.
- Create three module-level global variables for the color names:
COLOR1 = "Blue"
COLOR2 = "Gold"
COLOR3 = "Red"
- Create a callback function for the radio buttons:
if radSel == 1: win.configure(background=COLOR1)
    elif radSel == 2: win.configure(background=COLOR2)
    elif radSel == 3: win.configure(background=COLOR3)
- Create three tk radio buttons:
rad1 = tk.Radiobutton(win, text=COLOR1, variable=radVar, value=1,
                      command=radCall)
rad2 = tk.Radiobutton(win, text=COLOR2, variable=radVar, value=2,
                      command=radCall)
rad3 = tk.Radiobutton(win, text=COLOR3, variable=radVar, value=3,
                      command=radCall)
- Use the grid layout to position them:
rad1.grid(column=0, row=5, sticky=tk.W, columnspan=3)
rad2.grid(column=1, row=5, sticky=tk.W, columnspan=3)
rad3.grid(column=2, row=5, sticky=tk.W, columnspan=3)
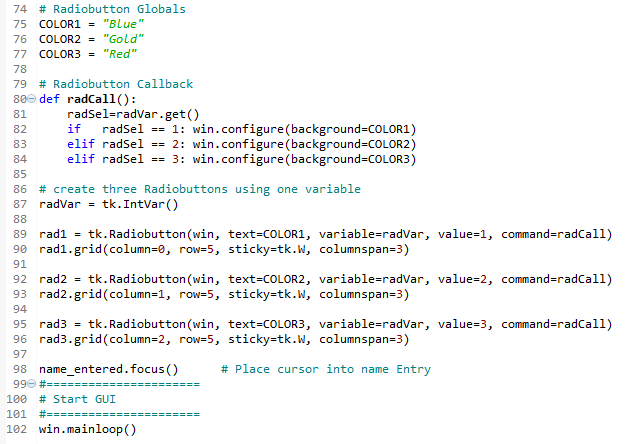
The preceding steps will finally produce the following code (GUI_radiobutton_widget.py):

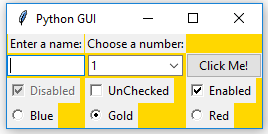
- Run the code. Running this code and selecting the radio button named Gold creates the following window:

Let's go behind the scenes to understand the code better.
How it works...
In lines 75-77, we create some module-level global variables that we will use in the creation of each radio button, as well as in the callback function that creates the action of changing the background color of the main form (using the win instance variable).
We are using global variables to make it easier to change the code. By assigning the name of the color to a variable and using this variable in several places, we can easily experiment with different colors. Instead of doing a global search and replace of the hardcoded string (which is prone to errors), we just need to change one line of code and everything else will work. This is known as the DRY principle, which stands for Don't Repeat Yourself. This is an OOP concept that we will use in the later recipes of the book.
Line 80 is the callback function that changes the background of our main form (win) depending upon the user's selection.
In line 87, we create a tk.IntVar variable. What is important about this is that we create only one variable to be used by all three radio buttons. As can be seen from the screenshot, no matter which radio buttons we select, all the others will automatically be unselected for us.
Lines 89 to 96 create the three radio buttons, assigning them to the main form, passing in the variable to be used in the callback function that creates the action of changing the background of our main window.
There's more...
Here is a small sample of the available symbolic color names that you can look up in the official TCL documentation at http://www.tcl.tk/man/tcl8.5/TkCmd/colors.htm:
| Name | Red | Green | Blue |
| alice blue | 240 | 248 | 255 |
| AliceBlue | 240 | 248 | 255 |
| Blue | 0 | 0 | 255 |
| Gold | 255 | 215 | 0 |
| Red | 255 | 0 | 0 |
Some of the names create the same color, so alice blue creates the same color as AliceBlue. In this recipe, we used the symbolic names Blue, Gold, and Red.
We've successfully learned how to use radio button widgets. Now, let's move on to the next recipe.


