Setting up PowerShell
PowerShell is a versatile scripting language that offers administrators a powerful toolset for managing Microsoft 365 environments. This recipe outlines the essential steps to prepare your PowerShell environment for administering Microsoft 365, ensuring you have the necessary setup to execute commands and scripts effectively.
Getting ready
Before beginning, ensure PowerShell is installed on your system. Most modern Windows versions come with PowerShell pre-installed. If you’re using a different operating system (OS) or need to install PowerShell, find guidance relevant to your OS at https://learn.microsoft.com/en-us/powershell/scripting/install/installing-powershell.
Verify your role as a Global Administrator or specific app administrator to ensure you have the necessary permissions to execute the task you wish to perform.
How to do it…
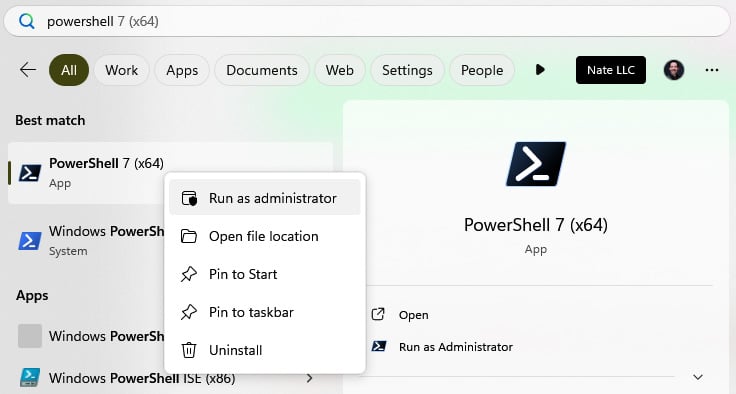
- Search for PowerShell in your Start menu, right-click on it, and select Run as administrator, as shown in Figure 1.4, to open a session with elevated rights.

Figure 1.4 – The Run as administrator option appears when right-clicking PowerShell from Start
- You’ll need the Microsoft Graph PowerShell Software Development Kit (SDK) to manage Microsoft 365. Run the following command to install the module:
Install-Module -Name Microsoft.Graph -Scope CurrentUser -AllowClobber
If prompted about an untrusted repository, type
Yand press Enter to continue.
Tip
The -AllowClobber parameter in PowerShell allows a new module, script, or command being installed to overwrite an existing command or alias that has the same name.
- Before executing management commands, establish a connection to your Microsoft 365 tenant with the following command:
Connect-MgGraph -Scopes "User.Read.All", "Group.ReadWrite.All"
This command initiates a sign-in process where you’ll enter your administrator credentials. If using multi-factor authentication (MFA), which is a best practice and mandatory for some admin locations, such as Azure and Entra, you’ll be prompted for additional verification. You’ll also be asked to consent to Graph API permissions for yourself, or on behalf of your organization.
- To confirm that your connection is active, try retrieving a list of users or another simple query to ensure responses from the Microsoft 365 services:
Get-MgUser
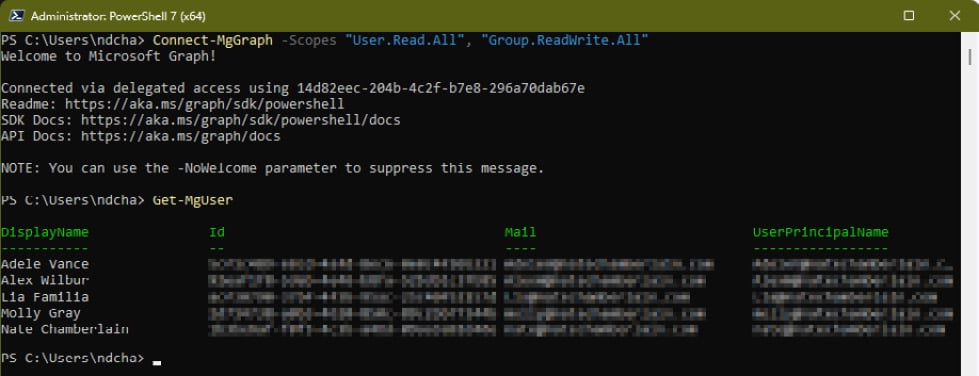
Figure 1.5 shows the result of this cmdlet, displaying a list of your users, their GUIDs, email addresses, and user principal names.

Figure 1.5 – Result of Steps 3 and 4, signing in and retrieving a list of your users
How it works…
With the evolution of Microsoft 365, PowerShell now leverages the Microsoft Graph PowerShell SDK for a more integrated and robust management experience, replacing the older MSOnline module. PowerShell 7 or later is recommended when working with Graph PowerShell SDK.
By installing the Microsoft Graph PowerShell SDK and connecting to Microsoft 365 using Connect-MgGraph, you gain access to a wide range of cmdlets designed for the efficient management of users, groups, and services within your organization. This setup differs from the older MSOnline module by providing a direct interface with Microsoft Graph, which is the unified API endpoint for Microsoft services.
See Chapter 3, Administering Microsoft 365 with PowerShell, to dive into the specific administrative actions you can now perform with PowerShell.
There’s more…
The Connect-MgGraph command supports MFA by default, simplifying the process of connecting to Microsoft 365 in secure environments.
The -Scopes parameter in the Connect-MgGraph command can be adjusted to match the specific permissions your scripts require to execute their tasks within Microsoft 365.
See also
- Learn more about Microsoft Graph PowerShell at https://learn.microsoft.com/en-us/powershell/microsoftgraph/overview


