Managing costs
Because Azure is a Pay As You Go service, and due to the range and power of the available components, it can be easy to lose sight of costs.
Fortunately, Azure provides several tools to help monitor and alert you on your ongoing and forecast spend:
- Navigate to the Azure portal by opening https://portal.azure.com.
- In the left-hand menu, select or search for Subscriptions.
- Select the subscription you wish to view.
The overview page of a subscription shows you a high-level view of your current spend, broken down by your most costly resources, and a forecast based on currently deployed infrastructure, as shown here:

Figure 1.29 – Example costs dashboard
For a more detailed analysis, you can use the Cost Analysis tools.
Cost Analysis
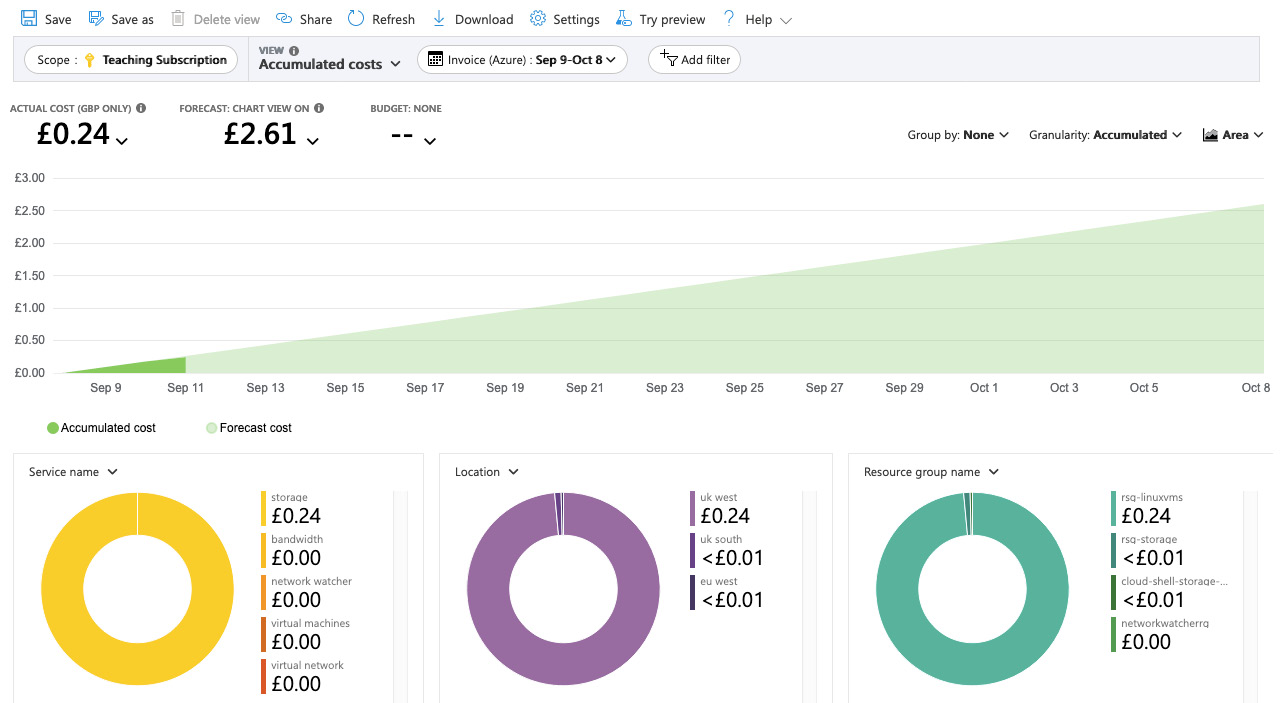
In the Subscription blade, under Cost Management, click the Cost Analysis left-hand menu option. This view shows a more detailed and customizable set of charts. As shown in the following screenshot, the default view provides a breakdown by Service name, Location, and Resource group name:

Figure 1.30 – Cost analysis details
This view can be configured as per your requirements using a mixture of the filtering and selection options in the top menu. You can view costs as charts or text and set timespans or grouping options.
As an example of what can be achieved through this view, we shall create a monthly cost per resource table that can then be exported to CSV:
- From the current Costs Analysis View, click the View menu, which by default will be Accumulated costs. The following screenshot shows the available options:

Figure 1.31 – Example subscription costs
- Change the view to Cost by Resource.
- Now select the Granularity option and change it from None to Monthly:

Figure 1.32 – Changing the Granularity to Monthly
- From the top menu, click Download, choose your export format, such as
CSV, then click Download data.
Now that we have created a monthly cost per resource table, let’s take a look at budgets.
Budgets
Being able to view your current and forecast spend is, of course, important, but even more useful is the ability to alert you when thresholds are met. For this, we can use Budgets:
- From the current Subscription blade, click the Budgets option in the left-hand menu.
- Click Add on the top menu.
- Set the name, for example,
MonthlyBudget. - Set a budget amount, for example,
30. The budget amount is specified in your local currency. - Click Next.
- Set an alert as an amount of your monthly budget. For example, if you want to be alerted when you have spent 80% of your budget, enter
80. - Assign an action group if you set one up previously.
- Enter a recipient email for whoever should be alerted when the budget alert is reached.
- Click Create.
Setting budgets doesn’t prevent you from overspending, but it will alert you when your set thresholds are met.
Summary
In this chapter, we covered the Implement and Monitor Azure Infrastructure objective. We covered the various aspects of Azure Monitor and showed how you can use metrics to monitor all of your Azure resources and alerts to get notified when certain things are happening with your Azure resources.
We saw how Log Analytics and created queries so that we can get valuable data out of the logs. We looked at how Network Watcher can help you identify and resolve connectivity problems between devices. We covered how Activity Logs can highlight and notify you of security events. Finally, we also looked at how we can use the cost reporting and alerting features to help control costs.
In the next chapter, we will cover the second part of this exam objective. We will learn how to create and configure storage accounts.


