Razor components
Blazor WebAssembly is a component-driven framework. Razor components are the fundamental building blocks of a Blazor WebAssembly application. They are classes that are implemented using a combination of C#, HTML, and Razor markup. When the web app loads, the classes get downloaded into the browser as normal .NET assemblies (DLLs).
Important note
In this book, the terms Razor component and component are used interchangeably.
Using components
HTML element syntax is used to add a component to another component. The markup looks like an HTML tag where the name of the tag is the component type.
The following markup in the Pages\Index.razor file of the Demo project that we will create in this chapter will render a SurveyPrompt instance:
<SurveyPrompt Title="How is Blazor working for you?" />
The preceding SurveyPrompt element includes an attribute parameter named Title.
Parameters
Component parameters are used to make components dynamic. Parameters are public properties of the component that are decorated with either the Parameter attribute or the CascadingParameter attribute. Parameters can be simple types, complex types, functions, RenderFragments, or event callbacks.
The following code for a component named HelloWorld includes a parameter named Text:
HelloWorld.razor
<h1>Hello @Text!</h1>
@code {
    [Parameter] public string Text { get; set; }
}
To use the HelloWorld component, include the following HTML syntax in another component:
<HelloWorld Text="World" />
In the preceding example, the Text attribute of the HelloWorld component is the source of the Text parameter. This screenshot shows the results of using the component as indicated:

Figure 2.1 – HelloWorld component
A component can also receive parameters from its route or a query string. You will learn more about the different types of parameters later in this chapter.
Naming components
The name of a Razor component must be in title case. Therefore, helloWorld would not be a valid name for a Razor component since the h is not capitalized. Also, Razor components use the RAZOR extension rather than the CSHTML extension that is used by Razor Pages.
Important note
Razor components must start with a capital letter.
Component life cycle
Razor components inherit from the ComponentBase class. The ComponentBase class includes both asynchronous and synchronous methods used to manage the life cycle of a component. In this book, we will be using the asynchronous versions of the methods since they execute without blocking other operations. This is the order in which the methods in the life cycle of a component are invoked:
SetParameterAsync: This method sets the parameters that are supplied by the component's parent in the render tree.OnInitializedAsync: This method is invoked after the component is first rendered.OnParametersSetAsync: This method is invoked after the component initializes and each time the component re-renders.OnAfterRenderAsync: This method is invoked after the component has finished rendering. This method is for working with JavaScript since JavaScript requires the Document Object Model (DOM) elements to be rendered before they can do any work.
Component structure
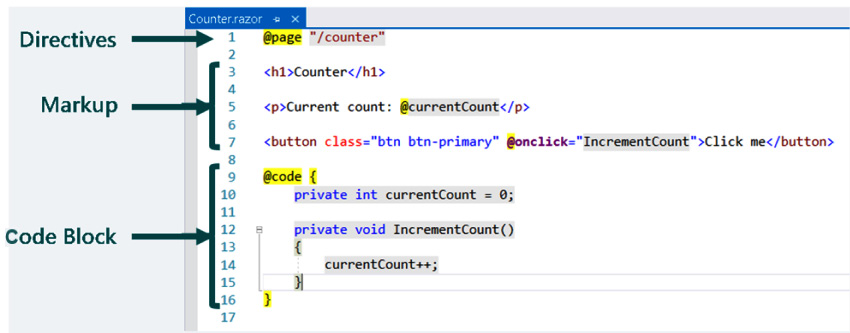
The following diagram shows code from the Counter component of the Demo project that we will create in this chapter:

Figure 2.2 – Component structure
The code in the preceding example is divided into three sections:
- Directives
- Markup
- Code Block
Each of the sections has a different purpose.
Directives
Directives are used to add special functionality, such as routing, layout, and dependency injection. They are defined within Razor and you cannot define your own directives.
In the preceding example, there is only one directive used – the @page directive. The @page directive is used for routing. In this example, the following URL will route the user to the Counter component:
/counter
A typical page can include many directives at the top of the page. Also, many pages have more than one @page directive.
Most of the directives in Razor can be used in a Blazor WebAssembly application. These are the Razor directives that are used in Blazor, in alphabetical order:
@attribute: This directive adds a class-level attribute to the component. The following example adds the[Authorize]attribute:@attribute [Authorize]@code: This directive adds class members to the component. In the example, it is used to distinguish the code block.@implements: This directive implements the specified class.@inherits: This directive provides full control of the class that the view inherits.@inject: This directive is used for dependency injection. It enables the component to inject a service from the dependency injection container into the view. The following example injectsHttpClientdefined in theProgram.csfile into the component:@inject HttpClient Http@layout: This directive is used to specify a layout for the Razor component.@namespace: This directive sets the component's namespace. You only need to use this directive if you do not want to use the default namespace for the component. The default namespace is based on the location of the component.@page: This directive is used for routing.@typeparam: This directive sets a type parameter for the component.@using: This directive controls the components that are in scope.
Markup
This is HTML with Razor syntax. The Razor syntax can be used to render text and allows C# to be used as part of the markup. We will cover more about Razor syntax later in this chapter.
Code block
The code block contains the logic for the page. It begins with the @code directive. By convention, the @code directive is at the bottom of the page. It is the only file-level directive that is not placed at the top of the page.
The code block is where we add C# fields, properties, and methods to the component. Later in this chapter, we will move the code block to a separate code-behind file.
Razor components are the building blocks of a Blazor WebAssembly application. They are easy to use since they are simply a combination of HTML markup and C# code. In the next section, we will see how routing is used to navigate between each of the components.


