Adding SD and WAV file libraries to your Arduino sketch
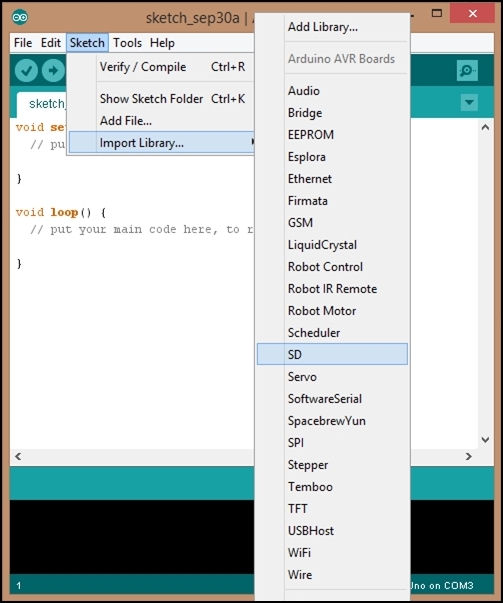
To allow the sound effects machine to play WAV files, additional software resources are needed. The two important software resources required for the sound effects machine to work properly are the <SD.h> and <TMRpcm.h> libraries. The
SD (San-Disk) library is required for read / write operations from an SD part. The Arduino Integrated Development Environment (IDE) has the SD resource as part of its software library.

With the SD library included in the Arduino sketch, as shown next, the available software resource allows the microcontroller to talk to the actual SD card using a module or breakout board. The pin allowing the Arduino to talk to the SD card module or breakout board is the SS or CS pin:
#include <SD.h>   // need to include the SD library

#define SD_ChipSelectPin 10  //using digital pin 10 on Arduino 328

if (!SD.begin(SD_ChipSelectPin)) {  // see if the card is present and can be initialized:
  return;   // don't do anything more if not
}
Depending on the SD module or breakout board manufacturer, the SS or CS pin assignment on the Arduino may vary. Therefore, consult the manufacturer's datasheet for the appropriate Arduino pin assignment. With the appropriate Arduino pin numbers assigned, another file to include in the Arduino sketch is the TMRpcm library.
The TMRpcm library installation
The TMRpcm is a software library used for playing PCM/WAV files on Arduino. The Arduino SD library is used to communicate with an SD card to read data, such as WAV files. The WAV files can be accessed using the TMRpcm library so that they may be heard through a speaker wired to the Arduino. Perform the following steps to install the TMRpcm library:
- To obtain the
TMRpcmlibrary to use it in the sound effects machine project, there is a GitHub website—https://github.com/TMRh20/TMRpcm/wiki.
- Scrolling down on the web page will provide a link to the Arduino.cc website for the library installation instructions. Also, the
TMRpcmzipped file is located above this link and can be downloaded on your desktop, pc, or notebook computer's hard drive.
- After the installation has been completed, the
TMRpcmfile will be included in the Arduino's IDE library.
- With the
TMRpcmfile included in the Arduino IDE library, the following line of code can be added to the sound effects machine sketch:#include <SD.h> // need to include the SD library #define SD_ChipSelectPin 10 //using digital pin 4 on Arduino nano 328 #include <TMRpcm.h> // also need to include this library... #include <SPI.h>
- Also included with the sketch is the
<SPI.h>file for connecting the SD module or breakout board to the Arduino. With theTMRpcmlibrary added to the Arduino sketch, the WAV file audio content can be heard using a simple transistor amplifier, as shown in the following image:
- The circuit schematic can be used to wire the transistor amplifier to the Arduino, as shown in the next diagram:

The 2N3904 NPN transistor has sufficient gain or volume potential (hfe 100 typical) to drive an 8 ohm speaker. The hfe is an electrical symbol parameter found on transistor or audio amplifier integrated circuit datasheets. The unitless number refers to the current gain for audio amplifiers and transistors to sufficiently drive an electromechanical load wired to them. For amplifiers, in particular, sometimes it refers to the amplification factor of increasing an input signal applied to the transistor or IC amplifier. If a higher audio volume is desired, an LM386 power amplifier IC can easily be substituted for the simple transistor circuit.
- With the
<TMRpcm.h>library included in the Arduino sketch, the following lines of code allow the WAV files to be heard through the speaker driven by the transistor amplifier:TMRpcm tmrpcm; // create an object for use in this sketch int SW1; int SW2; int SW3; int SW4; void setup(){ pinMode(5,INPUT); //Define A0 as digital input. pinMode(6,INPUT); //Define A1 as digital input. pinMode(7,INPUT); //Define A2 as digital input. pinMode(8,INPUT); //Define A3 as digital input. tmrpcm.speakerPin = 9; //11 on Mega, 9 on Uno, Nano, etc if (!SD.begin(SD_ChipSelectPin)) { // see if the card is present and can be initialized: return; // don't do anything more if not } tmrpcm.volume(7); tmrpcm.play("1.wav"); //the sound file "1" will play each time the Arduino powers up, or is reset } void loop(){ SW1=digitalRead(5); SW2=digitalRead(6); SW3=digitalRead(7); SW4=digitalRead(8); if (SW1 == LOW) { //if SW1 pressed then play file "6.wav" tmrpcm.play("6.wav"); } else if(SW2 == LOW){ //if SW2 pressed then play file "4.wav" tmrpcm.play("4.wav"); } else if(SW3 == LOW){ //if SW3 pressed then play file "5.wav" tmrpcm.play("5.wav"); } else if(SW4 == LOW){ //if SW4 pressed then play file "3.wav" tmrpcm.play("3.wav"); } }
As you can see, this code follows the traditional coding format for programming an Arduino. After uploading the sketch to the Arduino, 1.wav will be heard through the speaker for a few seconds. This initial tone heard upon resetting the Arduino alerts you that the sound effects machine is ready to use. By pressing each of the pushbutton tactile switches, a unique sound will be heard through speaker. If an automatic approach is desired, a random function can easily be programmed for the sound effects machine.
Adding a random function to play sounds automatically
To allow the sound effects machine to select various sounds automatically, the random function can be used. The description for the random function is given on the Arduino.cc website:

The key concept behind this programming instruction is to set a maximum number for the random function generator. This maximum number will prevent the random function from generating values not exceeding the set maximum limit. For example, random(300) will allow the generation of numbers ranging from 0 to 300 to be produced in a non-sequential matter. With this function, the sound effects machine will select WAV files automatically to play, and they can be heard through the simple transistor amplifier-speaker circuit.
To test this random generator function, type the following sketch onto the text editor of the Arduino IDE:
long randNumber;
void setup(){
  Serial.begin(9600);
}

void loop(){
  randNumber = random(5); // set max random number
  Serial.println(randNumber); //print random number on Serial Monitor
  delay(1000); //wait 1 sec between printing random numbers
}
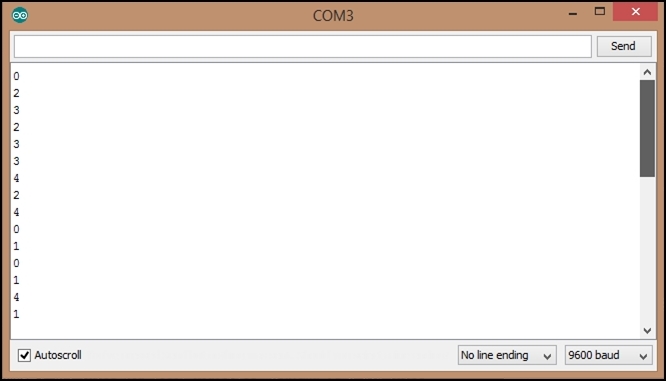
Attach an Arduino to the desktop pc or notebook computer and upload the sketch to it. Next, open the serial monitor and notice the numbers being displayed on the screen. The numbers generated will range between 0 to 5 on the serial monitor. Modeling this function on the Arduino IDE allows a better understanding of how the concept of selecting sounds from the SD card randomly is feasible. Try out different values for the random function parameter and watch the results on the serial monitor.
The next phase of the sound effects machine modification project will consist of taking sections of the random function and adding them to the original sketch. The technique used in this modification method is called software remixing. This software remixing method allows Proof of Concept-embedded devices to be rapidly developed and tested. Again, our concept is to provide a hands-free sound effects machine for selecting WAV files from an SD card.

Type the following sketch onto the IDE text editor and upload the code to the Arduino:
#include <SD.h>                 // need to include the SD library
#define SD_ChipSelectPin 11b  //using digital pin 4 on Arduino nano 328
#include <TMRpcm.h>           //  also need to include this library...
#include <SPI.h>
long randNumber;

TMRpcm audio;   // create an object for use in this sketch

void setup(){
  audio.speakerPin = 9; //11 on Mega, 9 on Uno, Nano, etc

  if (!SD.begin(SD_ChipSelectPin)) {  // see if the card is present and can be initialized:
    return;   // don't do anything more if not
  }
  audio.volume(7);
  audio.play("1.wav"); //the sound file "1" will play each time the Arduino powers up, or is reset
}

void loop(){
  randNumber = random(5); // set max random number

  if (randNumber == 5){ // if number is 5 play file ""6.wav"
    audio.play("6.wav");
    delay(5000);

  } else if(randNumber == 4){ // if number is 4 play file "4.wav"
      audio.play("4.wav");
      delay(5000);

  } else if(randNumber == 3){ // if number is 3 play file "5.wav"
    audio.play("5.wav");
    delay(5000);

  } else if(randNumber == 2){ // if number is 2 play file "3.wav"
    audio.play("3.wav");
    delay(5000);

  } else if (randNumber == 0){ // if number is 0 play "1.wav"
    audio.play("1.wav");
    delay(5000);
  } else if (randNumber == 1){ // if number is 1 play "2.wav"
    audio.play("2.wav");
    delay(5000);
  }

}
The WAV files will play randomly, based on the number stored in the randNumber variable. The delay(5000) instruction will allow the selected sound to play for 5 sec. An added feature of this sketch is that new files can be added to the SD card and can also be selected on the basis of the assigned number chosen by the else if statement. If additional sounds are added with the random (n) instruction, they will be adjusted to accommodate the number of new WAV files stored on the SD card. Also, to see which WAV files have been selected, the serial monitor can be modified to include the new lines of code.
In addition, the actual WAV file name can be displayed as the machine plays the SD card audio content using the serial monitor. A few additional lines of code can be included to the sketch shown earlier. The new changes to the Random Function WAV code are given here:
#include <SD.h>                  // need to include the SD library
#define SD_ChipSelectPin 11  //using digital pin 4 on Arduino nano 328
#include <TMRpcm.h>           //  also need to include this library...
#include <SPI.h>
long randNumber;

TMRpcm audio;   // create an object for use in this sketch

void setup(){
  Serial.begin(9600);
  audio.speakerPin = 9; //11 on Mega, 9 on Uno, Nano, etc

  if (!SD.begin(SD_ChipSelectPin)) {  // see if the card is present and can be initialized:
    return;   // don't do anything more if not
  }
  audio.volume(7);
  audio.play("1.wav"); //the sound file "1" will play each time the Arduino powers up, or is reset
}

void loop(){
  randNumber = random(5); // set max random number

  if (randNumber == 5){ // if number is 5 play file "6.wav"
    audio.play("6.wav");
    Serial.println("Playing 6.wav");
    delay(5000);

  } else if(randNumber == 4){ // if number is 4 play file "4.wav"
    audio.play("4.wav");
    Serial.println("Playing 4.wav");
    delay(5000);

  } else if(randNumber == 3){ // if number is 3 play file "5.wav"
    audio.play("5.wav");
    Serial.println("Playing 5.wav");
    delay(5000);

  } else if(randNumber == 2){ // if number is 2 play file "3.wav"
    audio.play("3.wav");
    Serial.println("Playing 3.wav");
    delay(5000);

  } else if (randNumber == 0){ // if number is 0 play "1.wav"
    audio.play("1.wav");
    Serial.println("Playing 1.wav");
    delay(5000);
  } else if (randNumber == 1){ // if number is 1 play "2.wav"
    audio.play("2.wav");
    Serial.println("Playing 2.wav");
    delay(5000);
  }

}
Tip
Downloading the example code
You can download the example code files from your account at http://www.packtpub.com for all the Packt Publishing books you have purchased. If you purchased this book elsewhere, you can visit http://www.packtpub.com/support and register to have the files e-mailed directly to you.
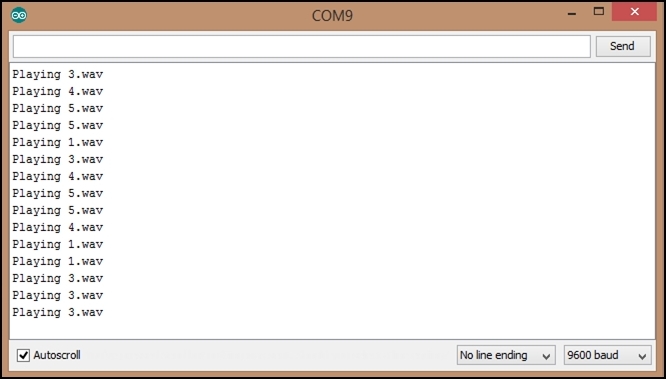
Type the new sketch onto the text editor of the Arduino's IDE. Upload the sketch to the USB connected Arduino and open the serial monitor. As sounds are playing through the speaker, the WAV file names will be displayed on the serial monitor:

The serial monitor provides a user friendly visual display to watch the WAV sound files as they are being played. Also, this monitor can serve as a software debugging tool by providing WAV file data as the code is being executed. If a particular file is not providing sound, the serial monitor will validate the absence of the data on the SD card quite easily.


