Installing SFML 2.2
There are two ways to get the SFML library. The easier way is to download the prebuilt version, which can be found at http://sfml-dev.org/download/sfml/2.2/, but ensure that the version you download is compatible with your compiler.
The second option is to compile the library yourself. This option is preferable to the previous one to avoid any trouble.
Building SFML yourself
Compiling SFML is not as difficult as we might think, and is within the reach of everyone. First of all, we will need to install some dependencies.
Installing dependencies
SFML depends on a few libraries. Before starting to compile it, make sure that you have all the dependencies installed along with their development files. Here is the list of dependencies:
pthreadopenglxlibxrandrfreetypeglewjpegsndfileopenal
Linux
On Linux, we will need to install the development versions of each of these libraries. The exact names of the packages depend on each distribution, but here is the command line for Debian:
sudo apt-get install libglu1-mesa-dev freeglut3-dev mesa-common-dev libxrandr-dev libfreetype6-dev libglew-dev libjpeg-dev libsndfile1-dev libopenal-dev -y
Other operating systems
On Windows and Mac OS X, all the needed dependencies are provided directly with SFML, so you don't have to download or install anything. Compilation will work out of the box.
Compilation of SFML
As mentioned previously, the SFML compilation is really simple. We just need to use CMake, by following these steps:
- Download the source code at http://sfml-dev.org/download/sfml/2.2/ and extract it.
- Open CMake and specify the source code directory and the build directory. By convention, the build directory is called
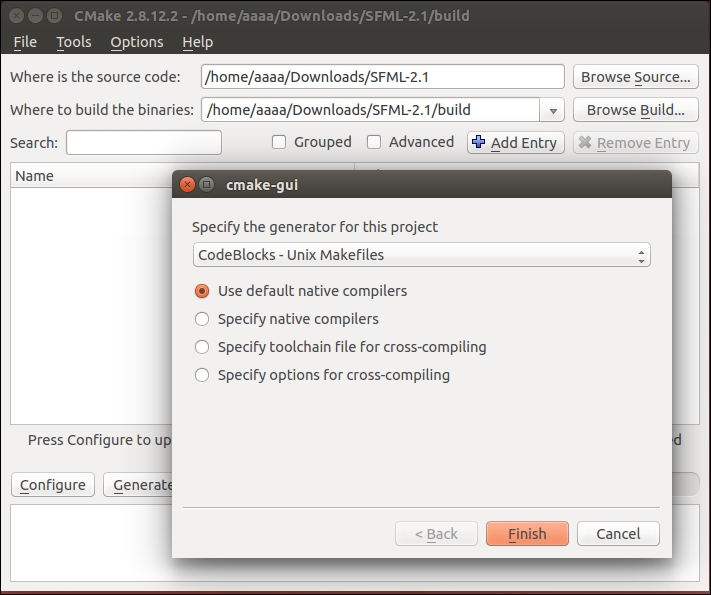
buildand is at the root level of the source directory. - Press the Configure button, and select Code::Blocks with the right option for your system.
Under Linux, choose Unix Makefiles. It should look like this:
Under Windows, choose MinGW Makefiles. It should look like this:

- And finally, press the Generate button. You'll have an output like this:
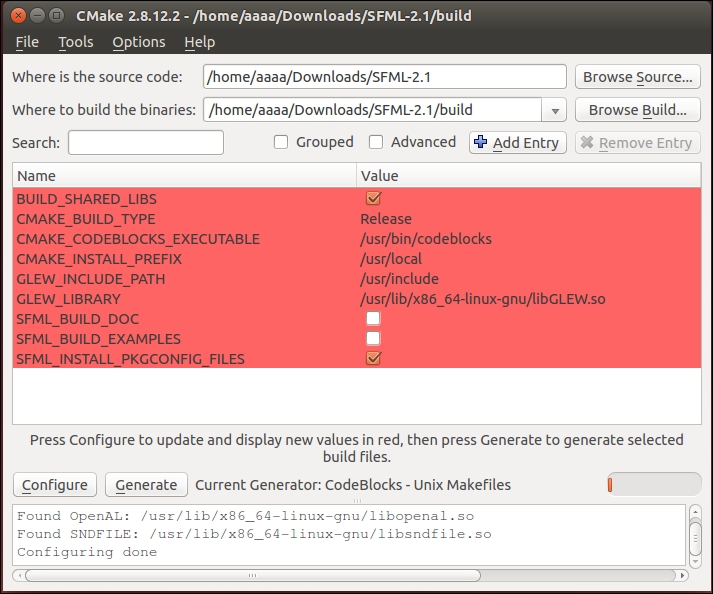
Now the Code::Blocks file is built, and can be found in your build directory. Open it with Code::Blocks and click on the Build button. All the binary files will be built and put in the build/lib directory. At this point, you have several files with an extension that depend on your system. They are as follows:
libsfml-systemlibsfml-windowlibsfml-graphicslibsfml-audiolibsfml-network
Each file corresponds to a different SFML module that will be needed to run our future games.
Now it's time to configure our system to be able to find them. All that we need to do is add the build/lib directory to our system path.
Linux
To compile in Linux, first open a terminal and run the following command:
cd /your/path/to/SFML-2.2/build
The following command will install the binary files under /usr/local/lib/ and the headers files in /usr/local/include/SFML/:
sudo make install
By default, /usr/local/ is in your system path, so no more manipulations are required.
Windows
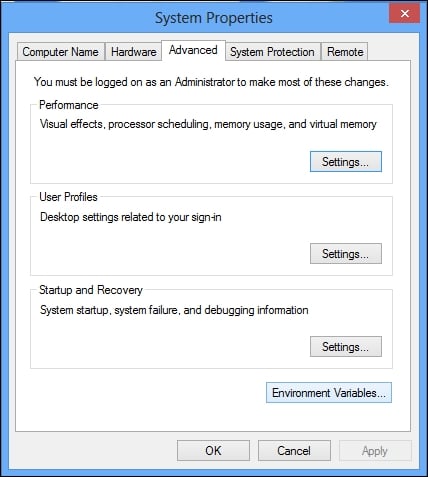
On Windows, you will need to add to your system path, the /build/lib/ directory, as follows:
- Go to the Advanced tab in System Properties, and click on the Environment Variables button:
- Then, select Path in the System variables table and click on the Edit... button:

- Now edit the Variable value input text, add
;C:\your\path\to\SFML-2.2\build\lib, and then validate it by clicking on OK in all the open windows: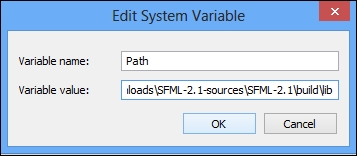
At this point, your system is configured to find the SFML dll modules.
Code::Blocks and SFML
Now that your system is configured to find the SFML binary files, it's time for us to configure Code::Blocks and finally test whether everything is fine with your fresh installation. To do so, follow these steps:
- Run Code::Blocks, go to File | New | Project, and then choose Console Application.
- Click on GO.
- Choose C++ as the programming language, and follow the instructions until the project is created. A default
main.cppfile is now created with a typicalHello worldprogram. Try to build and run it to check whether your compiler is correctly detected.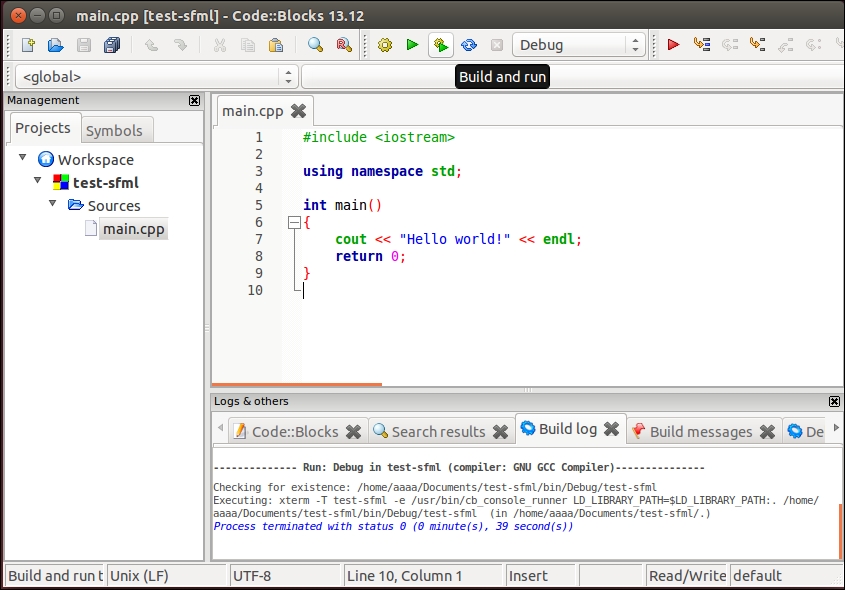
If everything works correctly, you will have a new window created that has a Hello world! message, as follows:

If you have this output, everything is fine. In any other case, make sure you have followed all the steps for the installations.
Now we will configure Code::Blocks to find the SFML library, and ask it to link with our program at the end of the compilation. To do this, perform the following steps:
- Go to Project | Build options and select your project at the root level (not debug or release).
- Go to Search directories. Here we have to add the path where the compiler and the linker can find the SFML.
- For the compiler, add your SFML folder.
- For the linker, add the
build/libfolder, as follows: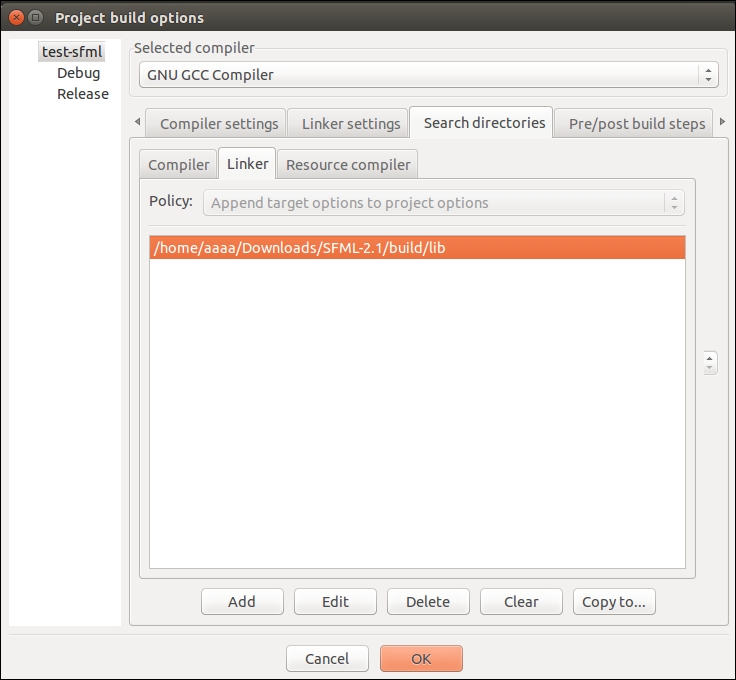
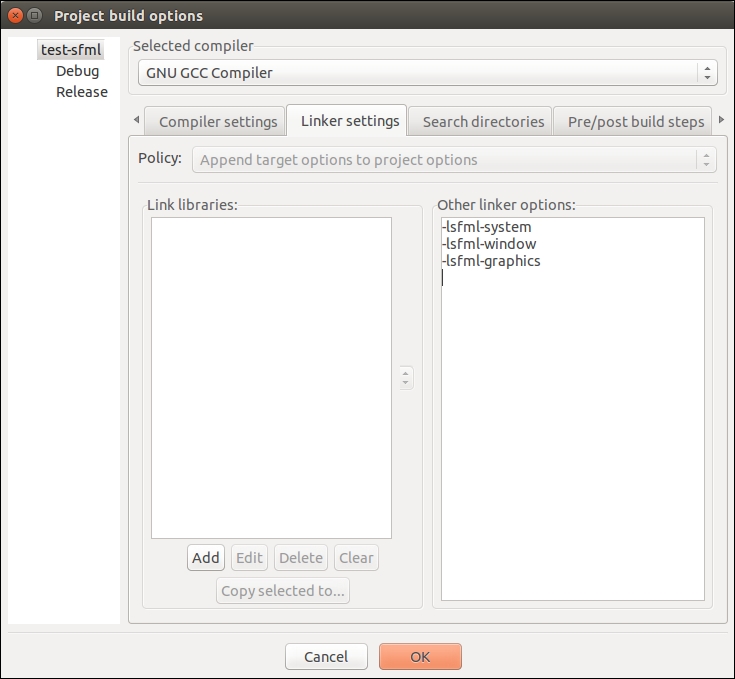
Now we need to ask the linker which libraries our project needs. All our future SFML projects will need the System, Window, and Graphics modules, so we will add them:
- Go to the Linker settings tab.
- Add
-lsfml-system,-lsfml-windowand-lsfml-graphicsin the Other linker options column. - Now click on OK.
Good news, all the configurations are now finished. We will eventually need to add a library to the linker in the future (audio, network), but that's it.
A minimal example
It's now time for us to test the SFML with a very basic example. This application will show us the window as in the following screenshot:

The following code snippet brings about this window:
int main(int argc,char* argv[])
{
    sf::RenderWindow window(sf::VideoMode(400,
400),"01_Introduction");
    window.setFramerateLimit(60);

    //create a circle
    sf::CircleShape circle(150);
    circle.setFillColor(sf::Color::Blue);
    circle.setPosition(10, 20);

    //game loop
    while (window.isOpen())
    {
       //manage the events
        sf::Event event;
        while(window.pollEvent(event))
        {
            if ((event.type == sf::Event::Closed)
                or (event.type == sf::Event::KeyPressed and
event.key.code == sf::Keyboard::Escape))
                window.close(); //close the window
        }
        window.clear(); //clear the windows to black
        window.draw(circle); //draw the circle
        window.display(); //display the result on screen
    }
    return 0;
}
All that this application does is to create a window with a width and height of 400 pixels and its title is 01_Introduction. Then a blue circle with a radius of 150 pixels is created, and is drawn while the window is open. Finally, the user events are checked on each loop. Here we verify if the close event has been asked (close the button or click Alt + F4), or if the user has pressed the Esc button on his keyboard. In both case, we close the window, that will result to the program exit.


