Introducing Material Design
As mentioned earlier, Material Design was a revolution in the way apps look and feel. You have probably heard of this concept before, but what is it exactly?
Material Design is a new visual language created by Google, used on all the platforms, websites, and mobile devices that are based on materials, meaningful transitions, animations, and responsive interactions.
The material is a metaphor of an element that can be seen on the surface; it consists of layers that can have different heights and widths, but their thickness is always one unit, as with sheets of paper. We can place materials above each other, which introduces a depth element to the view, a Z coordinate. In the same way, we can have a sheet of paper on top of another, casting shadows and defining a visual priority.
The content is displayed on the materials but they don't add thickness to it. The content can be displayed in any shape and color; it can be a plain background color, a text, a video, and many other things. It is limited within the bounds of the material.
The material can expand and the content can expand with it, but the content can never expand more than the material. We can't have two materials at the same Z position. One of them always has to be below or on top of the other. If we interact with the materials, we always interact at the top layer level. For instance, a touch event will be performed in the top layer and won't go through to the layers below. You can change the size and shape of the materials and the two materials can be merged into one, but they can't bend or fold.

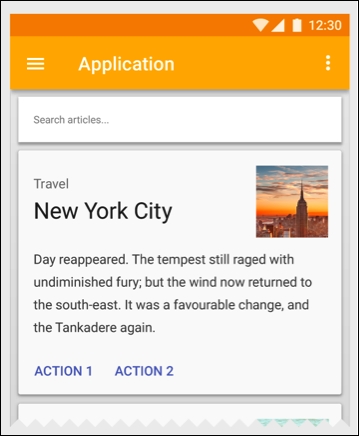
This is an example of an app using the Material Design style; we can see cards with shadows, different content, and an app bar with a navigation drawer. All these components will be explained in the course of this book, and we will aim to build an app using the same style.
Material design also came with important UI elements, such as RecyclerView. This is a view that will replace ListView, which came earlier in Android, to create any kind of a scrollable list of elements. We'll work with these components in Chapter 5, Lists and Grids, starting with the basic version of ListView, evolving it to understand how RecyclerView was born, and finishing with an example of it.
The CardView was another major UI element introduced. We can see one in the previous image; it's a component with a background and shadows that can be customized to fit all the content that we want. We will work with it in Chapter 6, CardView and Material Design, where we'll also introduce the next component—design support library.
Design support library is a must have library that includes animations, FAB (Floating Action Button), and the navigation drawer. You've probably already seen the sliding menu that comes from the left in other apps. Design support library offers support for these components in previous Android versions, allowing us to use Material Design features in older versions.
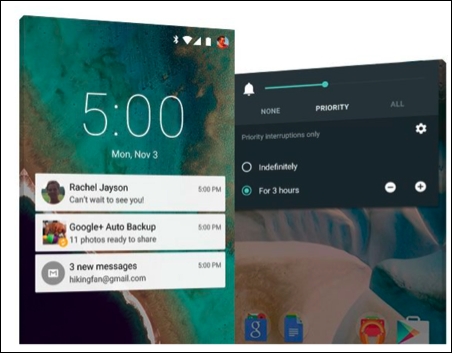
All of the above are features from a UI and programming perspective, but Material design also introduced different features for our phone, such as a new notification management system with different priority levels. For instance, we can say which notifications are important and establish a time frame when we don't want to be disturbed.

Another thing that we can't miss is the battery consumption improvement in this version, which can save up to 90 minutes of battery compared to previous Android versions, and it is due to a new Android runtime called ART. To explain it in a nontechnical way, it translates the app to a language that can be understood by Android faster when the app is installed. The previous runtime, Dalvik, had to do this translation while executing our app rather than just once at the installation. This helps the app consume less battery and run faster.


