Search icon CANCEL
Subscription
0
Cart icon
Your Cart (0 item)
Close icon
You have no products in your basket yet
Arrow left icon
Explore Products
Best Sellers
New Releases
Books
Videos
Audiobooks
Learning Hub
Free Learning
Arrow right icon
Arrow up icon
GO TO TOP
Learn Microsoft PowerApps

You're reading from   Learn Microsoft PowerApps Build customized business applications without writing any code

Arrow left icon
Product type Paperback
Published in Nov 2019
Publisher Packt
ISBN-13 9781789805826
Length 560 pages
Edition 1st Edition
Languages
Arrow right icon
Author (1):
Arrow left icon
Matthew Weston Matthew Weston
Author Profile Icon Matthew Weston
Matthew Weston
Arrow right icon
View More author details
Toc

Table of Contents (25) Chapters Close

Preface 1. Section 1: Getting Started with PowerApps FREE CHAPTER
2. Introducing PowerApps 3. Creating Your First Canvas PowerApp 4. Creating Apps from SharePoint 5. Publishing and Leveraging PowerApps 6. Section 2: Developing Your PowerApp
7. Exploring Controls 8. Exploring Formulas 9. Working with Data 10. Introducing Connectors 11. Section 3: Extending the Capabilities of Your PowerApp
12. Using GPS in PowerApps 13. Working with Images and Barcodes 14. Securing Your PowerApps 15. Working Offline 16. Using Power Automate with PowerApps 17. Using Azure with PowerApps 18. Section 4: Working with Model-Driven Apps
19. Introducing Model-Driven Apps 20. Creating Model-Driven Apps 21. Section 5: Governing PowerApps
22. Exploring Environments within Our Tenancy 23. Assessments 24. Other Books You May Enjoy

Lab 7

In this lab, we are going to establish a connection to a data source that isn't local to our PowerApp. For simplicity, the data source will be an Excel spreadsheet that will need to be stored within cloud storage such as OneDrive.

Activity 1: Preparing the data source

Before we use a connector, the first thing that we need to do is prepare a data source. To demonstrate this, we will use Microsoft Excel and store the data source within OneDrive. Let's get started:

  1. Create an Excel workbook and save it to OneDrive as Assets.xlsx.
  2. Right-click the tab at the bottom of the screen named Sheet1:
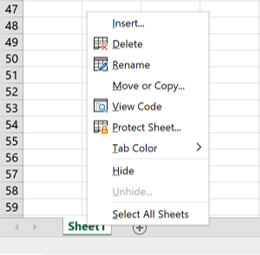
  1. Select Rename and change the name of the tab to Categories:

  1. On the Categories tab, add some data, as follows:
  1. Ensure that you have a cell containing data selected, for example, the Category cell, and select Format as Table from the Styles group in the ribbon. Select any formatting you like:
  1. Select the cell range that corresponds to your data, leave My table has headers ticked...
lock icon The rest of the chapter is locked
Register for a free Packt account to unlock a world of extra content!
A free Packt account unlocks extra newsletters, articles, discounted offers, and much more. Start advancing your knowledge today.
Unlock this book and the full library FREE for 7 days
Get unlimited access to 7000+ expert-authored eBooks and videos courses covering every tech area you can think of
Renews at $19.99/month. Cancel anytime
Banner background image