Search icon CANCEL
Subscription
0
Cart icon
Your Cart (0 item)
Close icon
You have no products in your basket yet
Save more on your purchases! discount-offer-chevron-icon
Savings automatically calculated. No voucher code required.
Arrow left icon
Explore Products
Best Sellers
New Releases
Books
Videos
Audiobooks
Learning Hub
Newsletter Hub
Free Learning
Arrow right icon
timer SALE ENDS IN
0 Days
:
00 Hours
:
00 Minutes
:
00 Seconds
Arrow up icon
GO TO TOP
Implementing Microsoft Dynamics 365 Customer Engagement

You're reading from   Implementing Microsoft Dynamics 365 Customer Engagement Configure, customize, and extend Dynamics 365 CE in order to create effective CRM solutions

Arrow left icon
Product type Paperback
Published in Mar 2020
Publisher Packt
ISBN-13 9781838556877
Length 426 pages
Edition 1st Edition
Concepts
Arrow right icon
Author (1):
Arrow left icon
Mahender Pal Mahender Pal
Author Profile Icon Mahender Pal
Mahender Pal
Arrow right icon
View More author details
Toc

Table of Contents (14) Chapters Close

Preface 1. Introduction to Dynamics 365 CE 2. Implementation Methodology FREE CHAPTER 3. Requirement Gathering and Analysis 4. Preparing Functional and Technical Design Documents 5. Configuring Your Dynamics 365 CE Organization 6. Customizing Dynamics 365 CE 7. Extending Dynamics 365 CE 8. Integrating Dynamics 365 CE with Other Applications 9. Business Intelligence and Reporting 10. Testing and User Training Planning 11. Migration and Upgrade 12. Deployment and Go-Live Support 13. Other Books You May Enjoy

Using Report Wizard

Report Wizard is an easy way to develop reports in Dynamics 365 CE. It provides an option to create a report by following multi-screen steps.

To create a report we can navigate, we can take the following steps:

  1. Navigate to Reports and click on the New button.
  2. Enter Make And Model Report under Report name and click on the Report Wizard button.
  1. Keep the New report option as the default and click on the Next button.
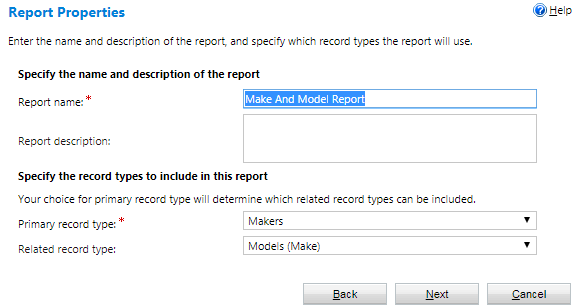
  2. Set up the entity information as follows and click on Next:
  1. Keep the report filtering option as it is and click on the Next button.
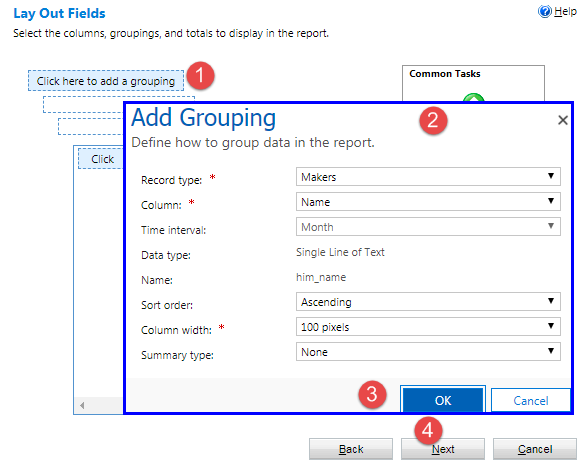
  2. Set up reporting by following the numbered steps shown in this screenshot:
  1. Click on Click here to add the column and set this column as the Models entity, as shown in the following image:
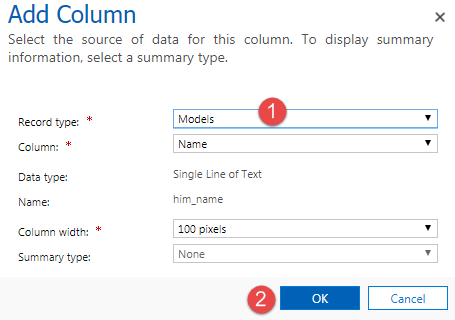
Once we have added the required column, we can perform other tasks from the Common Tasks section, such as sorting based on...

lock icon The rest of the chapter is locked
Register for a free Packt account to unlock a world of extra content!
A free Packt account unlocks extra newsletters, articles, discounted offers, and much more. Start advancing your knowledge today.
Unlock this book and the full library FREE for 7 days
Get unlimited access to 7000+ expert-authored eBooks and videos courses covering every tech area you can think of
Renews at $19.99/month. Cancel anytime
Banner background image