Search icon CANCEL
Arrow left icon
Explore Products
Best Sellers
New Releases
Books
Videos
Audiobooks
Learning Hub
Conferences
Free Learning
Arrow right icon
Arrow up icon
GO TO TOP
Hands-On Full-Stack Web Development with GraphQL and React

You're reading from   Hands-On Full-Stack Web Development with GraphQL and React Build scalable full-stack applications while learning to solve complex problems with GraphQL

Arrow left icon
Product type Paperback
Published in Jan 2019
Publisher Packt
ISBN-13 9781789134520
Length 460 pages
Edition 1st Edition
Languages
Tools
Arrow right icon
Author (1):
Arrow left icon
Sebastian Grebe Sebastian Grebe
Author Profile Icon Sebastian Grebe
Sebastian Grebe
Arrow right icon
View More author details
Toc

Table of Contents (15) Chapters Close

Preface 1. Preparing Your Development Environment FREE CHAPTER 2. Setting up GraphQL with Express.js 3. Connecting to The Database 4. Integrating React into the Back end with Apollo 5. Reusable React Components 6. Authentication with Apollo and React 7. Handling Image Uploads 8. Routing in React 9. Implementing Server-Side Rendering 10. Real-Time Subscriptions 11. Writing Tests 12. Optimizing GraphQL with Apollo Engine 13. Continuous Deployment with CircleCI and Heroku 14. Other Books You May Enjoy

Setting up React

The development environment for our project is ready. In this section, we are going to install and configure React, which is one primary aspect of this book. Let's start by creating a new directory for our project:

mkdir ~/graphbook
cd ~/graphbook

Our project will use Node.js and many npm packages. Create a package.json file to install and manage all of the dependencies for our project.

This stores information about the project, such as the version number, name, dependencies, and much more.

Just run npm init to create an empty package.json file:

npm init

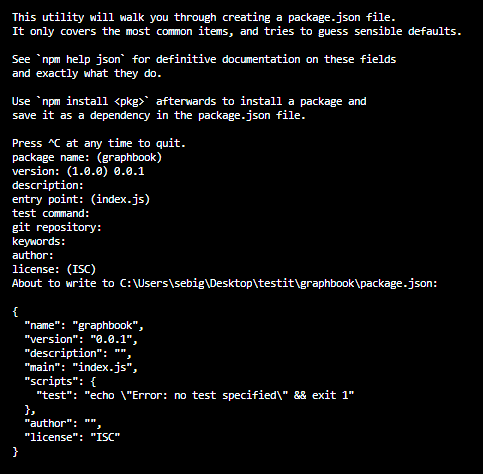
Npm will ask some questions, such as asking for the package name, which is, in fact, the project name. Enter Graphbook to insert the name of your application in the generated package.json file.

I prefer to start with version number 0.0.1 since the default version number npm offered with 1.0.0 represents the first stable release for me. However, it is your choice which version you use here.

You can skip all other questions using the Enter key to save the default values of npm. Most of them are not relevant because they just provide information such as a description or the link to the repository. We are going to fill the other fields, such as the scripts while working through this book. You can see an example of the command line in the following screenshot:
The first and most crucial dependency for this book is React. Use npm to add React to our project:

npm install --save react react-dom

This command installs two npm packages from https://npmjs.com into our project folder under node_modules.

Npm automatically edited our package.json file since we provided the --save option and added those packages with the latest available version numbers.

You might be wondering why we installed two packages although we only needed React. The react package provides only React-specific methods. All React hooks, such as componentDidMount, componentWillReceivesProps, and even React's component class, come from this package. You need this package to write React applications at all.

In most cases, you won't even notice that you have used react-dom. This package offers all functions to connect the actual DOM of the browser with your React application. Usually, you use ReactDOM.render to render your application at a specific point in your HTML and only once in your code. We will cover the rendering of React in a later chapter.

There is also a function called ReactDOM.findDOMNode, which gives you direct access to a DOMNode, but I hardly discourage using this since any changes on DOMNodes are not available in React itself. I personally have never needed to use this function, so try to avoid it if possible.

Preparing and configuring webpack

Our browser requests an index.html file when accessing our application. It specifies all of the files that are required to run our application. We need to create the index.html, which we serve as the entry point of our application:

  1. Create a separate directory for our index.html file:
mkdir public
touch index.html
  1. Then, save this inside index.html:
<!DOCTYPE html>
<html lang="en">
<head>
<meta charset="UTF-8">
<meta name="viewport" content="width=device-width, initial-
scale=1.0">
<meta http-equiv="X-UA-Compatible" content="ie=edge">
<title>Graphbook</title>
</head>
<body>
<div id="root"></div>
</body>
</html>

As you can see, no JavaScript is loaded here. There is only div with the root id. This div tag is the DOMNode in which our application will be rendered by ReactDOM.

So, how do we get React up and running with this index.html file?

To accomplish this, we need to use a web application bundler. It prepares and bundles all our application assets. All of the required JavaScript files and node_modules are bundled and minified; SASS and SCSS preprocessors are transpiled to CSS as well as being merged and minified.

To name a few application bundler packages, there are webpack, Parcel, and Gulp. For our use case, we will use webpack. It is the most common module bundler, which has a large community surrounding it. To bundle our JavaScript code, we need to install webpack and all of its dependencies as follows:

npm install --save-dev @babel/core babel-eslint babel-loader @babel/preset-env @babel/preset-react clean-webpack-plugin css-loader eslint file-loader html-webpack-plugin style-loader url-loader webpack webpack-cli webpack-dev-server @babel/plugin-proposal-decorators @babel/plugin-proposal-function-sent @babel/plugin-proposal-export-namespace-from @babel/plugin-proposal-numeric-separator @babel/plugin-proposal-throw-expressions @babel/plugin-proposal-class-properties

This command adds all of the development tools to devDependencies in the package.json file that are needed to allow the bundling of our application. They are only installed in a development environment and are skipped in production.

As you can see in the preceding code, we also installed eslint, which goes through our code on the fly and checks it for errors. We need an eslint configuration file, which, again, we install from https://npmjs.com. The following handy shortcut installs the eslint configuration created by the people at Airbnb, including all peer dependencies. Execute it straight away:

npx install-peerdeps --dev eslint-config-airbnb

Create a .eslintrc file in the root of your project folder to use the airbnb configuration:

{
"extends": ["airbnb"],
"env": {
"browser": true,
"node": true
},
"rules": {
"react/jsx-filename-extension": "off"
}
}

In short, this .eslinrc file loads the airbnb config; we define the environments where our code is going to run, and we turn off one default rule.

The react/jsx-filename-extension rule throws a warning when using JSX syntax inside a file not ending in .jsx. Our files will end with .js, so we enable this rule.

If you aren't already aware, setting up webpack can be a bit of a hassle, There are many options that can interfere with each other and lead to problems when bundling your application. Let's create a webpack.client.config.js file in the root folder of your project.

Enter the following:

const path = require('path');
const HtmlWebpackPlugin = require('html-webpack-plugin');
const CleanWebpackPlugin = require('clean-webpack-plugin');
const buildDirectory = 'dist';
const outputDirectory = buildDirectory + '/client';
module.exports = {
mode: 'development',
entry: './src/client/index.js',
output: {
path: path.join(__dirname, outputDirectory),
filename: 'bundle.js'
},
module: {
rules: [
{
test: /\.js$/,
exclude: /node_modules/,
use: {
loader: 'babel-loader'
}
},
{
test: /\.css$/,
use: ['style-loader', 'css-loader']
}
]
},
devServer: {
port: 3000,
open: true
},
plugins: [
new CleanWebpackPlugin({
cleanOnceBeforeBuildPatterns: [path.join(__dirname,
buildDirectory)]
}),
new HtmlWebpackPlugin({
template: './public/index.html'
})
]
};

The webpack configuration file is just a regular JavaScript file in which you can require node_modules and custom JavaScript files. This is the same as everywhere else inside Node.js. Let's quickly go through all of the main properties of this configuration. Understanding these will make future custom webpack configs much easier. All of the important points are explained below:

  • HtmlWebpackPlug: This automatically generates an HTML file that includes all of the webpack bundles. We pass our previously created index.html as a template.
  • CleanWebpackPlugin: This empties all of the provided directories to clean old build files. The cleanOnceBeforeBuildPatterns property specifies an array of folders which are cleaned before the build process is started.
  • The entry field tells webpack where the starting point of our application is. This file needs to be created by us.
  • The output object specifies how our bundle is called and where it should be saved. For us, this is dist/client/bundle.js.
  • Inside module.rules, we match our file extensions with the correct loaders. All JavaScript files (except those located in node_modules) are transpiled by Babel, specified by babel-loader , so that we can use ES6 features inside our code. Our CSS gets processed by style-loader and css-loader. There are many more loaders for JavaScript, CSS, and other file extensions available.
  • The devServer feature of webpack enables us to run the React code directly. It includes hot reloading code in the browser without rerunning a build or refreshing the browser tab.
If you need a more detailed overview of the webpack configuration, have a look at the official documentation here: https://github.com/webpack/docs/wiki/configuration.

With this in mind, let's move on. We are missing the src/client/index.js file from our webpack configuration, so let's create it as follows:

mkdir src/client
cd src/client
touch index.js

You can leave this file empty for the moment. It can be bundled by webpack without content inside. We are going to change it later in this chapter.

To spin up our development webpack server, we add a command to package.json , which we can run using npm.

Add this line to the scripts object inside package.json:

"client": "webpack-dev-server --devtool inline-source-map --hot --config webpack.client.config.js"

Now execute npm run client in your console, and watch how a new browser window opens. We are running webpack-dev-server with the newly created configuration file.

Sure, the browser is still empty, but if you inspect the HTML with Chrome DevTools, you can see that we have already got a bundle.js file and our index.html file was taken as a template.

We have accomplished including our empty index.js file with the bundle and can serve it to the browser. Next, we'll render our first React component inside our template index.html file.

Render your first React component

There are many best practices for React. The central philosophy behind it is to split up our code into separate components where possible. We are going to cover this approach in more detail later in Chapter 5, Reusable React Components.

Our index.js file is the main starting point of our front end code, and this is how it should stay. Do not include any business logic in this file. Instead, keep it as clean and slim as possible.

The index.js file should include this code:

import React from 'react';
import ReactDOM from 'react-dom';
import App from './App';

ReactDOM.render(<App/>, document.getElementById('root'));

The release of ECMAScript 2015 introduced the import feature. We use it to require our npm packages, react and react-dom , and our first custom React component, which we must write now.

Of course, it is essential for us to cover the sample Hello World program.

Create the App.js file next to your index.js file, with the following content:

import React, { Component } from 'react';

export default class App extends Component {
render() {
return (
<div>Hello World!</div>
)
}
}

This class is exported and then imported by the index.js file. As explained before, we are now actively using ReactDOM.render in our index.js file.

The first parameter of ReactDOM.render is the component that we want to render, which is the App class displaying the Hello World! message. The second parameter is the browser's DOMNode, where it should render. We receive DOMNode with plain document.getElementById JavaScript.

We defined our root element when we created the index.html file before. After saving the App.js file, webpack will try to build everything again. However, it shouldn't be able to do that. Webpack will encounter a problem bundling our index.js file because of the <App /> tag syntax we are using in the ReactDOM.render method. It was not transpiled to a normal JavaScript function.

We configured webpack to load Babel for our JS file but did not tell Babel what to transpile and what not to transpile.

Let's create a .babelrc file in the root folder with this content:

{
"plugins": [
["@babel/plugin-proposal-decorators", { "legacy": true }],
"@babel/plugin-proposal-function-sent",
"@babel/plugin-proposal-export-namespace-from",
"@babel/plugin-proposal-numeric-separator",
"@babel/plugin-proposal-throw-expressions",
["@babel/plugin-proposal-class-properties", { "loose": false }]
],
"presets": ["@babel/env","@babel/react"]
}
You may have to restart the server because the .babelrc file is not reloaded when changes happen to the file. After a few moments, you should see the standard Hello World! message in your browser.

Here, we told Babel to use @babel/preset-env and @babel/preset-react, installed together with webpack. These presets allow Babel to transform specific syntax such as JSX, which we use to create normal JavaScript that all browsers can understand and that webpack is able to bundle. Furthermore, we are using some Babel plugins we installed too, because they transform specific syntax not covered by the presets.

Rendering arrays from React state

Hello World! is a must for every good programming book, but this is not what we are aiming for when we use React.

A social network such as Facebook or Graphbook, which we are writing at the moment, needs a news feed and an input to post news. Let's implement this.

For the simplicity of the first chapter, we do this inside App.js.

We should work with some fake data here since we have not yet set up our GraphQL API. We can replace this later with real data.

Define a new variable above your App class like this:

const posts = [{
id: 2,
text: 'Lorem ipsum',
user: {
avatar: '/uploads/avatar1.png',
username: 'Test User'
}
},
{
id: 1,
text: 'Lorem ipsum',
user: {
avatar: '/uploads/avatar2.png',
username: 'Test User 2'
}
}];

We now render these two fake posts in React.

Replace the current content of your render method with the following code:

const { posts } = this.state;

return (
<div className="container">
<div className="feed">
{posts.map((post, i) =>
<div key={post.id} className="post">
<div className="header">
<img src={post.user.avatar} />
<h2>{post.user.username}</h2>
</div>
<p className="content">
{post.text}
</p>
</div>
)}
</div>
</div>
)

We iterate over the posts array with the map function, which again executes the inner callback function, passing each array item as a parameter one by one. The second parameter is just called i and represents the index of the array element we are processing. Everything returned from the map function is then rendered by React.

We merely return HTML by putting each post's data in ES6 curly braces. The curly braces tell React to interpret and evaluate the code inside them as JavaScript.

As you can see in the preceding code, we are extracting the posts we want to render from the component's state with a destructuring assignment. This data flow is very convenient because we can update the state at any point later in our application and the posts will rerender.

To get our posts into the state, we can define them inside our class with property initializers. Add this to the top of the App class:

state = {
posts: posts
}

The older way of implementing this—without using the ES6 feature—was to create a constructor:

constructor(props) {
super(props);

this.state = {
posts: posts
};
}

Upon initialization of the App class, the posts will be inserted into its state and rendered. It is vital that you run super before having access to this.

The preceding method is much cleaner, and I recommend this for readability purposes. When saving, you should be able to see rendered posts. They should look like this:

source: https://www.vecteezy.com/

The images I am using here are freely available. You can use any other material that you have got, as long as the path matches the string from the posts array. You can find those images in the official GitHub repository of this book.

CSS with webpack

The posts from the preceding picture have not been designed yet. I have already added CSS classes to the HTML our component returns.

Instead of using CSS to make our posts look better, another method is to use CSS-in-JS using packages such as styled-components, which is a React package. Other alternatives include Glamorous and Radium, for example. There are numerous reasons why we do not switch to such a workflow and stay with good old CSS. With those other tools, you are not able to use SASS, SCSS, or LESS effectively. Personally, I need to work with other people, such as screen and graphics designers, who can provide and use CSS, but do not program styled-components. There is always a prototype or existing CSS that can be used, so why should I spend time translating this to styled-components CSS when I could just continue with standard CSS?

There is no right or wrong option here; you are free to implement the styling in any way you like. However, in this book, we keep using good old CSS.

What we've already done in our webpack.client.config.js file is to specify a CSS rule, as you can see in the following code snippet:

{
test: /\.css$/,
use: ['style-loader', 'css-loader'],
},

The style-loader injects your bundled CSS right into the DOM. The css-loader will resolve all import or url occurrences in your CSS code.

Create a style.css file in /assets/css and fill in the following:

body {
background-color: #f6f7f9;
margin: 0;
font-family: 'Courier New', Courier, monospace
}
p {
margin-bottom: 0;
}
.container {
max-width: 500px;
margin: 70px auto 0 auto;
}
.feed {
background-color: #bbb;
padding: 3px;
margin-top: 20px;
}
.post {
background-color: #fff;
margin: 5px;
}
.post .header {
height: 60px;
}
.post .header > * {
display: inline-block;
vertical-align: middle;
}
.post .header img {
width: 50px;
height: 50px;
margin: 5px;
}
.post .header h2 {
color: #333;
font-size: 24px;
margin: 0 0 0 5px;
}
.post p.content {
margin: 5px;
padding: 5px;
min-height: 50px;
}

Refreshing your browser leaves you with the same old HTML as before.

This problem happens because webpack is a module bundler and does not know anything about CSS; it only knows JavaScript. We must import the CSS file somewhere in our code.

Instead of using index.html and adding a head tag, we can use webpack and our CSS rule to load it right in App.js. This solution is very convenient, since all of the required CSS throughout our application gets minified and bundled. Webpack automates this process.

In your App.js file, add the following behind the React import statement:

import '../../assets/css/style.css';

Webpack magically rebuilds our bundle and refreshes our browser tab.

You have now successfully rendered fake data via React and styled it with bundled CSS from webpack. It should look something like this:

source: https://www.vecteezy.com/

The output looks very good already.

Event handling and state updates with React

At the beginning of this project, it would be great to have a simple textarea where you can click a button and then have a new post added to the static posts array we wrote in the App class.

Add this above the div with the feed class:

<div className="postForm">
<form onSubmit={this.handleSubmit}>
<textarea value={postContent} onChange={this.handlePostContentChange}
placeholder="Write your custom post!"/>
<input type="submit" value="Submit" />
</form>
</div>

You can use forms in React without any problems. React can intercept the submit event of requests by giving the form an onSubmit property, which will be a function to handle the logic behind the form.

We are passing the postContent variable to the value property of textarea to have what's called a controlled component.

Create an empty string variable at the state property initializer, as follows:

state = {
posts: posts,
postContent: ''
}

Then, extract this from the class state inside the render method:

const { posts, postContent } = this.state;

Now, the new state variable stays empty, although, you can write inside textarea. This issue occurs because you are directly changing the DOM element but did not bind the change event to an existing React function. This function has the task of updating the React internal state that is not automatically connected to the browser's DOM state.

In the preceding code, we already passed the update function called this.handlePostContentChange to the onChange property of textarea.

The logical step is to implement this function:

handlePostContentChange = (event) => {
this.setState({postContent: event.target.value})
}

Maybe you are used to writing this a little differently, like this:

handlePostContentChange(event) {
this.setState({postContent: event.target.value})
}

Both variants differ a lot. Try it out for yourself.

When using the second variant, executing the function will lead to an error. The scope inside the function will be wrong, and you won't have access to the class via this.

In this case, you would need to write a constructor for your class and manually bind the scope to your function as follows:

this.handlePostContentChange = this.handlePostContentChange.bind(this);

You easily end up with five more additional lines of code when writing the constructor to bind the scope correctly.

The first variant uses the ES6 arrow function, which takes care of the right scope for you. I recommend this variant since it is very clean and you save time understanding and writing code.

Look at your browser again. The form is there, but it is not pretty, so add this CSS:

form {
padding-bottom: 20px;
}
form textarea {
width: calc(100% - 20px);
padding: 10px;
border-color: #bbb;
}
form [type=submit] {
border: none;
background-color: #6ca6fd;
color: #fff;
padding: 10px;
border-radius: 5px;
font-size: 14px;
float: right;
}

The last step is to implement the handleSubmit function for our form:

handleSubmit = (event) => {
event.preventDefault();
const newPost = {
id: this.state.posts.length + 1,
text: this.state.postContent,
user: {
avatar: '/uploads/avatar1.png',
username: 'Fake User'
}
};
this.setState((prevState) => ({
posts: [newPost, ...prevState.posts],
postContent: ''
}));
}

The preceding code looks more complicated than it is, but I am going to explain it quickly.

We need to run event.preventDefault to stop our browser from actually trying to submit the form and reload the page. Most people coming from jQuery or other JavaScript frameworks will know this.

Next, we save our new post in the newPost variable that we want to add to our feed.

We are faking some data here to simulate a real-world application. For our test case, the new post id is the number of posts in our state variable plus one. React wants us to give every child in the ReactDOM a unique id. By counting the number of posts, we simulate the behavior of a real back end giving us unique ids for our posts.

The text for our new post comes from the postContent variable from the component state.
Furthermore, we do not yet have a user system by now, that our GraphQL server can use to give us the newest posts, including the matching users with their avatars. We simulate this by having a static user object for all the new posts we create.

Finally, we update the component state again. This is where it gets a bit complicated. We are not passing an object as if we are doing it inside the handlePostContentChange function; we are passing an update function.

This approach gives us the current state reliably. Generally, I recommend using a function instead of using just an object. It automatically protects you against problems of race condition, where multiple functions manipulate the state. Always have in mind that the setState function is asynchronous.

The return value of the function is the state object we would normally have used directly. Thanks to the ES6 spread operator, we can prepend the newPost variable before the old posts, which will render the latest post at the top of our list. The textarea is cleared by passing an empty string into setState for the postContent field.

Now go ahead and play with your working React form. Do not forget that all posts you create do not persist since they are only held in the local memory of the browser and not saved to a database. Consequently, refreshing deletes your posts.

Controlling document heads with React Helmet

When developing a web application, it is crucial that you can control your document heads. You might want to change the title or description, based on the content you are presenting.

React Helmet is a great package that offers this on the fly, including overriding multiple headers and server-side rendering.

Install it with the following command:

npm install --save react-helmet

You can add all standard HTML headers with React Helmet.

I recommend keeping standard head tags inside your template. They have the advantage that, before React has rendered, there is always the default document head. For our case, you can directly apply a title and description in App.js.

Import react-helmet at the top of the file:

import { Helmet } from 'react-helmet';

Add Helmet itself directly above postForm div:

<Helmet>
<title>Graphbook - Feed</title>
<meta name="description" content="Newsfeed of all your friends on
Graphbook" />
</Helmet>

If you reload the browser and watch the title on the tab bar of your browser carefully, you will see that it changes from Graphbook to Graphbook - Feed. This behavior happens because we already defined a title inside index.html. When React finishes rendering, the new document head is applied.

Production build with webpack

The last step for our React setup is to have a production build. Until now, we were only using webpack-dev-server, but this naturally includes an unimproved development build. Furthermore, webpack automatically spawns a web server. In a later chapter, we introduce Express.js as our web server so we won't need webpack to host it.

A production bundle does merge all JavaScript files, but also CSS files into two separate files. Those can be used directly in the browser. To bundle CSS files, we will rely on another webpack plugin, called MiniCss:

npm install --save-dev mini-css-extract-plugin

We do not want to change the current webpack.client.config.js file, because it is made for development work. Add this command to the scripts object of your package.json:

"client:build": "webpack --config webpack.client.build.config.js"

This command runs webpack using an individual production webpack config file. Let's create this one. First, clone the original webpack.client.config.js file and rename it webpack.client.build.config.js.

Change the following things in the new file:

  1. The mode needs to be production, not development.
  2. Require the MiniCss plugin:
const MiniCssExtractPlugin = require('mini-css-extract-plugin');
  1. Replace the current CSS rule:
{
test: /\.css$/,
use: [{ loader: MiniCssExtractPlugin.loader,
options: {
publicPath: '../'
}
}, 'css-loader'],
},

We no longer use the style-loader but instead use the MiniCss plugin. The plugin goes through the complete CSS code, merges it in a separate file, and removes the import statements from the bundle.js we generate in parallel.

  1. Lastly, add the plugin to the plugins at the bottom of the configuration file:
new MiniCssExtractPlugin({
filename: 'bundle.css',
})
  1. Remove the entire devServer property.

When running the new configuration, it won't spawn a server or browser window; it only creates a production JavaScript and CSS bundle, and requires them in our index.html file. According to our webpack.client.build.config.js file, those three files are going to be saved to the dist/client folder.

You can run this command by executing npm run client:build.

Look in the dist/client folder, and you will see three files. You can open the index.html in your browser. Sadly, the images are broken because the image URLs are not right anymore. We accept this for the moment because it will be automatically fixed when we have a working back end.

You are now finished with the basic setup of React.

You have been reading a chapter from
Hands-On Full-Stack Web Development with GraphQL and React
Published in: Jan 2019
Publisher: Packt
ISBN-13: 9781789134520
Register for a free Packt account to unlock a world of extra content!
A free Packt account unlocks extra newsletters, articles, discounted offers, and much more. Start advancing your knowledge today.
Unlock this book and the full library FREE for 7 days
Get unlimited access to 7000+ expert-authored eBooks and videos courses covering every tech area you can think of
Renews at AU $24.99/month. Cancel anytime