Planning Timber!!!
Whenever you make a game, it is always best to start with a pencil and paper. If you don’t know exactly how your game is going to work on the screen, how can you possibly make it work in code?
At this point, if you haven’t already, I suggest you go and watch a video of Timberman in action so that you can see what we are aiming for. If you feel your budget can stretch to it, then grab a copy and give it a play. It is often on sale for under $1 on Steam: http://store.steampowered.com/app/398710/.
The features and objects of a game that define the gameplay are known as the mechanics. The basic mechanics of the game are as follows:
- Time is always running out.
- You can get more time by chopping the tree.
- Chopping the tree causes the branches to fall.
- The player must avoid the falling branches.
- Repeat until time runs out or the player is squished by a branch.
Expecting you to plan the C++ code at this stage is obviously a bit silly. This is, of course, the first chapter of a C++ beginner’s guide. We can, however, look at all the assets we will use and an overview of what we will need to make our C++ code do.
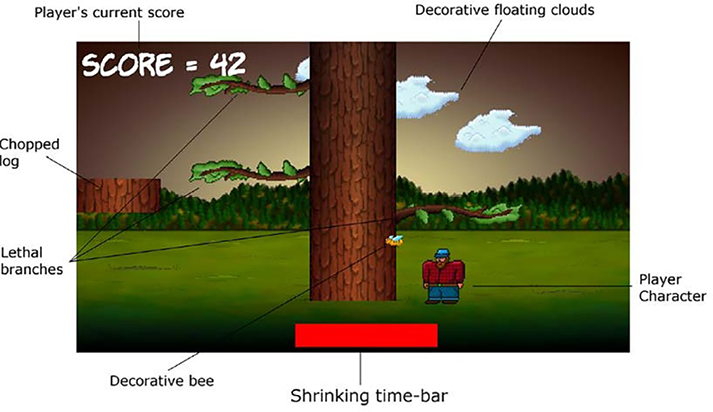
Look at this annotated screenshot of the game:

Figure 1.17: Screenshot of the Timber game
You can see that we have the following features:
- The player’s score: Each time the player chops a log, they will get one point. They can chop a log with either the left or the right arrow (cursor) key.
- Player character: Each time the player chops, they will move to/stay on the same side of the tree relative to the cursor key they use. Therefore, the player must be careful which side they choose to chop on.
- When the player chops, a simple axe graphic will appear in the player character’s hands.
- Shrinking time-bar: Each time the player chops, a small amount of time will be added to the ever-shrinking time-bar.
- The lethal branches: The faster the player chops, the more time they will win, but also the faster the branches will move down the tree and therefore the more likely they are to get squished. The branches spawn randomly at the top of the tree and move down with each chop.
- When the player gets squished – and they will get squished quite regularly – a gravestone graphic will appear.
- The chopped log: When the player chops, a chopped log graphic will whiz off, away from the player.
- Just for decoration: There are three floating clouds that will drift at random heights and speeds, as well as a bee that does nothing but fly around.
- The background: All this takes place on a pretty background.
So, in a nutshell, the player must frantically chop to gain points and avoid running out of time. As a slightly perverse but fun consequence, the faster they chop, the more likely their squishy demise.
We now know what the game looks like, how it is played, and the motivation behind the game mechanics. Now, we can go ahead and start building it. Follow these steps:
- Now, we need to copy the SFML
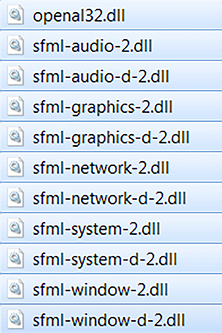
.dllfiles into the main project directory. My main project directory isD:\VS Projects\Timber. It was created by Visual Studio in the previous tutorial. If you put yourVS Projectsfolder somewhere else, then perform this step there instead. The files we need to copy into the project folder are in yourSFML\binfolder. Open a window for each of the two locations and highlight all the files in theSFML\binfolder, as shown in the following screenshot:

Figure 1.18: Selecting all the files you need
- Now, copy and paste the highlighted files into the project folder – that is
D:\VS Projects\Timber. - The project is now set up and ready to go. You will be able to see the following screen. I have annotated this screenshot so you can start familiarizing yourself with Visual Studio. We will revisit all these areas, and others, soon:

Figure 1.19: Where to type the code
Your layout might look slightly different from what’s shown in the preceding screenshot because the windows of Visual Studio, like most applications, are customizable. Take the time to locate the Solution Explorer window and adjust it to make its content nice and clear, as shown in the previous screenshot.
We will be back here soon to start coding. But first, we will explore the project assets we will be using.


