Installing ADempiere on the server side
All prerequisite applications for ADempiere are now configured properly. It is time to install the ADempiere application. A cup of coffee or tea would be refreshing before we begin.
Downloading the ADempiere core installation files
Currently, all of the ADempiere binary files, source code, and any other files related to ADempiere are hosted at http://sourceforge.net/. Throughout this book, we will use ADempiere 3.4.2s (as the latest stable version for the 3.4 release series).
We can download this file from http://downloads.sourceforge.net/adempiere/Adempiere_342s.zip. The installation file is about 99.22 MB. Create the C:\download\adempiere folder, and save the file to this folder.
For checking the integrity of our ADempiere installer, we will download its MD5 signature. Download the MD5 signature for ADempiere_342s.zip from http://sourceforge.net/projects/adempiere/files/Adempiere_342s.zip.MD5.
Downloading the latest ADempiere patch files
The ADempiere version 342s was released on December 21st, 2008. After the first release, there has always been an effort to fix bugs, and the ADempiere developer community has released regular application patch files. Along with these application patch files, sometimes the community provides files that need to be applied to the ADempiere database, too. We call these files, as migration script files which aim to alter the ADempiere database and make it comply with a newer database structure.
Obtaining the ADempiere application patch files
ADempiere developer community releases their patch files in the following format:
|
No |
Format name |
Description |
|---|---|---|
|
1 |
patches_xxxx_yyyymmdd.jar |
ADempiere core patches for version xxxx and released on the year, month, and date mentioned in patch's filename |
|
2 |
zkpatches_xxxx_yyyymmdd.jar |
ADempiere ZK web user interface patches for version xxxx and released on the year, month, and date mentioned in patch's filename |
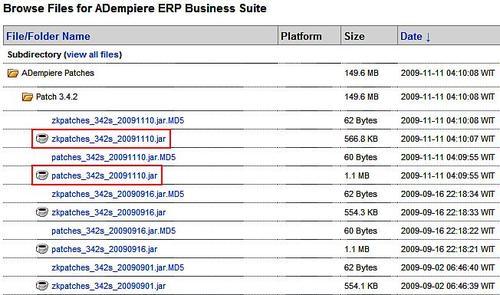
We can obtain a list of available ADempiere patch files from http://sourceforge.net/project/showfiles.php?group_id=176962&package_id=230906&release_id=648627. Here is an example of a list of ADempiere patch files that are currently available:
Note
For patch files, we need the latest files for both ADempiere core and the ADempiere ZK web user interface.
With this information, we shall download patches_342s_20091110.jar and zkpatches_342s_20091110.jar. For verification purposes, we shall download patches_342s_20091110.jar.MD5 and zkpatches_342s_20091110.jar.MD5 also. Put all of the downloaded files in the C:\download\adempiere folder.
Obtaining the ADempiere database migration script
To make sure that we are working with the latest ADempiere database structure, we need to download the migration script files. These files are standard SQL (Structured Query Language) files with .sql as the file extension. The migration script provided for PostgreSQL databases is different from the Oracle database one. For PostgreSQL databases, you can obtain it from http://adempiere.svn.sourceforge.net/viewvc/adempiere/branches/adempiere343/migration/342s-trunk/postgresql/ whereas for Oracle, it's available at http://adempiere.svn.sourceforge.net/viewvc/adempiere/branches/adempiere343/migration/342s-trunk/.
As this book uses a PostgreSQL database, at the time of writing this book, the following list of files were available for download:
372_round.sql379_FR1883270_NextIdByYear.sql391_C_Currency_Rate.sql398_currencyround.sql413_BF2567104.sql417_FR2582181.sql436_MissingSysConfigKeys.sql441_BF2710889_Add_Months.sql442_BF2710889_PaymentTermDueDate.sql443_BF2714803_InvoicepaidToDate.sql444_BF2714831_InvoiceopenToDate.sql566_FR1756793_RMA_JUST_FOR_343.sql
Put all of the downloaded files in the C:\download\adempiere\sql folder. We will apply these script files later.
Verifying the ADempiere binary files
While downloading, due to the uncertainty of Internet connections, sometimes our download files remain in an incomplete state. On the other hand, if we download the binary file from an unknown site, there is a possibility that it might be modified by somebody out there who wants to introduce security holes! This can lead to an unrecognized behavior when trying to proceed further with this file.
To avoid any unnecessary headaches in the near future, we strongly recommend that you perform an integrity check and validate your ADempiere binary installation files.
ADempiere provides us with MD5 signature files on the SourceForge sites. MD5 is one of cryptographic methods that can be used for verifying the integrity of files.
For a complete explanation of MD5, you can read http://en.wikipedia.org/wiki/MD5.
Fortunately, there are a lot of free tools that can be used to help us check the validity of files. One of them is Mat-MD5 (http://www.matsoftware.it/software/mat-md5). Create the C:\download\tools folder, and then download this tool into this folder.
We will now proceed to check the integrity of all of our ADempiere binary files, including core files and patch files. As an example, we will try to verify our ADempiere_342s.zip files, by performing the following steps:
Extract the contents of the
matmd5_en_10.zipfile.Double-click on
matmd5.exe.Click on the Browse button, and point to the
C:\download\adempiere\ADempiere_342s.zipfile.Click on the Open MD5 file button, and open the
C:\download\adempiere\ADempiere_342s.zip.MD5file. It will contain a value such as0ddb4da70fdf3ee5af227083c6f7fe10 *Adempiere_342s.zip.Copy
0ddb4da70fdf3ee5af227083c6f7fe10into the field Add MD5 sums for each file added, and click on the Add button.
If everything goes well, the system will indicate a successful integrity check, as shown in the following screenshot:

Otherwise, we need to download the ADempiere binary files again from http://sourceforge.net/ and perform another integrity check until the files are successfully verified.
Extracting the ADempiere core installation files
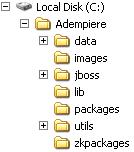
The ADempiere core installation file is Adempiere_342s.zip. This is only a ZIP file and not a windows installer. We need to extract the content of the ZIP file to the C:\ drive. Navigate to the C:\download\adempiere folder, right-click on this file, and click on Extract All. When the system asks about the target directory, point it to the C:\ drive. Click on the Next button to extract the files. Your ADempiere files should be found in the C:\Adempiere folder. The standard ADempiere folder structure is shown in the following screenshot:
Applying the ADempiere application patch files
Applying patch files is an easy task. First, ensure that you back up your patches_342s_20091110.jar and zkpatches_342s_20091110.jar files by copying them to the C:\download\adempiere\backup folder. Rename the original files in the downloaded folder from patches_342s_20091110.jar to patches.jar and from zkpatches_342s_20091110.jar to zkpatches.jar.
Before copying the patch files to another folder, it's a good practice to keep a backup of the original C:\adempiere\lib\patches.jar and C:\adempiere\lib\zkpatches.jar files. We shall put these backup files into the C:\download\adempiere\backup folder as well. The last thing to do is to copy our downloaded patches.jar and zkpatches.jar files, which can be found at C:\download\adempiere, into the C:\adempiere\lib folder.
During the copying procedure, when the system prompts us with a Confirm File Replace question, just click on Yes to All, and we will have finished our tasks.
Creating an ADempiere PostgreSQL database
ADempiere provides us with an initialized database dump. This file contains a list of SQL commands that can be used to create the ADempiere database structure and predefined data. The physical name of this file is Adempiere_pg.dmp. We will find this file in the C:\Adempiere\data folder.
Note
The C:\Adempiere\data folder will contain two DMP files. These are Adempiere.dmp and Adempiere_pg.dmp. The Adempiere.dmp file will be used for the Oracle installation, and the Adempiere_pg.dmp file will be used for PostgreSQL installation.
Creating a PostgreSQL new login role
While configuring the ADempiere server, a special login role is required, which is used internally by ADempiere. We can define additional login roles by using the pgAdmin III tools. We can access these tools through Start | All Programs | PostgreSQL 8.3 | pgAdmin III.
Double-click on PostgreSQL 8.3 (localhost:5432) in Object browser to connect to the PostgreSQL database server. When the system prompts us with the Connect to Server window, we will supply our postgres account password and click on OK.
Note
During the PostgreSQL databases installation, we provided postgres as our postgres account password.
After successfully logging in by using this tool, the system will show a screen similar to the following screenshot:
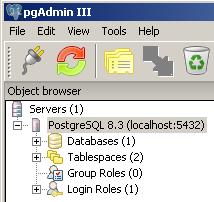
In order to add a new login role, right-click on the Login Roles node, and click on New Login Role. Create the role name adempiere with the password adempiere, and ensure that the following Role Privileges are selected:
Superuser
Can create database objects
Can create roles
Can modify catalog directly
Tip
This role name is the user who was previously configured in the Modify client authentication configuration file section.
Creating an ADempiere database
Using the pgAdmin III tools, we will create our new ADempiere database. Right-click on the Databases node, and then click on New database in the Object browser. Complete the information fields within the Properties tab, as shown in the following table:
|
No |
Field |
Value |
|---|---|---|
|
1 |
Name |
adempiere |
|
2 |
Owner |
adempiere |
|
3 |
Encoding |
UTF8 |
Leave the other information as it is. Click on OK to proceed to the database creation procedure.
Tip
By default, we will initially have an initial or blank ADempiere database due to the previous activities. We need to import the ADempiere database structure such as table, view, function, and initial data, from the existing database dump file later.
Configuring the ADempiere server
ADempiere needs to be configured on the server side. This task is intended to notify ADempiere about predefined variables or information. This information is needed by ADempiere to integrate the database, to bind official ADempiere core patches and ZK web user interface patches to the ADempiere core application, and to host these core packages on their default embedded application server (JBoss).
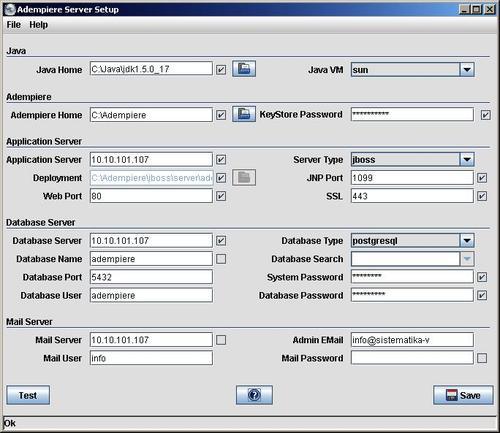
Double-click on the run_setup.bat file, which can be found in the C:\Adempiere folder. We need to complete the fields using the information given in the following table:
|
No |
Field |
Default value |
Set value to |
|---|---|---|---|
|
1 |
Application server |
your computer name |
your server ip address |
|
2 |
Database server |
your computer name |
your server ip address |
|
3 |
Database type |
oracleXE |
postgresql |
|
4 |
Database name |
xe |
adempiere |
|
5 |
System password |
blank |
postgres |
|
6 |
Mail server |
your computer name |
your server ip address |
Leave the other fields unchanged. Click on the Test button in the Adempiere Server Setup window. When the system prompts you with the Key Store Dialog window, complete the fields with your information, and ensure that the setup window displays an Ok message on the bottom-left info bar, as shown in the following screenshot:
Click on Save to proceed with our ADempiere server installation configuration. Carefully read through the ADempiere license agreement window. Accept the terms of the agreement, and click on OK once again to start the ADempiere deployment. Wait for a moment as the ADempiere system performs its internal tasks to configure and build our ADempiere server.
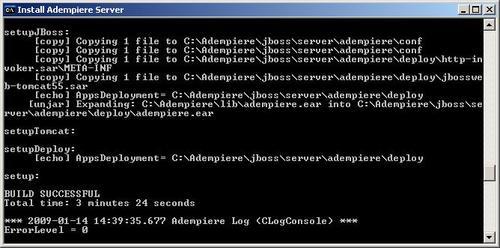
At the end of these tasks, we will get the information shown in the next screenshot, which indicates successful packaging and deployment of the application to the embedded JBoss application server.
Tip
During the Test procedure on the Adempiere Server Setup window, we might get a server setup error message—Error JDBC Connection. (Error connecting: jdbc:postgresql://your_pc_name:5432/template1 postgres/postgres). Just make sure that you have defined the Application Server, Database Server, Database Type, Database Name, and System Password, as mentioned earlier, and set up the PostgreSQL client authentication properly, as mentioned in the section Modifying client authentication configuration file.
As mentioned earlier, the ADempiere developer community will release their patches regularly. If there are newer patches available, you can download those patch files, perform MD5 verification, copy them to the C:\Adempiere\lib folder, and then run run_setup.bat again.
Importing the initial ADempiere database
We need to import the structures such as tables, functions, initial data, and another prerequisite metadata into our blank ADempiere database previously created. ADempiere provides us with a script or batch file to load Adempiere_pg.dmp into our blank ADempiere database.
Find and execute RUN_ImportAdempiere.bat, which can be found in the C:\Adempiere\utils folder. During execution, this script will show you a message, as shown in the next screenshot:
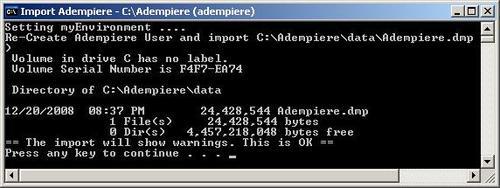
Press Enter, and the import activity will run immediately.
Tip
If you encounter a:
psql: FATAL database "adempiere" does not exist
error message, then you can rectify this problem by accessing http://adempiere.svn.sourceforge.net/viewvc/adempiere/branches/adempiere343/utils/postgresql/ImportAdempiere.bat.
From this preview file, we can copy the content and save it as ImportADempiere.bat.
Next, access the link http://adempiere.svn.sourceforge.net/viewvc/adempiere/branches/adempiere343/utils/postgresql/DBRestore.bat.
Save it as DBRestore.bat.
Put these files in C:\Adempiere\utils\postgresql as a replacement for the initial files. This should fix your problem.
Although it lists the Adempiere.dmp file with our configuration value while executing run_setup.bat, this batch file should load and import the Adempiere_pg.dmp file.
Applying the database migration script
After importing the initial database structure, we need to apply all of the migration scripts available. The important thing, when applying the migration scripts, is that you have to process the files in a sequential order! You can check the number given in the file name of each of the available SQL files (based on sequential process). With our available migration script, the execution process would be in the following order:
372_round.sql379_FR1883270_NextIdByYear.sql391_C_Currency_Rate.sql
And so on.
To apply these SQL files, you need to open your DOS prompt. Change the active directory to C:\download\adempiere\sql. Then execute the following commands, one-by-one (and only execute each once):
psql -U adempiere -f 372_round.sql -o 372.txt
psql -U adempiere -f 379_FR1883270_NextIdByYear.sql -o 379.txt
psql -U adempiere -f 391_C_Currency_Rate.sql -o 391.txt
psql -U adempiere -f 398_currencyround.sql -o 398.txt
psql -U adempiere -f 413_BF2567104.sql -o 413.txt
psql -U adempiere -f 417_FR2582181.sql -o 417.txt
psql -U adempiere -f 436_MissingSysConfigKeys.sql -o 436.txt
psql -U adempiere -f 441_BF2710889_Add_Months.sql -o 441.txt
psql -U adempiere -f 442_BF2710889_PaymentTermDueDate.sql -o 442.txt
psql -U adempiere -f 443_BF2714803_InvoicepaidToDate.sql -o 443.txt
psql -U adempiere -f 444_BF2714831_InvoiceopenToDate.sql -o 444.txt
psql -U adempiere -f 566_FR1756793_RMA_JUST_FOR_343.sql -o 566.txt
You can supply the default password as adempiere (when system prompts with the Password for user adempiere message). After performing this activity, your database complies with the newer or latest ADempiere database structures.
For more information on migration scripts, you can access http://www.adempiere.com/index.php/Migration.
ADempiere server memory management
We can check the physical memory available by opening Windows Task Manager. Use the shortcut keys Ctrl + Shift + Esc. Click on the Performance tab and you will see the Physical Memory (K) information, as shown in the following screenshot:

This shows that the author's computer has 2086956 kilobytes (almost 2 GB) of physical memory.
During the initial loading of the ADempiere application server, the system will allocate a minimum memory for its operations, and if necessary, it will allocate more memory resources until it reaches the maximum value specified by the configuration. We can access this configuration from the myEnvironment.bat file in the C:\Adempiere\utils folder.
If you go through this file, then you will find the following information:
@SET ADEMPIERE_JAVA_OPTIONS=-Xms64M -Xmx512M -DADEMPIERE_HOME=C:\Adempiere
With this default configuration, ADempiere will consume 64 MB of available memory (-Xms64M) during the initial loading. If required, the maximum memory could be allocated, that is, 512 MB (-Xmx512M).
We are not discussing how to perform efficient memory allocation. We are just ensuring that we have allocated the maximum memory, that is, 75 percent of our memory available.
With this requirement, we can set this configuration as follows:
@SET ADEMPIERE_JAVA_OPTIONS=-Xms256M -Xmx512M -DADEMPIERE_HOME=C:\Adempiere
This means that we will allocate a maximum of 512 MB of memory from the available memory of 1406 MB on the author's computer.
Starting up the ADempiere application server
On the server side, we need to start our application server. To start the application server, double-click on Run_Server2.bat in the C:\Adempiere\utils folder.
Check the DOS Prompt, and wait for a while, until you see a notification such as the following:
12:31:52,564 INFO [Server] JBoss (MX MicroKernel) [4.0.2 (build: CVSTag=JBoss_4_0_2 date=200505022023)] Started in 1m:48s:637ms
Now our application server is ready.
Starting the application server will start ADempiere's accounting processors, internal schedulers, ADempiere's web user interface, ADempiere's web admin tools (that can be used to install ADempiere client), ADempiere's client Web Start feature, and all of the activities related to the ADempiere server.
After we finish our work with the ADempiere server, we have to shut down the application server. We can shut it down by double-clicking on Run_Server2Stop.bat in the C:\Adempiere\utils folder.


