We will start by creating a simple Tic-tac-toe game, using the basic pieces of GUI that Unity provides. Following this, we will discuss how we can change the styles of our GUI controls to improve the look of our game. We will also explore some tips and tricks to handle the many different screen sizes of Android devices. Finally, we will learn about a much quicker way, to put our games on the device. With all that said, let's jump in.
In this article, we will cover the following topics:
- User preferences
- Buttons, text, and images
- Dynamic GUI positioning
- Build and run
In this article, we will be creating a new project in Unity. The first section here will walk you through its creation and setup
(For more resources related to this topic, see here.)
Creating a Tic-tac-toe game
The project for this article is a simple Tic-tac-toe style game, similar to what any of us might play on paper. As with anything else, there are several ways in which you can make this game. We are going to use Unity's uGUI system in order to better understand how to create a GUI for any of our other games.
The game board
The basic Tic-tac-toe game involves two players and a 3 x 3 grid. The players take turns filling squares with Xs and Os. The player who first fills a line of three squares with their letter wins the game. If all squares are filled without a player achieving a line of three, the game is a tie. Let's start with the following steps to create our game board:
- The first thing to do is to create a project for this article. So, start up Unity and we will do just that.
If you have been following along so far, Unity should boot up into the last project that was open. This isn't a bad feature, but it can become extremely annoying. Think of it like this: you have been working on a project for a while and it has grown large. Now you need to quickly open something else, but Unity defaults to your huge project. If you wait for it to open before you can work on anything else, it can consume a lot of time.
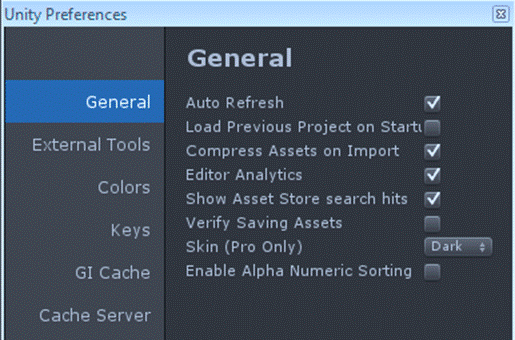
To change this feature, go to the top of the Unity window and click on Edit followed by Preferences. This is the same place where we changed our script editor's preferences. This time, though, we are going to change settings in the General tab. The following screenshot shows the options that are present under the General tab:

- At this moment, our primary concern is the Load Previous Project on Startup option; however, we will still cover all of the options in turn. All the options under the General tab are explained in detail as follows:
- Auto Refresh: This is one of the best features of Unity. As an asset is changed outside of Unity, this option lets Unity automatically detect the change and refresh the asset inside your project.
- Load Previous Project on Startup: This is a great option and you should make sure that this is unchecked whenever installing Unity. When checked, Unity will immediately open the last project you worked on rather than Project Wizard.
- Compress Assets on Import: This is the checkbox for automatically compressing your game assets when they are first imported to Unity.
- Editor Analytics: This checkbox is for Unity's anonymous usage statistics. Leave it checked and the Unity Editor will send information occasionally to the Unity source. It doesn't hurt anything to leave it on and helps the Unity team to make the Unity Editor better; however, it comes down to personal preference.
- Show Asset Store search hits: This setting is only relevant if you plan to use Asset Store. The asset store can be a great source of assets and tools for any game; however, since we are not going to use it. It does what the name suggests. When you search the asset store for something within the Unity Editor, the number of results is displayed based on this checkbox.
- Verify Saving Assets: This is a good one to be left off. If this is on, every time you click on Save in Unity, a dialog box will pop up so that you can make sure to save any and all of the assets that have changed since your last save. This option is not so much about your models and textures, but it is concerned with Unity's internal files, materials, and prefabs. It's best to leave it off for now.
- Skin (Pro Only): This option only applies to Unity Pro users. It gives the option to switch between the light and dark versions of the Unity Editor. It is purely cosmetic, so go with your gut for this one.
- With your preferences set, now go to File and then select New Project.
- Click on the Browse... button to pick a location and name for the new project.
- We will not be using any of the included packages, so click on Create and we can get on with it.
By changing a few simple options, we can save ourselves a lot of trouble later. This may not seem like that big of a deal now for simple projects from this article, but, for large and complex projects, not choosing the correct options can cause a lot of hassle for you even if you just want to make a quick switch between projects.
Creating the board
With the new project created, we have a clean slate to create our game. Before we can create the core functionality, we need to set up some structure in our scene for our game to work and our players to interact with:
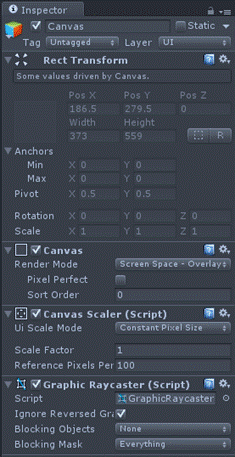
- Once Unity finishes initializing the new project, we need to create a new canvas. We can do this by navigating to GameObject | UI | Canvas. The whole of Unity's uGUI system requires a canvas in order to draw anything on the screen. It has a few key components, as you can see in the following Inspector window, which allow it and everything else in your interface to work.

- Rect Transform: This is a special type of the normal transform component that you will find on nearly every other object that you will use in your games. It keeps track of the object's position on screen, its size, its rotation, the pivot point around which it will rotate, and how it will behave when the screen size changes. By default, the Rect Transform for a canvas is locked to include the whole screen's size.
- Canvas: This component controls how it and the interface elements it controls interact with the camera and your scene. You can change this by adjusting Render Mode. The default mode, Screen Space – Overlay, means that everything will be drawn on screen and over top of everything else in the scene. The Screen Space – Camera mode will draw everything a specific distance away from the camera. This allows your interface to be affected by the perspective nature of the camera, but any models that might be closer to the camera will appear in front of it. The World Space mode ensures that the canvas and elements it controls are drawn in the world just like any of the models in your scene.
- Graphics Raycaster: This is the component that lets you actually interact with and click on your various interface elements.
- When you added the canvas, an extra object called EventSystem was also created. This is what allows our buttons and other interface elements to interact with our scripts. If you ever accidentally delete it, you can recreate it by going to the top of the Unity and navigating to GameObject | UI | EventSystem.
- Next, we need to adjust the way the Unity Editor will display our game so that we can easily make our game board. To do this, switch to the Game view by clicking on its tab at the top of the Scene view.
- Then, click on the button that says Free Aspect and select the option near the bottom: 3 : 2 Landscape (3 : 2). Most of the mobile devices your games will be played on will use a screen that approximates this ratio. The rest will not see any distortion in your game.
- To allow our game to adjust to the various resolutions, we need to add a new component to our canvas object. With it selected in the Hierarchy panel, click on Add Component in the Inspector panel and navigate to Layout | Canvas Scaler. The selected component allows a base screen resolution to be worked from, letting it automatically scale our GUI as the devices change.
- To select a base resolution, select Scale With Screen Size from the Ui Scale Mode drop-down list.
- Next, let's put 960 for X and 640 for Y. It is better to work from a larger resolution than a smaller one. If your resolution is too small, all your GUI elements will look fuzzy when they are scaled up for high-resolution devices.
- To keep things organized, we need to create three empty GameObjects. Go back to the top of Unity and select Create Empty three times under GameObject.
- In the Hierarchy tab, click and drag them to our canvas to make them the canvas's children.
- To make each of them usable for organizing our GUI elements, we need to add the Rect Transform component. Find it by navigating to Add Component | Layout | Rect Transform in Inspector for each.
- To rename them, click on their name at the top of the Inspector and type in a new name. Name one Board, another Buttons, and the last one as Squares.
- Next, make Buttons and Squares children of Board. The Buttons element will hold all of the pieces of our game board that are clickable while Squares will hold the squares that have already been selected.
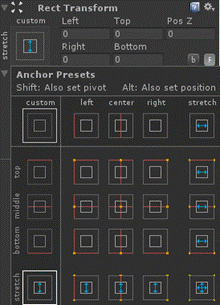
- To keep the Board element at the same place as the devices change, we need to change the way it anchors to its parent. Click on the box with a red cross and a yellow dot in the center at the top right of Rect Transform to expand the Anchor Presets menu:

- Each of these options affects which corner of the parent the element will stick to as the screen changes size. We want to select the bottom-right option with four arrows, one in each direction. This will make it stretch with the parent element.
- Make the same change to Buttons and Squares as well.
- Set Left, Top, Right, and Bottom of each of these objects to 0. Also, make sure that Rotation is all set to 0 and Scale is set to 1. Otherwise, our interface may be scaled oddly when we work or play on it.
- Next, we need to change the anchor point of the board. If Anchor is not expanded, click on the little triangle on the left-hand side to expand it. Either way, the Max X value needs to be set to 0.667 so that our board will be a square and cover the left two-thirds of our screen.
This game board is the base around which the rest of our project will be created. Without it, the game won't be playable. The game squares use it to draw themselves on screen and anchor themselves to relevant places. Later, when we create menus, this is needed to make sure that a player only sees what we need them to be interacting with at that moment.
Game squares
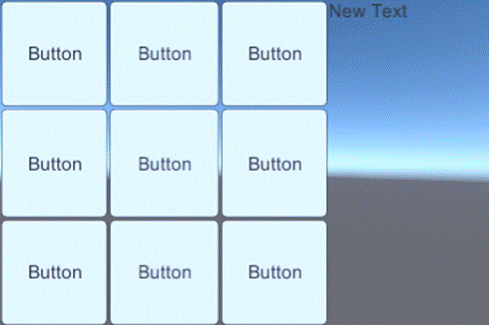
Now that we have our base game board in place, we need the actual game squares. Without them, it is going to be kind of hard to play the game. We need to create nine buttons for the player to click on, nine images for the background of the selected squares, and nine texts to display which person controls the squares. To create them and set them up, perform these steps:
- Navigate to Game Object | UI just like we did for the canvas, but this time select Button, Image, and Text to create everything we need.
- Each of the image objects needs one of the text objects as a child. Then, all of the images must be children of the Squares object and the buttons must be children of the Buttons object.
- All of the buttons and images need a number in their name so that we can keep them organized. Name the buttons Button0 through Button8 and the images Square0 through Square8.
- The next step is to lay out our board so that we can keep things organized and in sync with our programming. We need to set each numbered set specifically. But first, pick the crossed arrows from the bottom-right corner of Anchor Presets for all of them and ensure that their Left, Top, Right, and Bottom values are set to 0.
- To set each of our buttons and squares at the right place, just match the numbers to the following table. The result will be that all the squares will be in order, starting at the top left and ending at the bottom right:
|
Square
|
Min X
|
Min Y
|
Max X
|
Max Y
|
|
0
|
0
|
0.67
|
0.33
|
1
|
|
1
|
0.33
|
0.67
|
0.67
|
1
|
|
2
|
0.67
|
0.67
|
1
|
1
|
|
3
|
0
|
0.33
|
0.33
|
0.67
|
|
4
|
0.33
|
0.33
|
0.67
|
0.67
|
|
5
|
0.67
Unlock access to the largest independent learning library in Tech for FREE!
Get unlimited access to 7500+ expert-authored eBooks and video courses covering every tech area you can think of.
Renews at AU $24.99/month. Cancel anytime
|
0.33
|
1
|
0.67
|
|
6
|
0
|
0
|
0.33
|
0.33
|
|
7
|
0.33
|
0
|
0.67
|
0.33
|
|
8
|
0.67
|
0
|
1
|
0.33
|
- The last thing we need to add is an indicator to show whose turn it is. Create another Text object just like we did before and rename it as Turn Indicator.
- After you make sure that the Left, Top, Right, and Bottom values are set to 0 again, set Anchor Point Preset to the blue arrows again.
- Finally, set Min X under Anchor to 0.67.
- We now have everything that we need to play the basic game of Tic-tac-toe. To check it out, select the Squares object and uncheck the box in the top-right corner to turn it off. When you hit play now, you should be able to see your whole game board and click on the buttons. You can even use Unity Remote to test it with the touch settings. If you have not already done so, it would be a good idea to save the scene before continuing.
The game squares are the last piece to set up our initial game. It almost looks like a playable game now. We just need to add a few scripts and we will be able to play all the games of Tic-tac-toe that we could ever desire.
Controlling the game
Having a game board is one of the most important parts of creating any game. However, it does us no good if we can't control what happens when its various buttons are pressed. Let's create some scripts and write some code to fix this now:
- Create two new scripts in the Project panel. Name the new scripts as TicTacToeControl and SquareState. Open them and clear out the default functions.
- The SquareState script will hold the possible states of each square of our game board. To do this, clear absolutely everything out of the script, including the using UnityEngine line and the public class SquareState line, so that we can replace it with a simple enumeration. An enumeration is just a list of potential values. This one is concerned with the player who controls the square. It will allow us to keep track of whether X's controlling it, O's controlling it, or if it is clear. The Clear statement becomes the first and therefore, the default state:
public enum SquareState {
  Clear,
  Xcontrol,
  Ocontrol
}
- In our other script, TicTacToeControl, we need to start by adding an extra line at the very beginning, right under using UnityEngine. This line lets our code interact with the various GUI elements, most importantly with this game, allowing us to change the text of who controls a square and whose turn it is.
using UnityEngine.UI;
- Next, we need two variables that will largely control the flow of the game. They need to be added in place of the two default functions. The first defines our game board. It is an array of nine squares to keep track of who owns what. The second keeps track of whose turn it is. When the Boolean is true, the X player gets a turn. When the Boolean is false, the O player gets a turn:
public SquareState[] board = new SquareState[9];
public bool xTurn = true;
- The next variable will let us change the text on screen for whose turn it is:
public Text turnIndicatorLandscape;
- These three variables will give us access to all of the GUI objects that we set up in the last section, allowing us to change the image and text based on who owns the square. We can also turn the buttons and squares on and off as they are clicked. All of them are marked with Landscape so that we will be able to keep them straight later, when we have a second board for the Portrait orientation of devices:
public GameObject[] buttonsLandscape;
public Image[] squaresLandscape;
public Text[] squareTextsPortrait;
- The last two variables for now will give us access to the images that we need to change the backgrounds:
public Sprite oImage;
public Sprite xImage;
- Our first function for this script will be called every time a button is clicked. It receives the number of buttons clicked, and the first thing it does is turn the button off and the square on:
public void ButtonClick(int squareIndex) {
  buttonsLandscape[squareIndex].SetActive(false);
  squaresLandscape[squareIndex].gameObject.SetActive(true);
- Next, the function checks the Boolean that we created earlier to see whose turn it is. If it is the X player's turn, the square is set to use the appropriate image and text, indicating that their control is set. It then marks on the script's internal board that controls the square before finally switching to the O player's turn:
if(xTurn) {
  squaresLandscape[squareIndex].sprite = xImage;
  squareTextsLandscape[squareIndex].text = "X";

  board[squareIndex] = SquareState.XControl;
  xTurn = false;
  turnIndicatorLandscape.text = "O's Turn";
}
- This next block of code does the same thing as the previous one, except it marks control for the O player and changes the turn to the X player:
else {
  squaresLandscape[squareIndex].sprite = oImage;
  squareTextsLandscape[squareIndex].text = "O";

  board[squareIndex] = SquareState.OControl;
  xTurn = true;
  turnIndicatorLandscape.text = "X's Turn";
}
}
- That is it for the code right now. Next, we need to return to the Unity Editor and set up our new script in the scene. You can do this by creating another empty GameObject and renaming it as GameControl.
- Add our TicTacToeControl script to it by dragging the script from the Project panel and dropping it in the Inspector panel when the object is selected.
- We now need to attach all of the object references that our script needs in order to actually work. We don't need to touch the Board or XTurn slots in the Inspector panel, but the Turn Indicator object does need to be dragged from the Hierarchy tab to the Turn Indicator Landscape slot in the Inspector panel.
- Next, expand the Buttons Landscape, Squares Landscape, and Square Texts Landscape settings and set each Size slot to 9.
- To each of the new slots, we need to drag the relevant object from the Hierarchy tab. The Element 0 object under Buttons Landscape gets Button0, Element 1 gets Button1, and so on. Do this for all of the buttons, images, and texts. Ensure that you put them in the right order or else our script will appear confusing as it changes things when the player is playing.
- Next, we need a few images. If you have not already done so, import the starting assets for this article by going to the top of Unity, by navigating to Assets | Import New Asset and selecting the files to import them. You will need to navigate to and select each one at a time. We have Onormal and Xnormal for indicating control of the square. The ButtonNormal image is used when the button is just sitting there and ButtonActive is used when the player touches the button. The Title field is going to be used for our main menu a little bit later.
- In order to use any of these images in our game, we need to change their import settings. Select each of them in turn and find the Texture Type dropdown in the Inspector panel. We need to change them from Texture to Sprite (2D \ uGUI). We can leave the rest of the settings at their defaults. The Sprite Mode option is used if we have a sprite sheet with multiple elements in one image. The Packing Tag option is used for grouping and finding sprites in the sheet. The Pixels To Units option affects the size of the sprite when it is rendered in world space. The Pivot option simply changes the point around which the image will rotate.
- For the four square images, we can click on Sprite Editor to change how the border appears when they are rendered. When clicked, a new window opens that shows our image with some green lines at the edges and some information about it in the lower-right. We can drag these green lines to change the Border property. Anything outside the green lines will not be stretched with the image as it fills spaces that are larger than it. A setting around 13 for each side will keep our whole border from stretching.
- Once you make any changes, ensure that you hit the Apply button to commit them.
- Next, select the GameControl object once more and drag the ONormal image to the OImage slot and the XNormal image to the XImage slot.
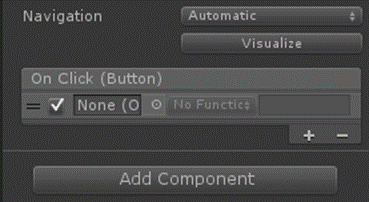
- Each of the buttons needs to be connected to the script. To do this, select each of them from Hierarchy in turn and click on the plus sign at the bottom-right corner of their Inspector:

- We then need to click on that little circle to the left of No Function and select GameControl from the list in the new window.
- Now navigate to No Function | TicTacToeControl | ButtonClick (int) to connect the function in our code to the button.
- Finally, for each of the buttons, put the number of the button in the number slot to the right of the function list.
- To keep everything organized, rename your Canvas object to GameBoard_Landscape.
- Before we can test it out, be sure that the Squares object is turned on by checking the box in the top-left corner of its Inspector. Also, uncheck the box of each of its image children.

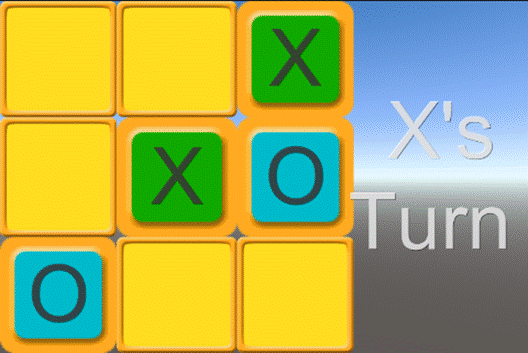
This may not look like the best game in the world, but it is playable. We have buttons that call functions in our scripts. The turn indicator changes as we play. Also, each square indicates who controls it after they are selected. With a little more work, this game could look and work great.
Messing with fonts
Now that we have a basic working game, we need to make it look a little better. We are going to add our button images and pick some new font sizes and colors to make everything more readable:
- Let's start with the buttons. Select one of the Button elements and you will see in the Inspector that it is made of an Image (Script) component and a Button (Script) component. The first component controls how the GUI element will appear when it just sits there. The second controls how it changes when a player interacts with it and what bit of functionality this triggers.
- Source Image: This is the base image that is displayed when the element just sits there and is untouched by the player.
- Color: This controls the tinting and fading of the image that is being used.
- Material: This lets you use a texture or shader that might otherwise be used on 3D models.
- Image Type: This determines how the image will be stretched to fill the available space. Usually, it will be set to Sliced, which is for images that use a border and can be optionally filled with a color based on the Fill Center checkbox. Otherwise, it will be often set to Simple, for example when you are using a normal image and can use prevent the Preserve Aspect box from being stretched by odd sized Rect Transforms.
- Interactable: This simply toggles whether or not the player is able to click on the button and trigger functionality.
- Transition: This changes how the button will react as the player interacts with it. ColorTint causes the button to change color as it is interacted with. SpriteSwap will change the image when it is interacted with. Animation will let you define more complex animation sequences for the transitions between states.
- The Target Graphic is a reference to the base image used for drawing the button on screen.
- The Normal slot, Highlighted slot, Pressed slot, and Disabled slot define the effects or images to use when the button is not being interacted with, is moused over, the player clicks on it, and when the button has been turned off.
- For each of our buttons, we need to drag our ButtonNormal image from our Project panel to the Source Image slot.
- Next, click on the white box to the right of the Color slot to open the color picker. To stop our buttons from being faded, we need to move the A slider all the way to the right or set the box to 255.
- We want to change images when our buttons are pressed, so change the Transition to SpriteSwap.
- Mobile devices have almost no way of hovering over GUI elements, so we do not need to worry about the Highlighted state. However, we do want to add our ButtonActive image to the Pressed Sprite slot so that it will switch when the player touches the button.
- The button squares should be blank until someone clicks on them, so we need to get rid of the text element. The easiest way to do this is to select each one under the button and delete it.
- Next, we need to change the Text child of each of the image elements. It is the Text (Script) component that allows us to control how text is drawn on screen.
- Text: This is the area where we can change text that will be drawn on screen.
- Font: This allows us to pick any font file that is in our project to use for the text.
- Font Style: This will let you adjust the bold and italic nature of the text.
- Font Size: This is the size of the text. This is just like picking a font size in your favorite word processor.
- Line Spacing: This is the distance between each line of text.
- Rich Text: This will let you use a few special HTML style tags to affect only part of the text with a color, italics, and so on.
- Alignment: This changes the location where the text will be centered in the box. The first three boxes adjust the horizontal position. The second three change the vertical position.
- Horizontal Overflow / Vertical Overflow: These adjust whether the text can be drawn outside the box, wrapped to a new line, or clipped off.
- Best Fit: This will automatically adjust the size of the text to fit a dynamically size-changing element, within a Min and Max value.
- Color/Material: These change the color and texture of the text as and when it is drawn.
- Shadow (Script): This component adds a drop shadow to the text, just like what you might add in Photoshop.
- For each of our text elements, we need to use a Font Size of 120 and the Alignment should be centered.
- For the Turn Indicator text element, we also need to use a Font Size of 120 and it also needs to be centered.
- The last thing to do is to change the Color of the text elements to a dark gray so that we can easily see it against the color of our buttons:

Now, our board works and looks good too. Try taking a stab at adding your own images for the buttons. You will need two images; one for when the button sits there and one for when the button is pressed. Also, the default Arial font is boring. Find a new font to use for your game; you can import it just like any other asset for your game.
Rotating devices
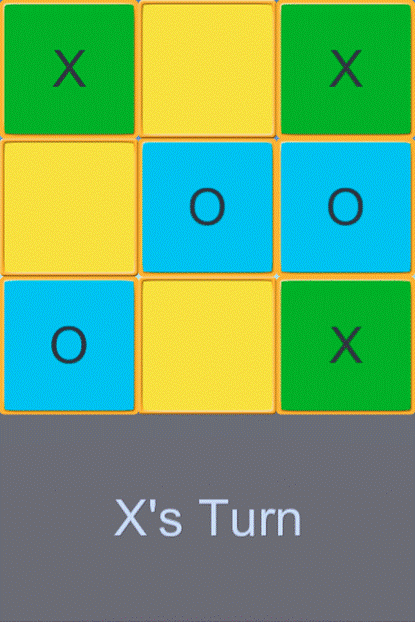
If you have been testing your game so far, you have probably noticed that the game only looks good when we hold the device in the landscape mode. When it is held in the portrait mode, everything becomes squished as the squares and turn indicator try to share the little amount of horizontal space that is available. As we have already set up our game board in one layout mode, it becomes a fairly simple matter to duplicate it for the other mode. However, it does require duplicating a good portion of our code to make it all work properly:
- To make a copy of our game board, right-click on it and select Duplicate from the new menu. Rename the duplicate game board to GameBoard_Portrait. This will be the board used when our player's device is in the portrait mode. To see our changes while we are making them, turn off the landscape game board and select 3:2 Portrait (2:3) from the drop-down list at the top left of the Game window.
- Select the Board object that is a child of GameBoard_Portrait. In its Inspector panel, we need to change the anchors to use the top two-thirds of the screen rather than the left two-thirds. The values of 0 for Min X, 0.33 for Min Y, and 1 for both Max X and Max Y will make this happen.
- Next, Turn Indicator needs to be selected and moved to the bottom-third of the screen. Values of 0 for Min X and Min Y, 1 for Max X, and 0.33 for Max Y will work well here.
- Now that we have our second board set up, we need to make a place for it in our code. So, open the TicTacToeControl script and scroll to the top so that we can start with some new variables.
- The first variable that we are going to add will give us access to the turn indicator for the portrait mode of our screen:
public Text turnIndicatorPortrait;
- The next three variables will keep track of the buttons, square images, and owner text information. These are just like the three lists that we created earlier to keep track of the board while it is in the landscape mode:
public GameObject[] buttonsPortrait;
public Image[] squaresPortrait;
public Text[] squareTextsPortrait;
- The last two variables that we are going to add to the top of our script here are for keeping track of the two canvas objects that actually draw our game boards. We need these so that we can switch between them as the user turns their device around.
public GameObject gameBoardGroupLandscape;
public GameObject gameBoardGroupPortrait;
- Next, we need to update a few of our functions so that they make changes to both boards and not just the landscape board. These first two lines turn the portrait board's buttons off and the squares on when the player clicks on them. They need to go at the beginning of our ButtonClick function. Put them right after the two lines where we use SetActive on the buttons and squares for the landscape set:
buttonsPortrait[squareIndex].SetActive(false);
squaresPortrait[squareIndex].gameObject.SetActive(true);
- These two lines change the image and text for the controlling square in favor of the X player for the Portrait set. They go inside the if statement of our ButtonClick function, right after the two lines that do the same thing for the landscape set:
squaresPortrait[squareIndex].sprite = xImage;
squareTextsPortrait[squareIndex].text = "X";
- This line goes at the end of that same if statement and changes the Portrait set's turn indicator text:
turnIndicatorPortrait.text = "O's Turn";
- The next two lines change image and text in favor of the O player. They go after the same lines for the Landscape set, inside of the else statement of our ButtonClick function:
squaresPortrait[squareIndex].sprite = oImage;
squareTextsPortrait[squareIndex].text = "O";
- This is the last line that we need to add to our ButtonClick function; it needs to be put at the end of the else statement. It simply changes the text indicating whose turn it is:
turnIndicatorPortrait.text = "X's Turn";
- Next, we need to create a new function to control the changing of our game boards when the player changes the orientation of their device. We will start by defining the Update function. This is a special function called by Unity for every single frame. It will allow us to check for a change in orientation for every frame:
public void Update() {
- The function begins with an if statement that uses Input.deviceOrientation to find out how the player's device is currently being held. It compares the finding to the LandscapeLeft orientation to see whether the device is begin held sideways, with the home button on the left side. If the result is true, the Portrait set of GUI elements are turned off while the Landscape set is turned on:
if(Input.deviceOrientation == DeviceOrientation.LandscapeLeft) {
  gameBoardGroupPortrait.SetActive(false);
  gameBoardGroupLandscape.SetActive(true);
}
- The next else if statement checks for a Portrait orientation, the home button is down. It turns Portrait on and the Landscape set off if true:
else if(Input.deviceOrientation == DeviceOrientation.Portrait) {
  gameBoardGroupPortrait.SetActive(true);
  gameBoardGroupLandscape.SetActive(false);
}
- This else if statement is checking LanscapeRight when the home button is on the right side:
else if(Input.deviceOrientation == DeviceOrientation.LandscapeRight) {
  gameBoardGroupPortrait.SetActive(false);
  gameBoardGroupLandscape.SetActive(true);
}
- Finally, we check the PortraitUpsideDown orientation, which is when the home button is at the top of the device. Don't forget the extra bracket to close off and end the function:
else if(Input.deviceOrientation == DeviceOrientation.PortraitUpsideDown) {
  gameBoardGroupPortrait.SetActive(true);
  gameBoardGroupLandscape.SetActive(false);
}
}
- We now need to return to Unity and select our GameControl object so that we can set up our new Inspector properties.
- Drag and drop the various pieces from the portrait game board in Hierarchy to the relevant slot in Inspector, Turn Indicator to the Turn Indicator Portrait slot, the buttons to the Buttons Portrait list in order, the squares to Squares Portrait, and their text children to the Square Texts Portrait.
- Finally, drop the GameBoard_Portrait object in the Game Board Group Portrait slot.

We should now be able to play our game and see the board switch when we change the orientation of our device. You will have to either build your project on your device or connect using Unity Remote because the Editor itself and your computer simply don't have a device orientation like your mobile device. Be sure to set the display mode of your Game window to Remote in the top-left corner so that it will update along with your device while using Unity Remote.
Menus and victory
Our game is nearly complete. The last things that we need are as follows:
- An opening menu where players can start a new game
- A bit of code for checking whether anybody has won the game
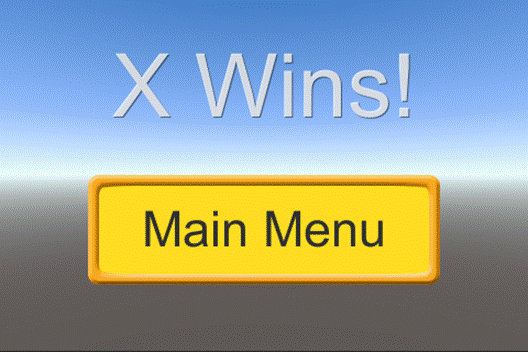
- A game over menu for displaying who won the game
Setting up the elements
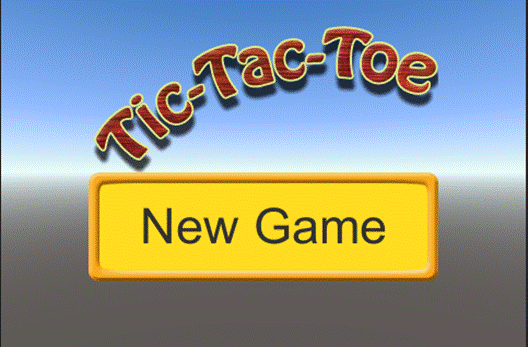
Our two new menus will be quite simple when compared to the game board. The opening menu will consist of our game's title graphic and a single button, while the game over menu will have a text element to display the victory message and a button to go back to the main menu. Let's perform the following steps to set up the elements:
- Let's start with the opening menu by creating a new Canvas, just like we did before, and rename it as OpeningMenu. This will allow us to keep it separate from the other screens that we have created.
- Next, the menu needs an Image element and a Button element as children.
- To make everything easier to work with, turn off the game boards with the checkbox at the top of their Inspector windows.
- For our image object, we can drag our Title image to the Source Image slot.
- For the image's Rect Transform, we need to set the Pos X and Pos Y values to 0.
- We also need to adjust the Width and Height. We are going to match the dimensions of the original image so that it will not be stretched. Put a value of 320 for Width and 160 for Height.
- To move the image to the top half of the screen, put a 0 in the Pivot Y slot. This changes where the position is based on for the image.
- For the button's Rect Transform, we again need the value of 0 for both Pos X and Pos Y.
- We again need a value of 320 for the Width, but this time we want a value of 100 for the Height.
- To move it to the bottom half of the screen, we need a value of 1 in the Pivot Y slot.
- Next up is to set the images for the button, just like we did earlier for the game board. Put the ButtonNormal image in the Source Image slot. Change Transition to SpriteSwap and put the ButtonActive image in the Pressed Sprite slot. Do not forget to change Color to have an A value of 255 in color picker so that our button is not partially faded.
- Finally, for this menu to change the button text, expand Button in the Hierarchy and select Text child object.
- Right underneath Text in the Inspector panel for this object is a text field where we can change the text displayed on the button. A value of New Game here will work well. Also, change Font Size to 45 so that we can actually read it.

- Next, we need to create the game over menu. So, turn off our opening menu and create a new canvas for our game over menu. Rename it as GameOverMenu so that we can continue to be organized.
- For this menu, we need a Text element and a Button element as its children.
- We will set this one up in an almost identical way to the previous one. Both the text and the button need values of 0 for the Pos X and Pos Y slots, with a value of 320 for Width.
- The text will use a Height of 160 and a Pivot Y of 0. We also need to set its Font Size as 80. You can change the default text, but it will be overwritten by our code anyway.
- To center our text in the menu, select the middle buttons from the two sets next to the Alignment property.
- The button will use a Height of 100 and a Pivot Y of 1.
- Also, be sure that you set the Source Image, Color, Transition, and Pressed Sprite to the proper images and settings.
- The last thing to set is the button's text child. Set the default text to Main Menu and give it a Font Size of 45.

That is it for setting up our menus. We have all the screens that we need to allow the player to interact with our game. The only problem is that we don't have any of the functionality to make them actually do anything.
Adding the code
To make our game board buttons work, we had to create a function in our script they could reference and call when they are touched. The main menu's button will start a new game, while the game over menu's button will change screens to the main menu. We will also need to create a little bit of code to clear out and reset the game board when a new game starts. If we don't, it would be impossible for the player to play more than one round before being required to restart the whole app if they want to play again.
- Open the TicTacToeControl script so that we can make some more changes to it.
- We will start with the addition of three variables at the top of the script. The first two will keep track of the two new menus, allowing us to turn them on and off as per our need. The third is for the text object in the game over screen that will give us the ability to put a message based on the result of the game.
- Next, we need to create a new function. The NewGame function will be called by the button in the main menu. Its purpose is to reset the board so that we can continue to play without having to reset the whole application.
public void NewGame() {
- The function starts by setting the game to start on the X player's turn. It then creates a new array of SquareStates, which effectively wipes out the old game board. It then sets the turn indicators for both the Landscape and Portrait sets of controls:
xTurn = true;
board = new SquareState[9];
turnIndicatorLandscape.text = "X's Turn";
turnIndicatorPortratit.text = "X's Turn";
- We next loop through the nine buttons and squares for both the Portrait and Landscape controls. All of the buttons are turned on and the squares are turned off using SetActive, which is the same as clicking on the little checkbox at the top-left corner of the Inspector panel:
for(int i=0;i<9;i++) {
  buttonsPortrait[i].SetActive(true);
  squaresPortrait[i].gameObject.SetActive(false);

  buttonsLandscape[i].SetActive(true);
  squaresLandscape[i].gameObject.SetActive(false);
}
- The last three lines of code control which screens are visible when we change over to the game board. By default, it chooses to turn on the Landscape board and makes sure that the Portrait board is turned off. It then turns off the main menu. Don't forget the last curly bracket to close off the function:
gameBoardGroupPortrait.SetActive(false);
  gameBoardGroupLandscape.SetActive(true);
  mainMenuGroup.SetActive(false);
}
- Next, we need to add a single line of code to the end of the ButtonClick function. It is a simple call to check whether anyone has won the game after the buttons and squares have been dealt with:
CheckVictory();
- The CheckVictory function runs through the possible combinations for victory in the game. If it finds a run of three matching squares, the SetWinner function will be called and the current game will end:
public void CheckVictory() {
- A victory in this game is a run of three matching squares. We start by checking the column that is marked by our loop. If the first square is not Clear, compare it to the square below; if they match, check it against the square below that. Our board is stored as a list but drawn as a grid, so we have to add three to go down a square. The else if statement follows with checks of each row. By multiplying our loop value by three, we will skip down a row of each loop. We'll again compare the square to SquareState.Clear, then to the square to its right, and finally with the two squares to its right. If either set of conditions is correct, we'll send the first square in the set to another function to change our game screen:
for(int i=0;i<3;i++) {
  if(board[i] != SquareState.Clear && board[i] == board[i + 3] && board[i] == board[i + 6]) {
    SetWinner(board[i]);
    return;
  }
  else if(board[i * 3] != SquareState.Clear && board[i * 3] == board[(i * 3) + 1] && board[i * 3] == board[(i * 3) + 2]) {
    SetWinner(board[i * 3]);
    return;
  }
}
- The following code snippet is largely the same as the if statements that we just saw. However, these lines of code check the diagonals. If the conditions are true, again send out to the other function to change the game screen. You probably also noticed the returns after the function calls. If we have found a winner at any point, there is no need to check any more of the board. So, we'll exit the CheckVictory function early:
if(board[0] != SquareState.Clear && board[0] == board[4] && board[0] == board[8]) {
  SetWinner(board[0]);
  return;
}
else if(board[2] != SquareState.Clear && board[2] == board[4] && board[2] == board[6]) {
  SetWinner(board[2]);
  return;
}
- This is the last little bit for our CheckVictory function. If no one has won the game, as determined by the previous parts of this function, we have to check for a tie. This is done by checking all the squares of the game board. If any one of them is Clear, the game has yet to finish and we exit the function. But, if we make it through the entire loop without finding a Clear square, we set the winner by declaring a tie:
for(int i=0;i<board.Length;i++) {
  if(board[i] == SquareState.Clear)
    return;
}
SetWinner(SquareState.Clear);
}
- Next, we create the SetWinner function that is called repeatedly in our CheckVictory function. This function passes who has won the game, and it initially turns on the game over screen and turns off the game board:
public void SetWinner(SquareState toWin) {
  gameOverGroup.SetActive(true);
  gameBoardGroupPortrait.SetActive(false);
  gameBoardGroupLandscape.SetActive(false);
- The function then checks to see who won and picks an appropriate message for the victorText object:
if(toWin == SquareState.Clear) {
    victorText.text = "Tie!";
  }
  else if(toWin == SquareState.XControl) {
    victorText.text = "X Wins!";
  }
  else {
    victorText.text = "O Wins!";
  }
}
- Finally, we have the BackToMainMenu function. This is short and sweet; it is simply called by the button on the game over screen to switch back to the main menu:
public void BackToMainMenu() {
  gameOverGroup.SetActive(false);
  mainMenuGroup.SetActive(true);
}
That is all of the code in our game. We have all of the visual pieces that make up our game and now, we also have all of the functional pieces. The last step is to put them together and finish the game.
Putting them together
We have our code and our menus. Once we connect them together, our game will be complete. To put it all together perform the following steps:
- Go back to the Unity Editor and select the GameControl object from the Hierarchy panel.
- The three new properties in its Inspector window need to be filled in. Drag the OpeningMenu canvas to the Main Menu Group slot and GameOverMenu to the Game Over Group slot.
- Also, find the text object child of GameOverMenu and drag it to the Victor Text slot.
- Next, we need to connect the button functionality for each of our menus. Let's start by selecting the button object child of our OpeningMenu canvas.
- Click on the little plus sign at the bottom right of its Button (Script) component to add a new functionality slot.
- Click on the circle in the center of the new slot and select GameControl from the new pop-up window, just like we did for each of our game board buttons.
- The drop-down list that currently says No Function is our next target. Click on it and navigate to TicTacToeControl | NewGame ().
- Repeat these few steps to add the functionality to the Button childof GameOverMenu. Except, select BackToMainMenu() from the list.
- The very last thing to do is to turn off both the game boards and the game over menu, using the checkbox in the top left of the Inspector. Leave only the opening menu on so that our game will start there when we play it.
Congratulations! This is our game. All of our buttons are set, we have multiple menus, and we even created a game board that changes based on the orientation of the player's device. The last thing to do is to build it for our devices and go show it off.
A better way to build to device
Now for the part of the build process that everyone itches to learn. There is a quicker and easier way to have your game built and play it on your Android device. The long and complicated way is still very good to know. Should this shorter method fail, and it will at some point, it is helpful to know the long method so that you can debug any errors. Also, the short path is only good for building for a single device. If you have multiple devices and a large project, it will take significantly more time to load them all with the short build process. Follow these steps:
- Start by opening the Build Settings window. Remember, it can be found under File at the top of the Unity Editor.
If you have not already done so, save your scene. The option to save your scene is also found under File at the top of the Unity Editor.
- Click on the Add Current button to add our current scene, also the only scene, to the Scenes In Build list. If this list is empty, there is no game.
- Be sure to change your Platform to Android, if you haven't already done so. Do not forget to set the Player Settings. Click on the Player Settings button to open them up in the Inspector window. At the top, set the Company Name and Product Name fields. Values of TomPacktAndroid and Ch2 TicTacToe respectively for these fields will match the included completed project. Remember, these fields will be seen by the people playing your game.
- The Bundle Identifier field under Other Settings needs to be set as well. The format is still com.CompanyName.ProductName, so com.TomPacktAndroid.Ch2.TicTacToe will work well. In order to see our cool dynamic GUI in action on a device, there is one other setting that should be changed. Click on Resolution and Presentation to expand the options.
- We are interested in Default Orientation. The default is Portrait, but this option means that the game will be fixed in the portrait display mode. Click on the drop-down menu and select Auto Rotation. This option tells Unity to automatically adjust the game to be upright irrespective of the orientation in which it is being held.
The new set of options that popped up when Auto Rotation was selected allows to limit the orientations that are supported. Perhaps you are making a game that needs to be wider and held in landscape orientation. By unchecking Portrait and Portrait Upside Down, Unity will still adjust (but only for the remaining orientations).
On your Android device, the controls are along one of the shorter sides; these usually are the home, menu, and back or recent apps buttons. This side is generally recognized as the bottom of the device and it is the position of these buttons that dictates what each orientation is. The Portrait mode is when these buttons are down relative to the screen. The Landscape Right mode is when they are to the right. The pattern begins to become clear, does it not?
- For now, leave all of the orientation options checked and we will go back to Build Settings.
- The next step (and this very important) is to connect your device to your computer and give it a moment to be recognized. If your device is not the first one connected to your computer, this shorter build path will fail.
- In the bottom-right corner of the Build Settings window, click on the Build And Run button. You will be asked to give the application file, the APK, a relevant name, and save it to an appropriate location. A name such as Ch2_TicTacToe.apk will be fine, and it is suitable enough to save the file to the desktop.
- Click on Save and sit back to watch the wonderful loading bar that is provided. After the application is built, there is a pushing to device step. This means that the build was successful and Unity is now putting the application on your device and installing it. Once this is done, the game will start on the device and the loading will be done.
We just learned about the Build And Run button provided by the Build Settings window. This is quick, easy, and free from the pain of using the command prompt; isn't the short build path wonderful? However, if the build process fails for any reason including being unable to find the device, the application file will not be saved. You will have to go through the entire build process again, if you want to try installing again. This isn't so bad for our simple Tic-tac-toe game, but it might consume a lot of time for a larger project. Also, you can only have one Android device connected to your computer while building. Any more devices and the build process is a guaranteed failure. Unity also doesn't check for multiple devices until after it has gone through the rest of the potentially long build process.
Other than these words of caution, the Build And Run option is really quite nice. Let Unity handle the hard part of getting the game to your device. This gives us much more time to focus on testing and making a great game.
If you are up for a challenge, this is a tough one: creating a single player mode. You will have to start by adding an extra button to the opening screen for selecting the second game mode. Any logic for the computer player should go in the Update function. Also, take a look at Random.Range for randomly selecting a square to take control. Otherwise, you could do a little more work and make the computer search for a square where it can win or create a line of two matches.
Summary
To learn more about ECMAScript and JavaScript, the following books published by Packt Publishing (https://www.packtpub.com/) are recommended:
Resources for Article:
Further resources on this subject:
 United States
 Great Britain
 India
India
 Germany
 France
 Canada
 Russia
 Spain
Spain
 Brazil
 Australia
 Singapore
 Hungary
 Ukraine
 Luxembourg
 Estonia
 Lithuania
 South Korea
 Turkey
 Switzerland
 Colombia
 Taiwan
 Chile
Chile
 Norway
 Ecuador
 Indonesia
 New Zealand
 Cyprus
 Denmark
 Finland
 Poland
 Malta
Malta
 Czechia
 Austria
 Sweden
 Italy
Italy
 Egypt
Egypt
 Belgium
 Portugal
 Slovenia
 Ireland
 Romania
 Greece
 Argentina
 Netherlands
 Bulgaria
 Latvia
 South Africa
 Malaysia
 Japan
Japan
 Slovakia
 Philippines
 Mexico
 Thailand
