AWS provides a wide variety of tools and managed services which allow you to safeguard your applications running on the cloud, such as AWS WAF and AWS Shield. But this, however, just forms one important piece of a much larger jigsaw puzzle! What about compliance monitoring, risk auditing, and overall governance of your environments? How do you effectively analyze events occurring in your environment and mitigate against the same? Well, luckily for us, AWS has the answer to our problems in the form of AWS CloudTrail.
In today's post, we will explore AWS CloudTrail and learn how to create our own CloudTrail trail.
[box type="shadow" align="" class="" width=""]This tutorial is an excerpt from the book AWS Administration - The Definitive Guide - Second Edition, written by Yohan Wadia. This book will help you create a highly secure, fault-tolerant, and scalable Cloud environment for your applications to run on.[/box]
AWS CloudTrail provides you with the ability to log every single action taken by a user, service, role, or even API, from within your AWS account. Each action recorded is treated as an event which can then be analyzed for enhancing the security of your AWS environment. The following are some of the key benefits that you can obtain by enabling CloudTrail for your AWS accounts:
- In-depth visibility: Using CloudTrail, you can easily gain better insights into your account's usage by recording each user's activities, such as which user initiated a new resource creation, from which IP address was this request initiated, which resources were created and at what time, and much more!
- Easier compliance monitoring: With CloudTrail, you can easily record and log events occurring within your AWS account, whether they may originate from the Management Console, or the AWS CLI, or even from other AWS tools and services. The best thing about this is that you can integrate CloudTrail with another AWS service, such as Amazon CloudWatch, to alert and respond to out-of-compliance events.
- Security automations: Automating responses to security threats not only enables you to mitigate the potential threats faster, but also provides you with a mechanism to stop all further attacks. The same can be applied to AWS CloudTrail as well! With its easy integration with Amazon CloudWatch events, you can now create corresponding Lambda functions that trigger automatically each time a compliance is not met, all in a matter of seconds!
CloudTrail's essential concepts and terminologies
With these key points in mind, let's have a quick look at some of CloudTrail's essential concepts and terminologies:
Events
Events are the basic unit of measurement in CloudTrail. Essentially, an event is nothing more than a record of a particular activity either initiated by the AWS services, roles, or even an AWS user. These activities are all logged as API calls that can originate from the Management Console, the AWS SDK, or even the AWS CLI as well. By default, events are stored by CloudTrail with S3 buckets for a period of 7 days. You can view, search, and even download these events by leveraging the events history feature provided by CloudTrail.
Trails
Trails are essentially the delivery mechanism, using which events are dumped to S3 buckets. You can use these trails to log specific events within specific buckets, as well as to filter events and encrypt the transmitted log files. By default, you can have a maximum of five trails created per AWS region, and this limit cannot by increased.
CloudTrail Logs
Once your CloudTrail starts capturing events, it sends these events to an S3 bucket in the form of a CloudTrail Log file. The log files are JSON text files that are compressed using the .gzip format. Each file can contain one or more events within itself. Here is a simple representation of what a CloudTrail Log looks like. In this case, the event was created when I tried to add an existing user by the name of Mike to an administrator group using the AWS Management Console:
{"Records": [{
    "eventVersion": "1.0",
    "userIdentity": {
        "type": "IAMUser",
        "principalId": "12345678",
        "arn": "arn:aws:iam::012345678910:user/yohan",
        "accountId": "012345678910",
        "accessKeyId": "AA34FG67GH89",
        "userName": "Alice",
        "sessionContext": {"attributes": {
            "mfaAuthenticated": "false",
            "creationDate": "2017-11-08T13:01:44Z"
        }}
    },
    "eventTime": "2017-11-08T13:09:44Z",
    "eventSource": "iam.amazonaws.com",
    "eventName": "AddUserToGroup",
    "awsRegion": "us-east-1",
    "sourceIPAddress": "127.0.0.1",
    "userAgent": "AWSConsole",
    "requestParameters": {
        "userName": "Mike",
        "groupName": "administrator"
    },
    "responseElements": null
}]}
You can view your own CloudTrail Log files by visiting the S3 bucket that you specify during the trail's creation. Each log file is named uniquely using the following format:
AccountID_CloudTrail_RegionName_YYYYMMDDTHHmmZ_UniqueString.json.gz
Where:
- AccountID: Your AWS account ID.
- RegionName: AWS region where the event was captured: us-east-1, and so on.
- YYYYMMDDTTHHmmz: Specifies the year, month, day, hour (24 hours), minutes, and seconds. The z indicates time in UTC.
- UniqueString: A randomly generated 16-character-long string that is simply used so that there is no overwriting of the log files.
With the basics in mind, let's quickly have a look at how you can get started with CloudTrail for your own AWS environments!
Creating your first CloudTrail Trail
To get started, log in to your AWS Management Console and filter the CloudTrail service from the AWS services filter. On the CloudTrail dashboard, select the Create Trail option to get started:
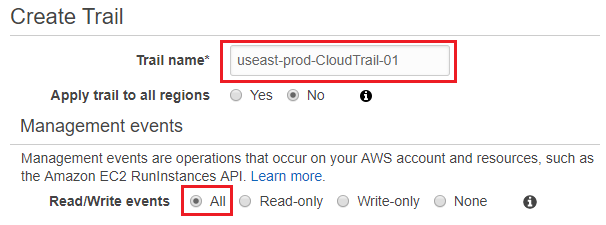
- This will bring up the Create Trail wizard. Using this wizard, you can create a maximum of five-trails per region. Type a suitable name for the Trail into the Trail name field, to begin with.
- Next, you can either opt to Apply trail to all regions or only to the region out of which you are currently operating. Selecting all regions enables CloudTrail to record events from each region and dump the corresponding log files into an S3 bucket that you specify. Alternatively, selecting to record out of one region will only capture the events that occur from the region out of which you are currently operating. In my case, I have opted to enable the Trail only for the region I'm currently working out of. In the subsequent sections, we will learn how to change this value using the AWS CLI:

- Next, in the Management events section, select the type of events you wish to capture from your AWS environment. By default, CloudTrail records all management events that occur within your AWS account. These events can be API operations, such as events caused due to the invocation of an EC2 RunInstances or TerminateInstances operation, or even non-API based events, such as a user logging into the AWS Management Console, and so on. For this particular use case, I've opted to record All management events.
Unlock access to the largest independent learning library in Tech for FREE!
Get unlimited access to 7500+ expert-authored eBooks and video courses covering every tech area you can think of.
Renews at AU $24.99/month. Cancel anytime
Selecting the Read-only option will capture all the GET API operations, whereas the Write-only option will capture only the PUT API operations that occur within your AWS environment.
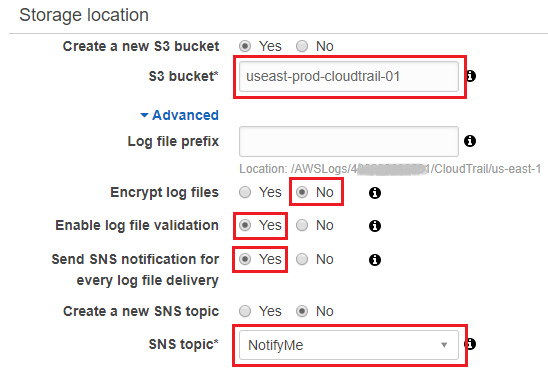
- Moving on, in the Storage location section, provide a suitable name for the S3 bucket that will store your CloudTrail Log files. This bucket will store all your CloudTrail Log files, irrespective of the regions the logs originated from. You can alternatively select an existing bucket from the S3 bucket selection field:

- Next, from the Advanced section, you can optionally configure a Log file prefix. By default, the logs will automatically get stored under a folder-like hierarchy that is usually of the form AWSLogs/ACCOUNT_ID/CloudTrail/REGION.
- You can also opt to Encrypt log files with the help of an AWS KMS key. Enabling this feature is highly recommended for production use.
- Selecting Yes in the Enable log file validation field enables you to verify the integrity of the delivered log files once they are delivered to the S3 bucket.
- Finally, you can even enable CloudTrail to send you notifications each time a new log file is delivered to your S3 bucket by selecting Yes against the Send SNS notification for every log file delivery option. This will provide you with an additional option to either select a predefined SNS topic or alternatively create a new one specifically for this particular CloudTrail. Once all the required fields are filled in, click on Create to continue.
With this, you should be able to see the newly created Trail by selecting the Trails option from the CloudTrail dashboard's navigation pane, as shown in the following screenshot:
AWS SAM (AWS Serverless Application Model) is now open source!
How to run Lambda functions on AWS Greengrass
AWS Greengrass brings machine learning to the edge
 United States
 United Kingdom
 India
India
 Germany
 France
 Canada
 Russia
 Spain
Spain
 Brazil
 Australia
 Argentina
 Austria
 Belgium
 Bulgaria
 Chile
Chile
 Colombia
 Cyprus
 Czechia
 Denmark
 Ecuador
 Egypt
Egypt
 Estonia
 Finland
 Greece
 Hungary
 Indonesia
 Ireland
 Italy
Italy
 Japan
Japan
 Latvia
 Lithuania
 Luxembourg
 Malaysia
 Malta
Malta
 Mexico
 Netherlands
 New Zealand
 Norway
 Philippines
 Poland
 Portugal
 Romania
 Singapore
 Slovakia
 Slovenia
 South Africa
 South Korea
 Sweden
 Switzerland
 Taiwan
 Thailand
 Turkey
 Ukraine


