Information window
In this recipe, we are going to go over the ZAP Proxy information window and what each section of the information window does.
Getting ready
For you to be able to go over this recipe, you will need to have ZAP installed on your computer and also have it started and running.
How to do it…
The information window contains data about the application being tested. It consists of the History, Search, Alerts, and Output tabs, and other ZAP tools can be added as a tab by using the + icon. The following is a screenshot of the information window:

Figure 2.13 – The information window
The History tab
In this tab, ZAP displays all the requests that have been made, starting with the first request. This tab contains four options that can be selected, as shown in Figure 2.13:
- Bullseye (1): The target icon, when selected, shows only the URLs that are in scope.
- Globe icon (2): The globe icon is for Sites selection. This shows only the URLs that are contained in the Sites of the Tree Window. You can only select one or the other for Scope versus Sites.
- Funnel icon (3): This allows you to filter requests based on HTTP verb method, HTTP verb code, Tags, Alerts, and/or URL Regex.
- Export with green arrow (4): This allows you to save the history in CSV format to your host directory of choice.
The Search tab
In this tab, ZAP provides a search mechanism where you can search for regular expressions across all the data or only in URLs, requests, responses, headers, or HTTP fuzz results of the data. The Search tab has eight options. Figure 2.14 showcases the Search tab:

Figure 2.14 – The information window Search tab
The icon highlighted in the following screenshot it for searching through only the URLs that are in scope (Contexts – see Figure 2.10). In order to use this feature, a URL in Sites must be added to Contexts first. Once selected, the target icon will light up red versus being grayed out:

Figure 2.15 – The Contexts button
Scrolling right, the next field that is highlighted in red is the search box input field. This is used to search for content using regular expressions:

Figure 2.16 – The search input field
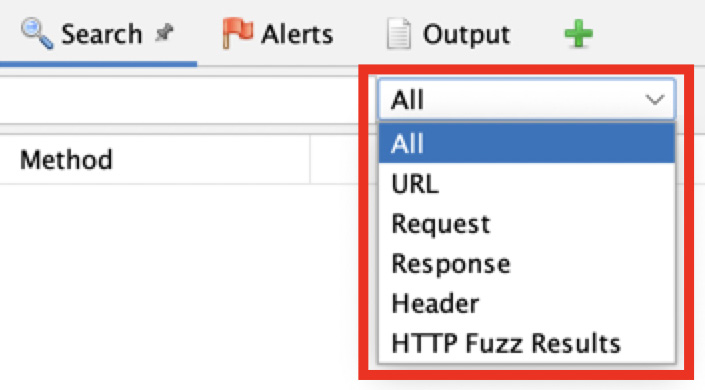
Search parameters are based on specific fields and the choices are displayed in a drop-down menu. In this drop-down menu, you can select whether you would like to search, using regular expressions, all the data or just URLs, requests, responses, headers, or HTTP fuzz results:

Figure 2.17 – The Search drop-down menu
Next is the Inverse checkbox. When checked, as displayed in Figure 2.18, ZAP will then search for anything that does not contain the regular expression you are searching for:

Figure 2.18 – The Inverse checkbox
After entering your text using a regular expression, you need to click the Search button with the magnifying glass. When clicked, the search for the regular expression starts. As an alternative, you can also press the Return or Enter key, depending on your keyboard, to start the search:

Figure 2.19 – The Search button
Once the search has been completed, you can use the Next or Previous buttons to move the selection to the next or previous item in the search result:

Figure 2.20 – The Next and Previous buttons
There is also a field in the Search tab that gives information about the search results. This will show the number of matches, as the name explains, for how many findings matched the searched regular expression:

Figure 2.21 – The Number of matches indicator
Last, there is an Export button. When clicked, the user will be able to export the search results and save them as a CSV file into the local file storage:

Figure 2.22 – The Export button
The Alerts tab
The Alerts tab is separated into two panes, as shown in Figure 2.23. The left-hand pane contains the alerts found by ZAP, and once an alert is selected, the right-hand pane will then show the alert information, as seen in Figure 2.23. The left pane shows all the alerts or issues found during spidering, active or passive scan, and displays each in a tree view format. The alerts are also ranked by severity, starting with highs and moving downward to informational. The Alerts tab also comes with four options that can be selected.

Figure 2.23 – Alerts tab
The following, corresponding to Figure 2.23, is an explanation of these options:
- Contexts (1): Used to show alerts from only URLs in scope.
- Globe (2): Only select alerts from sites contained in the Sites tree window.
- Pencil (3): Allows a user to edit the attributes of an alert.
- Broom with color (4): Delete all alerts button. When clicked, this will display a warning to the user asking them to confirm whether this action is OK or to cancel it. Click OK to remove every alert or Cancel to go back.
The plus (+) symbol
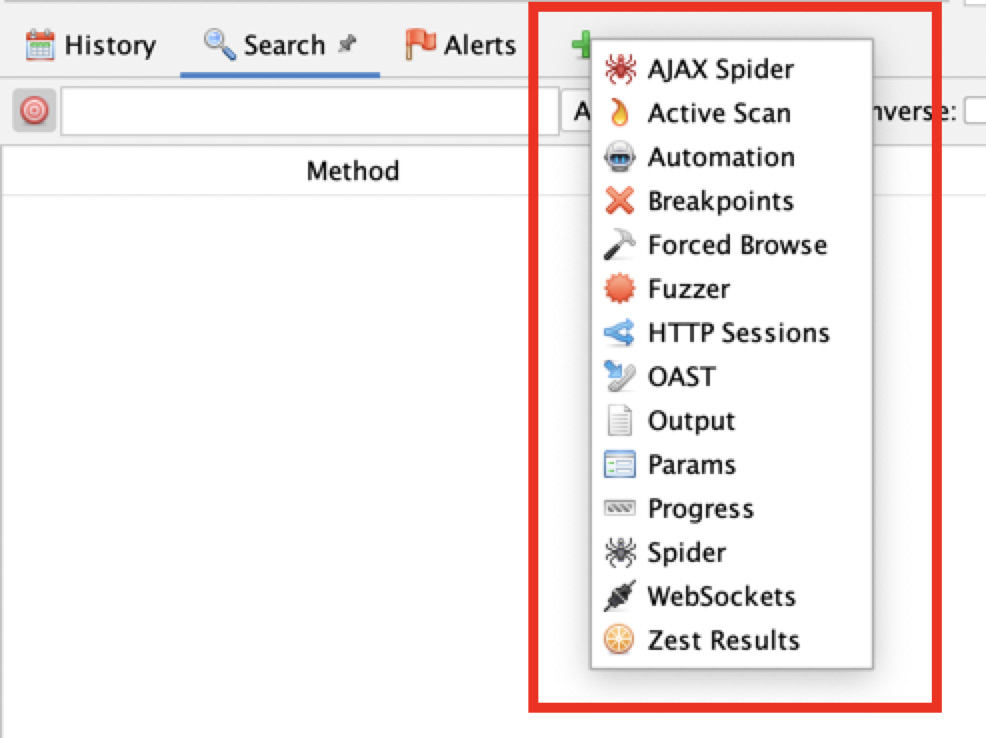
The plus icon can be used to add additional tabs to the information window. The tabs are ZAP tools. The tabs that can be added are AJAX Spider, Active Scan, Automation, Breakpoints, Forced Browse, Fuzzer, HTTP Sessions, OAST, Output, Params, Progress, Spider, WebSockets, and Zest Results. Figure 2.24 shows all these options and a description of each follows:

Figure 2.24 – The options of the plug symbol
The following are explanations of these options:
- AJAX Spider: This is used to efficiently and effectively crawl Ajax-based web applications. It creates a proxy for ZAP to talk to Crawljax, which is an open source event-driven dynamic crawling tool. It is recommended to use both the native Spider tool and Ajax Spider when testing an Ajax-based web application.
- Active Scan: This has options to start new scans and see the progress of existing scans. Furthermore, it shows the data of various scans.
- Automation: This allows you to create scripts for automated testing.
- Breakpoints: This manages all the breakpoints set in the current session.
- Forced Browse: In this tab, ZAP allows you to use forced browsing to find directories and files.
- Fuzzer: In Fuzzer, there are options to start new fuzzing tests and see information about a fuzz test that has already started.
- HTTP Sessions: In this tab, ZAP displays the HTTP sessions for the selected site.
- OAST: In this tab, ZAP displays out-of-band messages found.
- Output: In this tab, ZAP will display error messages found on the application. These errors can be used to report a bug to the ZAP team.
- Params: In this tab, ZAP displays the parameters and response header fields of a site.
- Progress: In this tab, ZAP displays the completed or in-progress scanning rules for each host and details for each scanning rule.
- Spider: The Spider tool is ZAP’s native crawler. In this tab, ZAP displays the unique URIs discovered by the Spider tool during the scan. This tab contains three tabs. The first tab displays the URIs discovered, the second tab displays any added nodes, and the third tab displays any Spider messages.
- WebSockets: The tab shows all messages from WebSockets connections.
- Zest Results: This tab will display the result of Zest scans.
How it works…
The Information window is the bread and butter of outcomes from your initial spidering, active or passive scans, fuzzing, or any other add-ons used. This section is where you will want to start paying attention to forming more specific manual attacks and testing the web applications in scope.
There’s more…
There’s a lot of good information to help a tester create good written penetration testing reports by offering references to the OWASP Top 10 or other documents from vendors. This information can be found in the Alerts tab and changes when selecting a specific vulnerability.


