Configuring the user interface in the Preferences menu
There are a large number of parameters you can change in the Preferences window, including what data is presented, where files are saved by default, what is the default interface that Wireshark captures data from, and many more.
What we will refer to in this chapter are the common parameters that when changed will help us with various capture scenarios.
Getting ready
For configuring User Interface, we will choose the Preferences option from the Edit menu. You will get the following window:

We will look at the configuration of the following parameters:
- Columns
- Capture
- Name Resolution
How to do it...
In this section we will see how to change parameters that will help in working with Wireshark.
Changing and adding columns
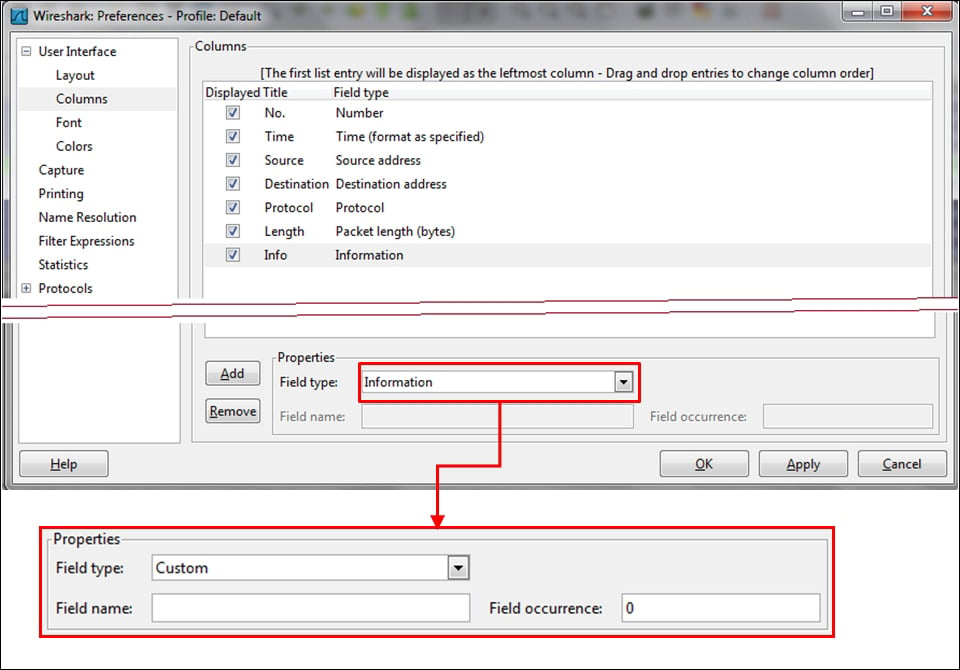
The default columns that we see in the packet pane are the number, time, source and destination addresses, protocol, length, and information columns, as shown in the following screenshot:

To add a new column to the packet pane:
- You can choose one of the predefined parameters to be added as a new column from the Field type. Among these parameters are time delta, IP DSCP value, port numbers, and others.
- A very important feature comes up when you fill in Custom in the field type. In this case, you can fill in any filter string for Field name. You can, for example, add the following:
- Add the string
tcp.window_sizeto view the TCP window size (that influences performance). - Add the string
ip.ttlto view the IP TTL (Time-To-Live) parameter of every packet. - Add
rtp.markerto view every instance of a marker set in an RTP packet. - As we will see in the later chapters, this feature will assist us a lot for fast resolutions of network problems.
- Add the string
Changing the capture configuration
There are some parameters that can be configured before capturing data. In the Preferences window choose the Capture menu, and the following window will come up:

For changing the default interface that the capture will start from, just click on the Edit button, and mark the interface you would like to be the default. Of course you can change it every time you start a new capture, this is only the default.
Configuring the name resolution
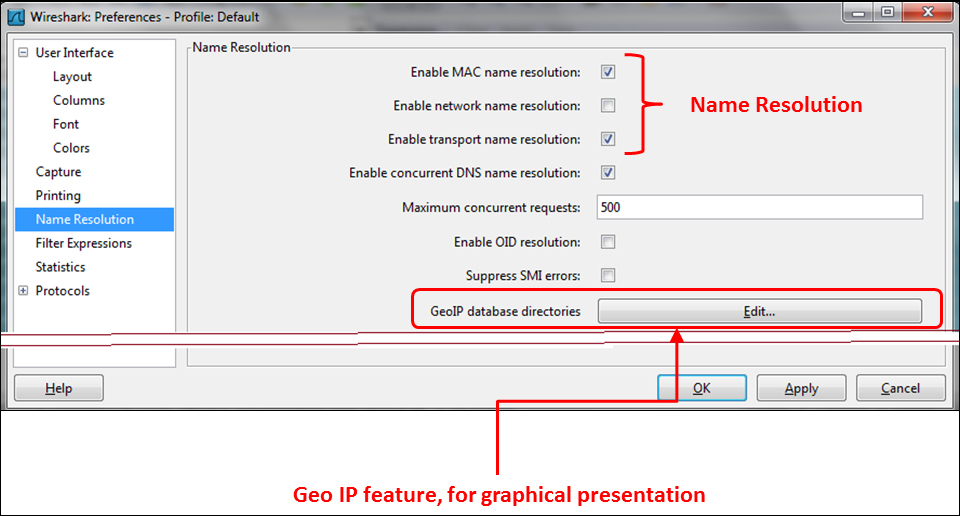
Wireshark supports Name Resolution in three layers:
- Layer 2: by resolving the first part of the MAC addresses to the vendor name. For example, 14:da:e9 will be presented as AsusTeckC (ASUSTeK Computer Inc.).
- Layer 3: by resolving IP addresses to the DNS names. For example, 157.166.226.46 will be resolved to www.edition.cnn.com.
- Layer 4: by resolving TCP/UDP port numbers to port names. For example, port 80 will be resolved as HTTP, and port 53 as DNS.

Tip
In TCP and UDP, there is a meaning only to the destination port that the client initially opens the session to. The source port that the connection is opened from is a random number (higher than 1024), and therefore there is no meaning to its translation to a port name.
The Wireshark default is to resolve layer-2 MAC addresses and layer-4 TCP/UDP port numbers. Resolving IP addresses can slow down Wireshark due to a large amount of DNS queries that it uses; therefore, use it carefully.
How it works...
Very simple. This is the configuration menu for the Wireshark. Here you can configure parameters as described in this recipe, along with some other parameters. You can refer to Wireshark manuals at www.wireshark.org for further information.


