Implementing and testing GraphQL subscriptions
Subscription is another GraphQL root type that sends the object to the subscriber (client) when a particular event occurs.
Let’s assume an online shop offers a discount on products when the product’s inventory reaches a certain level. You cannot track each product’s quantity manually and then perform the computation and trigger the discount. To do things faster (or reduce manual intervention), this is where you can make use of a subscription.
Each change in the product’s inventory (quantity) through the addQuantity() mutation should trigger the event and the subscriber should receive the updated product and hence the quantity. Then, the subscriber can place the logic and automate this process.
Let’s write the subscription that will send the updated product object to the subscriber. You are going to use Reactive Streams and WebSocket to implement this functionality.
You need to enable CORS. Let’s enable it by adding the following properties into the application.properties file:
management.endpoints.web.exposure.include=health,metrics
graphql.servlet.actuator-metrics=true
graphql.servlet.tracing-enabled=false
graphql.servlet.corsEnabled=true
Here, you have also enabled the actuator metrics and tracing for GraphQL along with exposing the health and metrics actuator endpoints.
In build.gradle, you have graphql-dgs-subscriptions-websockets-autoconfigure to take care of the auto-configuration of WebSocket that is required for WebSocket-based GraphQL subscriptions.
You can add the following subscription data fetcher to the ProductDatafetcher class as shown in the following code:
// rest of the ProductDatafetcher class code @DgsSubscription(field = SUBSCRIPTION.QuantityChanged)
public Publisher<Product> quantityChanged(
    @InputArgument("productId") String productId) {
  return productService.gerProductPublisher();
}
// rest of the ProductDatafetcher class code
Here, you are using another DGS framework annotation, @DgsSubscription, which is a type of @DgsData annotation that is marked on a method to denote it as a data fetcher method. The @DgsSubscription annotation, by default, has the Subscription value set to the parentType property. You just must set the field property in this annotation. By setting field to quantityChanged, you are indicating to the DGS framework to use this method when the subscription request for quantityChanged is called.
The Subscription method returns the Publisher instance, which can send an unbound number of objects (in this case, Product instances) to multiple subscribers. Therefore, the client just needs to subscribe to the product publisher.
You need to add a new method to the ProductService interface and its implementation in the ProductServiceImpl class. The method signature in the ProductService interface and its implementation are straightforward. It passes the call to the repository to perform the operation. You can have a look at the source code in the book’s GitHub code repository.
The actual work is being performed by the repository. Therefore, you need to make certain changes in the repository, as shown in the following steps:
- First, add the following method signature to the repository interface:
Publisher<Product> getProductPublisher();
- Next, you have to implement the
getProductPublisher()method in theInMemRepositoryclass. This method returns the product publisher as shown in the following code:public Publisher<Product> getProductPublisher() { return productPublisher; } - Now, we need all the magic to be performed by Reactive Streams. First, let’s declare the
FluxSink<Product>andConnectableFlux<Product>(which is returned by the repository) variables:private FluxSink<Product> productsStream; private ConnectableFlux<Product> productPublisher;
- Now, we need to initialize these declared instances. Let’s do so in the
InMemRepositoryconstructor, as shown in the following code:Flux<Product> publisher = Flux.create(emitter -> { productsStream = emitter; }); productPublisher = publisher.publish(); productPublisher.connect(); Flux<Product>is a product stream publisher that passes the baton toproductsStream(FluxSink) to emit the next signals followed byonError()oronComplete()events. This meansproductsStreamshould emit the signal when the product quantity gets changed. WhenFlux<Product>calls thepublish()method, it returns an instance ofconnectableFlux, which is assigned toproductPublisher(the one that is returned by the subscription).- You are almost done with the setup. You just need to emit the signal (product) when the product gets changed. Let’s add the following highlighted line to the
addQuantity()method before it returns the product, as shown in the following code:product.setCount(product.getCount() + qty); productEntities.put(product.getId(), product); productsStream.next(product); return product;
You have completed the subscription quantityChanged implementation. You can test it next.
You need to build the application before running the test. Let’s build the application using the following command:
$ gradlew clean build
Once the build is done successfully, you can run the following command to run the application:
$ java –jar build/libs/chapter14-0.0.1-SNAPSHOT.jar
The application should be running on the default port 8080 if you have not made any changes to the port settings.
Before testing the GraphQL subscription, you need to understand the GraphQL subscription protocol over WebSocket.
Understanding the WebSocket sub-protocol for GraphQL
You have implemented the GraphQL subscription over WebSocket in this chapter. In WebSocket-based subscription implementation, the network socket is the main communication channel between the GraphQL server and the client.
The graphql-dgs-subscriptions-websockets-autoconfigure dependency’s current implementation (version 6.0.5) makes use of graphql-transport-ws sub-protocol specifications. In this sub-protocol, messages are represented using the JSON format, and over the network, these JSON messages are stringified. Both the server and client should conform to this message structure.
There are the following types of messages (code in Kotlin from the DGS framework):
object MessageType {
    const val CONNECTION_INIT = "connection_init"
    const val CONNECTION_ACK = "connection_ack"
    const val PING = "ping"
    const val PONG = "pong"
    const val SUBSCRIBE = "subscribe"
    const val NEXT = "next"
    const val ERROR = "error"
    const val COMPLETE = "complete"
}
You might have got the idea about the life cycle of a GraphQL subscription over WebSocket by looking at the message type. Let’s understand the life cycle of a subscription in detail:
- Connection Initialization (
CONNECTION_INIT): The client initiates the communication by sending this type of message. The connection initialization message contains two fields –type('connection_init') andpayload. Thepayloadfield is an optional field. Its (ConnectionInitMessage) structure is represented as follows:{ type: 'connection_init'; payload: Map<String, Object>; // optional } - Connection Acknowledgment (
CONNECTION_ACK): The server sends the connection acknowledgment in response to a successful connection initialization request. It means the server is ready for subscription. Its structure (ConnectionAckMessage) is represented as follows:{ type: 'connection_ack'; payload: Map<String, Any>; // optional } - Subscribe (
SUBSCRIBE): The client now can send thesubscriberequest. If the client sends thesubscriberequest without getting a connection acknowledgment from the server, the client may get the error4401: Unauthorized.
This request contains three fields – id, type, and payload. Here, each new subscription request should contain a unique id; otherwise, the server may throw 4409: Subscriber for <unique-operation-id> already exists. The server keeps track of the id, until the subscription is active. The moment the subscription is complete, the client can reuse the id. The structure of this message type (SubscribeMessage) is as follows:
{
  id: '<unique-id>';
  type: 'subscribe';
  payload: {
    operationName: ''; // optional operation name
    query: '';  // Mandatory GraphQL subscription
    query
    variables?: Map<String, Any>; // optional
    variables
    extensions?: Map<String, Any>; // optional
  };
} - Next (
NEXT): After a successful subscription operation, the client receives the messages of typeNEXTfrom the server that contain the data related to the operation the client subscribes to. Data is part of thepayloadfield. The server keeps sending these message types to the client until GraphQL subscription events occur. Once the operation gets completed, the server sends the complete message to the client. Its message type (NextMessage) is represented by the following:{ id: '<unique-id>'; // one sent with subscribe type: 'next'; payload: ExecutionResult; } - Complete (
COMPLETE):Completeis a bi-directional message, which can be sent by both the server and client:- Client to Server: The client can send the complete message to the server when the client wants to stop listening to the message sent by the server. Since it’s a duplex call, the client should ignore the messages that are en route when the client sends a complete request.
- Server to Client: The server sends the complete message to the client when the requested operation is completed by the server. The server doesn’t send the complete message when an error message is sent by the server for the subscription request by the client.
The message type (CompleteMessage) is represented by the following structure:
{
  id: '<unique-id>'; // one sent with subscribe
  type: 'complete';
} - Error (
ERROR): The server sends an error message when the server encounters any operation execution error. Its type (ErrorMessage) is represented by the following structure:{ id: '<unique-id>'; type: 'error'; payload: GraphQLError[]; } PINGandPONG: These are bi-directional message types and are sent by both the server and client. If the client sends apingmessage, the server should immediately send apongmessage and vice versa. These messages are useful for detecting networking problems and network latency. Bothping(PingMessage) andpong(PongMessage) contain the following structure:{ type: String; // either 'ping' or 'pong' payload: Map<String, Object>; // optional }
Understanding the subscription life cycle will help you test the subscription thoroughly.
You can use any tool that supports GraphQL subscription testing. We’ll test it using the Insomnia WebSocket request client – a bit of a crude way so you can understand the complete life cycle of the GraphQL subscription.

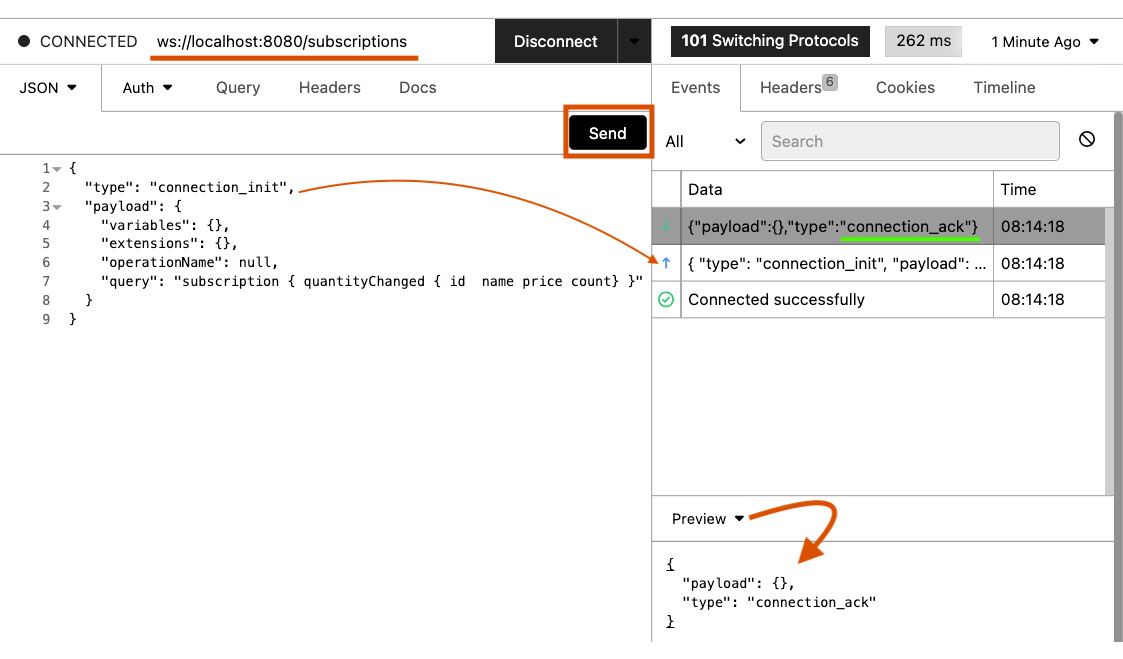
Figure 14.3 – GraphQL subscription connection_init call in the Insomnia client
Testing GraphQL subscriptions using Insomnia WebSocket
Let’s perform the following steps to test the subscription manually:
- First, add a new request using WebSocket Request by using the (+) drop-down menu available in the top-left corner.
- Then add the following URL in the URL box:
ws://localhost:8080/subscriptions
- Then, add the following headers in the Headers tab:
Connection: Upgrade
Upgrade: websocket
dnt: 1
accept: */*
accept-encoding: gzip, deflate, br
host: localhost:8080
origin: http://localhost:8080
sec-fetch-dest: websocket
sec-fetch-mode: websocket
sec-fetch-site: same-origin
Sec-WebSocket-Protocol: graphql-transport-ws
Sec-WebSocket-Version: 13
Sec-WebSocket-Key: 3dcYr9va5icM8VcKuCr/KA==
Sec-WebSocket-Extensions: permessage-deflate
Here, through the headers, you upgrade the connection to WebSocket; therefore, the server sends the 101 Switching Protocol response. Also, you can see that you are using the graphql-transport-ws GraphQL sub-protocol.
- Then, add the following payload in the JSON tab for connection initialization (see Figure 14.3):
{ "type": "connection_init", "payload": { "variables": {}, "extensions": {}, "operationName": null, "query":"subscription { quantityChanged { id name price count} }"} } - Then, click on the Send button (don’t click on the Connect button – if you do, then it needs to be followed by one more click on Send).
- On a successful connection, you will receive the following acknowledgment message from the server. It means the server is ready to serve the subscription request (shown in Figure 14.3):
{ "payload": {}, "type": "connection_ack" } - Then, use the following payload in the JSON tab:
{
  "id": "b",
  "type": "subscribe",
  "payload": {
     "variables": {},
  "extensions": {},
  "operationName": null,
      "operationName": null,
"query":"subscription { quantityChanged { id name price count} }"}
}
Here, you are adding a unique ID to the message. The type of message is set to subscribe. You can send a subscribe message because a connection acknowledgment is received by the client. The query field contains the GraphQL subscription query.
- Then, again click on the Send button (don’t click on the Connect button – if you do, then it needs to be followed by one more click on Send).
- After clicking on the Send button, you need to fire the
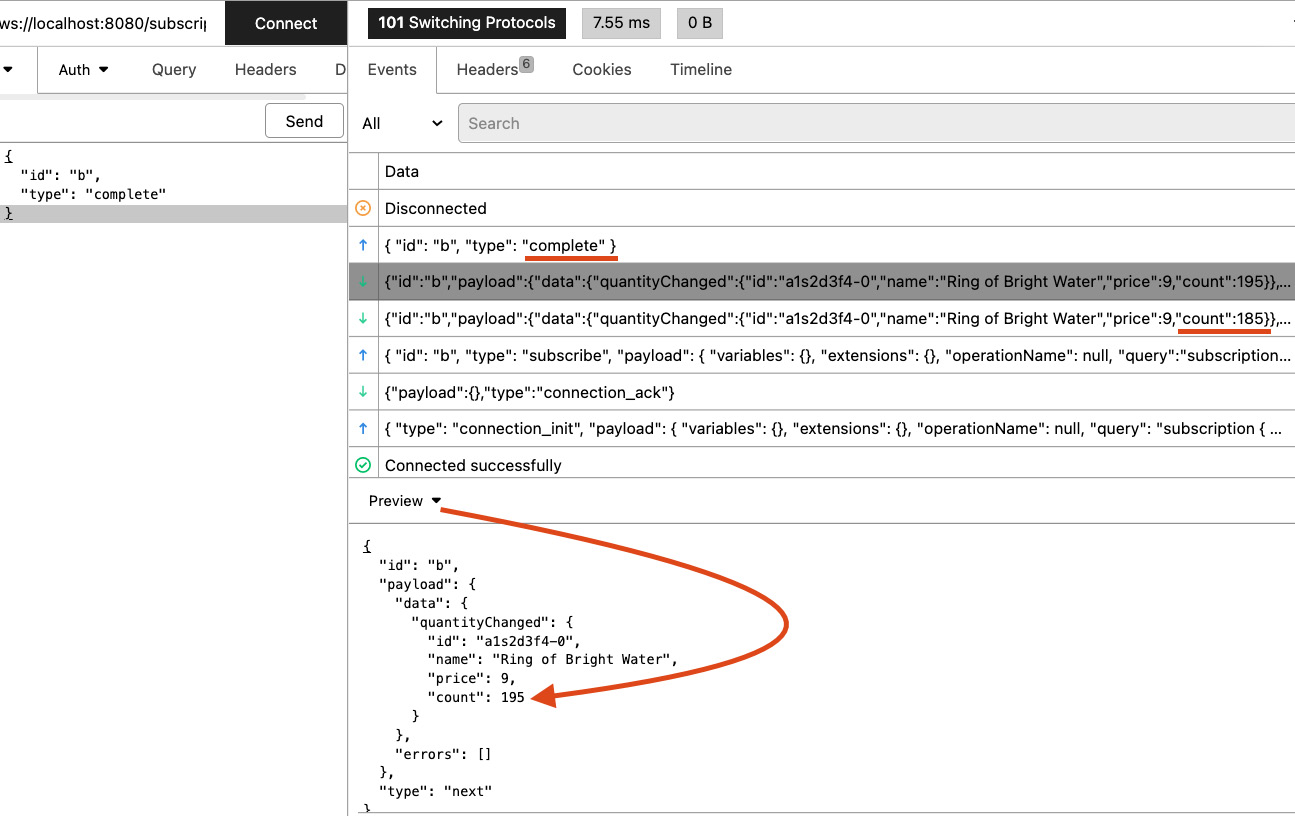
addQuantitymutation to trigger the publication of the event by using the following payload:mutation { addQuantity(productId: "a1s2d3f4-0", quantity: 10) { id name price count } } - After a successful mutation call, you can check the subscription output in the Insomnia client. You will find an incoming JSON message that will display the increased quantity, as shown in Figure 14.4.
- You can repeat steps 9 and 10 to get the (
NEXTtype) messages. - Once you are done, you can send the following JSON payload to complete the call as shown in Figure 14.4:
{
  "id": "b",
  "type": "complete"
}

Figure 14.4 – GraphQL subscription’s next and complete calls in the Insomnia client
This is the way you can implement and test the GraphQL subscription over WebSocket. You will automate the test for GraphQL subscription in the Testing GraphQL subscriptions using automated test code subsection in this chapter.
Next, you should know about the instrumentation that helps to implement the tracing, logging, and metrics collection. Let’s discuss this in the next subsection.


