Search icon CANCEL
Arrow left icon
Explore Products
Best Sellers
New Releases
Books
Videos
Audiobooks
Learning Hub
Conferences
Free Learning
Arrow right icon
Arrow up icon
GO TO TOP
Machine Learning for OpenCV

You're reading from   Machine Learning for OpenCV Intelligent image processing with Python

Arrow left icon
Product type Paperback
Published in Jul 2017
Publisher Packt
ISBN-13 9781783980284
Length 382 pages
Edition 1st Edition
Languages
Tools
Arrow right icon
Authors (2):
Arrow left icon
Michael Beyeler Michael Beyeler
Author Profile Icon Michael Beyeler
Michael Beyeler
Michael Beyeler (USD) Michael Beyeler (USD)
Author Profile Icon Michael Beyeler (USD)
Michael Beyeler (USD)
Arrow right icon
View More author details
Toc

Table of Contents (13) Chapters Close

Preface 1. A Taste of Machine Learning 2. Working with Data in OpenCV and Python FREE CHAPTER 3. First Steps in Supervised Learning 4. Representing Data and Engineering Features 5. Using Decision Trees to Make a Medical Diagnosis 6. Detecting Pedestrians with Support Vector Machines 7. Implementing a Spam Filter with Bayesian Learning 8. Discovering Hidden Structures with Unsupervised Learning 9. Using Deep Learning to Classify Handwritten Digits 10. Combining Different Algorithms into an Ensemble 11. Selecting the Right Model with Hyperparameter Tuning 12. Wrapping Up

Installation

Before we get started, let's make sure that we have all the tools and libraries installed that are necessary to create a fully functioning data science environment. After downloading the latest code for this book from GitHub, we are going to install the following software:

  • Python's Anaconda distribution, based on Python 3.5 or higher
  • OpenCV 3.1 or higher
  • Some supporting packages
Don't feel like installing stuff? You can also visit http://beta.mybinder.org/v2/gh/mbeyeler/opencv-machine-learning/master, where you will find all the code for this book in an interactive, executable environment and 100% free and open source, thanks to the Binder project.

Getting the latest code for this book

You can get the latest code for this book from GitHub, https://github.com/mbeyeler/opencv-machine-learning. You can either download a .zip package (beginners) or clone the repository using git (intermediate users).

Git is a version control system that allows you to track changes in files and collaborate with others on your code. In addition, the web platform GitHub.com makes it easy for me to share my code with you on a public server. As I make improvements to the code, you can easily update your local copy, file bug reports, or suggest code changes.

If you choose to go with git, the first step is to make sure it is installed (https://git-scm.com/downloads).

Then, open a terminal (or command prompt, as it is called in Windows):

  • On Windows 10, right-click on the Start Menu button, and select Command Prompt.
  • On Mac OS X, press Cmd + Space to open spotlight search, then type terminal, and hit Enter.
  • On Ubuntu and friends, press Ctrl + Alt + T. On Red Hat, right-click on the desktop and choose Open Terminal from the menu.

Navigate to a directory where you want the code downloaded, for example:

$ cd Desktop

Then you can grab a local copy of the latest code by typing the following:

$ git clone https://github.com/mbeyeler/opencv-machine-learning.git

This will download the latest code in a folder called opencv-machine-learning.

After a while, the code might change online. In that case, you can update your local copy by running the following command from within the opencv-machine-learning directory:

$ git pull origin master

Getting to grips with Python's Anaconda distribution

Anaconda is a free Python distribution developed by Continuum Analytics that is made for scientific computing. It works across Windows, Linux, and Mac OS X platforms and is free even for commercial use. However, the best thing about it is that it comes with a number of preinstalled packages that are essential for data science, math, and engineering. These packages include the following:

  • NumPy: A fundamental package for scientific computing in Python, which provides functionality for multidimensional arrays, high-level mathematical functions, and pseudo-random number generators
  • SciPy: A collection of functions for scientific computing in Python, which provides advanced linear algebra routines, mathematical function optimization, signal processing, and so on
  • scikit-learn: An open-source machine learning library in Python, which provides useful helper functions and infrastructure that OpenCV lacks
  • Matplotlib: The primary scientific plotting library in Python, which provides functionality for producing line charts, histograms, scatter plots, and so on
  • Jupyter Notebook: An interactive environment for the running of code in a web browser

An installer for our platform of choice (Windows, Mac OS X, or Linux) can be found on the Continuum website, https://www.continuum.io/Downloads. I recommend using the Python 3.6-based distribution, as Python 2 is no longer under active development.

To run the installer, do one of the following:

  • On Windows, double-click on the .exe file and follow the instructions on the screen
  • On Mac OS X, double-click on the .pkg file and follow the instructions on the screen
  • On Linux, open a terminal and run the .sh script using bash:
      $ bash Anaconda3-4.3.0-Linux-x86_64.sh  # Python 3.6 based
$ bash Anaconda2-4.3.0-Linux-x64_64.sh # Python 2.7 based

In addition, Python Anaconda comes with conda--a simple package manager similar to apt-get on Linux. After successful installation, we can install new packages in the terminal using the following command:

$ conda install package_name

Here, package_name is the actual name of the package that we want to install.

Existing packages can be updated using the following command:

$ conda update package_name

We can also search for packages using the following command:

$ anaconda search -t conda package_name

This will bring up a whole list of packages available through individual users. For example, searching for a package named opencv, we get the following hits:

Searching for OpenCV packages provided by different conda users.

This will bring up a long list of users who have OpenCV packages installed, where we can locate users that have our version of the software installed on our own platform. A package called package_name from a user called user_name can then be installed as follows:

$ conda install -c user_name package_name

Finally, conda provides something called an environment, which allows us to manage different versions of Python and/or packages installed in them. This means we could have one environment where we have all packages necessary to run OpenCV 2.4 with Python 2.7, and another where we run OpenCV 3.2 with Python 3.6. In the following section, we will create an environment that contains all the packages needed to run the code in this book.

Installing OpenCV in a conda environment

In a terminal, navigate to the directory where you downloaded the code:

$ cd Desktop/opencv-machine-learning

Before we create a new conda environment, we want to make sure we added the Conda-Forge channel to our list of trusted conda channels:

$ conda config --add channels conda-forge

The Conda-Forge channel is led by an open-source community that provides a wide variety of code recipes and software packages (for more info, see https://conda-forge.github.io). Specifically, it provides an OpenCV package for 64-bit Windows, which will simplify the remaining steps of the installation.

Then run the following command to create a conda environment based on Python 3.5, which will also install all the necessary packages listed in the file requirements.txt in one fell swoop:

$ conda create -n Python3 python=3.5 --file requirements.txt

To activate the environment, type one of the following, depending on your platform:

$ source activate Python3  # on Linux / Mac OS X
$ activate Python3 # on Windows

Once we close the terminal, the session will be deactivated--so we will have to run this last command again the next time we open a terminal. We can also deactivate the environment by hand:

$ source deactivate  # on Linux / Mac OS X
$ deactivate # on Windows

And done!

Verifying the installation

It's a good idea to double-check our installation. While our terminal is still open, we fire up IPython, which is an interactive shell to run Python commands:

$ ipython

Now make sure that you are running (at least) Python 3.5 and not Python 2.7. You might see the version number displayed in IPython's welcome message. If not, you can run the following commands:

In [1]: import sys
... print(sys.version)
3.5.3 |Continuum Analytics, Inc.| (default, Feb 22 2017, 21:28:42) [MSC v.1900 64 bit (AMD64)]

Now try to import OpenCV:

In [2]: import cv2

You should get no error messages. Then, try to find out the version number:

In [3]: cv2.__version__
Out[3]: '3.1.0'

Make sure that the Python version reads 3.5 or 3.6, but not 2.7. Additionally, make sure that OpenCV's version number reads at least 3.1.0; otherwise, you will not be able to use some OpenCV functionality later on.

OpenCV 3 is actually called cv2. I know it's confusing. Apparently, the reason for this is that the 2 does not stand for the version number. Instead, it is meant to highlight the difference between the underlying C API (which is denoted by the cv prefix) and the C++ API (which is denoted by the cv2 prefix).

You can then exit the IPython shell by typing exit - or hitting Ctrl + D and confirming that you want to quit.

Alternatively, you can run the code in a web browser thanks to Jupyter Notebook. If you have never heard of Jupyter Notebooks or played with them before, trust me - you will love them! If you followed the directions as mentioned earlier and installed the Python Anaconda stack, Jupyter is already installed and ready to go. In a terminal, type as follows:

$ jupyter notebook

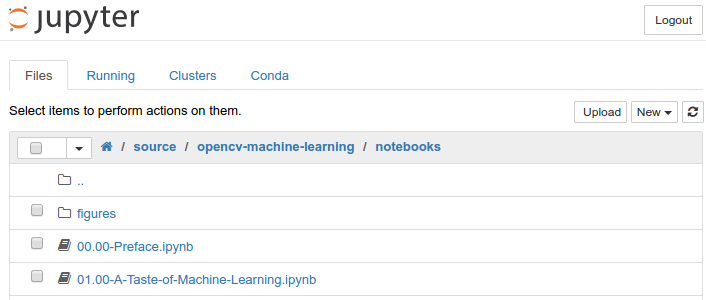
This will automatically open a browser window, showing a list of files in the current directory. Click on the opencv-machine-learning folder, then on the notebooks folder, and voila! Here you will find all the code for this book, ready for you to be explored:

Beginning of the list of Jupyter Notebooks that come with this book

The notebooks are arranged by chapter and section. For the most part, they contain only the relevant code, but no additional information or explanations. These are reserved for those who support our effort by buying this book - so thank you!

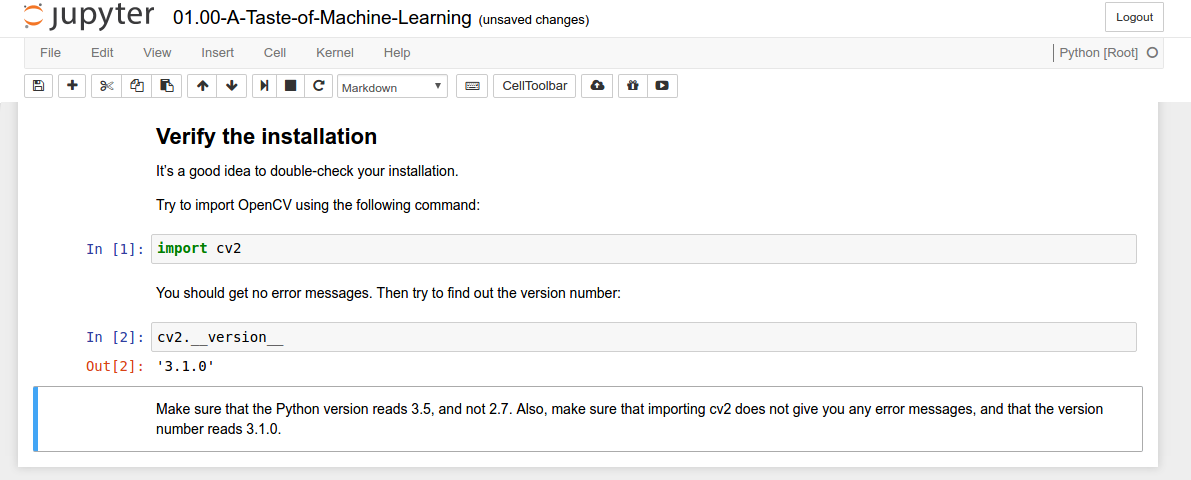
Simply click on a notebook of your choice, such as 01.00-A-Taste-of-Machine-Learning.ipynb, and you will be able to run the code yourself by selecting Kernel > Restart & Run All:

Example excerpt of this chapter's Jupyter Notebook

There are a few handy keyboard shortcuts for navigating Jupyter Notebooks. However, the only ones that you need to know about right now are the following:

  1. Click in a cell in order to edit it.
  2. While the cell is selected, hit Ctrl + Enter to execute the code in it.
  3. Alternatively, hit Shift + Enter to execute a cell and select the cell below it.
  4. Hit Esc to exit write mode, then hit A to insert a cell above the currently selected one and B to insert a cell below.
Check out all the keyboard shortcuts by clicking on Help > Keyboard Shortcut, or take a quick tour by clicking on Help > User Interface Tour.

However, I strongly encourage you to follow along the book by actually typing out the commands yourself, preferably in an IPython shell or an empty Jupyter Notebook. There is no better way to learn how to code than by getting your hands dirty. Even better if you make mistakes--we have all been there. At the end of the day, it's all about learning by doing!

Getting a glimpse of OpenCV's ML module

Starting with OpenCV 3.1, all machine learning-related functions in OpenCV have been grouped into the ml module. This has been the case for the C++ API for quite some time. You can get a glimpse of what's to come by displaying all functions in the ml module:

In [4]: dir(cv2.ml)
Out[4]: ['ANN_MLP_BACKPROP',
'ANN_MLP_GAUSSIAN',
'ANN_MLP_IDENTITY',
'ANN_MLP_NO_INPUT_SCALE',
'ANN_MLP_NO_OUTPUT_SCALE',
...
'__spec__']
If you have installed an older version of OpenCV, the ml module might not be present. For example, the k-nearest neighbor algorithm (which we will talk about in Chapter 3, First Steps in Supervised Learning) used to be called cv2.KNearest() but is now called cv2.ml.KNearest_create(). In order to avoid confusion throughout the book, I therefore recommend using at least OpenCV 3.1.
lock icon The rest of the chapter is locked
Register for a free Packt account to unlock a world of extra content!
A free Packt account unlocks extra newsletters, articles, discounted offers, and much more. Start advancing your knowledge today.
Unlock this book and the full library FREE for 7 days
Get unlimited access to 7000+ expert-authored eBooks and videos courses covering every tech area you can think of
Renews at €18.99/month. Cancel anytime