Running the IDE for the Galileo
Now that the device is installed, you can run the IDE. Select and run the program based on the type of machine you are using. The IDE should start and you should see something resembling the following screenshot:

This is the environment you will use to develop your applications. You can use this IDE to compile the code, upload it to the device, and then run it.
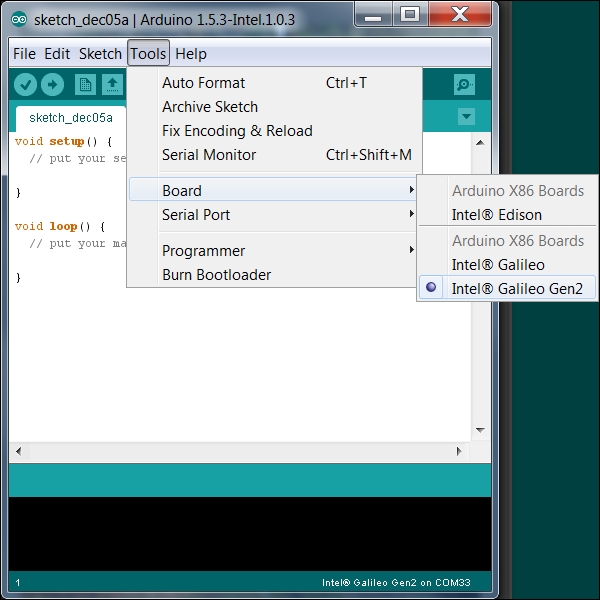
Setting the IDE to connect to your board
The first thing you'll need to do is set the IDE to create code for the proper Galileo board. Fortunately, the IDE lets you set that by choosing the board. To do this, navigate to Tools | Board | Intel® Galileo Gen2, as shown in the following screenshot:

The next step, selecting a port to connect the board to the IDE, will depend on the type of operating system you are using.
Selecting the proper COM port for Windows
To specify the port for Windows, navigate to Tools | Serial Port | COM23, (the port you noted earlier) as shown in the following screenshot:

The IDE should now indicate that you are using the Galileo on COM23 in the lower-right corner of the IDE, as in the preceding screenshot.
Selecting the proper COM port for the Mac
To specify the port for Mac, navigate to Tools | Serial Port | and select the port you noted earlier when you installed the drivers. The IDE should now indicate that you are using the Galileo on the proper port in the lower-right corner of the IDE.
Selecting the proper COM port for a Linux Machine
To specify the port for a Linux machine, navigate to Tools | Serial Port | and select the port you noted earlier when you first connected to the board. The IDE should now indicate that you are using the Galileo on the proper port in the lower-right corner of the IDE.


