A system overview
The BeagleBone Black is a complete computer despite its dimensions. In fact, it's a little bigger than a credit card yet power packed.
The main hardware key features are as follows:
|
Part |
Specification |
|---|---|
|
Processor |
ARM processor: Sitara AM3358 @ 1 Ghz with 3D engine |
|
SDRAM memory |
512 MB DDR3 @800 Mhz |
|
On-board flash |
4 GB, 8-bit eMMC |
|
USB 2.0 ports |
1 device 1 host |
|
Serial port |
UART0 via 6 pin 3.3 V TTL connector |
|
Ethernet |
10/100 via RJ45 connector |
|
SD/MMC |
MicroSD 3.3 V slot |
|
Video out |
16b HDMI 1280 x 1024 |
|
Audio out |
Stereo via HDMI interface |
|
LED indicators |
|
|
Expansion connectors |
|
The following image shows a top view of the BeagleBone Black, where we can see some interesting things:
- The connector J1 can be used to access the serial console (this concept will be explained in detail in the Getting access to the serial console section of Chapter 2, Managing the System Console).
- The Ethernet connector.
- The two expansion connectors P8 and P9, where we can connect the dedicated extension boards and/or custom peripherals (these connectors will be explained in detail in the next chapters).
- The reset button can be used to reset the board. The power button can be used to turn on/off the board.

From the preceding image, we can see that the BeagleBone Black doesn't look like a PC, but it can act as a PC! The BeagleBone Black is a fully functional single-board computer and can be readily used as a PC if required by connecting a monitor to the HDMI port and attaching a USB keyboard and mouse through a USB hub. However, it is more suited to embedded applications, where it can act as more than a PC due its expansion connectors, and we can stack up to four expansion boards (named capes) that are useful for several purposes.
In this book, we'll see how we can manage (and reinstall) a complete Debian distribution that allows us to have a wide set of ready-to-run software packages, as a normal PC may have (in fact, the Debian ARM version is equivalent to the Debian x86 version). Then, we'll see how we can use the expansion connectors to connect to the board. Several peripherals are used to monitor/control the external environment.
The first login
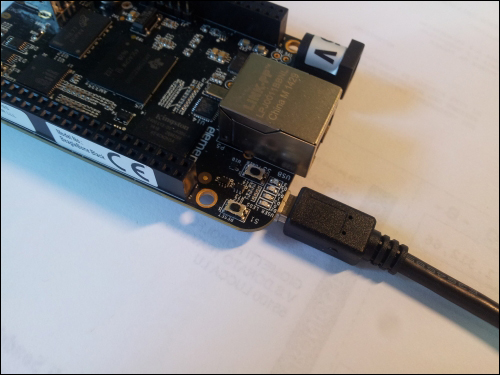
Once we get our new BeagleBone Black in front of us, we just have a board and a USB cable, so the only thing to do is to connect one end of the USB cable to the BeagleBone Black's mini USB connector and the other end to our PC's USB host port:

If everything works well, we should see the BeagleBone Black's user LEDs blinking (on the board, these LEDs are labeled as USER LEDS) and after a while, on the host PC, we should get some kernel messages as follows:
usb 2-1.1: new high-speed USB device number 12 using ehci-pci
usb 2-1.1: New USB device found, idVendor=1d6b, idProduct=0104
usb 2-1.1: New USB device strings: Mfr=2, Product=3, SerialNumber=4
usb 2-1.1: Product: BeagleBoneBlack
usb 2-1.1: Manufacturer: Circuitco
usb 2-1.1: SerialNumber: C0-3214BBBK0716
rndis_host 2-1.1:1.0 eth0: register 'rndis_host' at usb-0000:00:1d.0-1.1, RNDIS device, 78:a5:04:ca:cb:00
cdc_acm 2-1.1:1.2: This device cannot do calls on its own. It is not a modem.
cdc_acm 2-1.1:1.2: ttyACM0: USB ACM device
Tip
I'm using an Ubuntu 14.04 LTS-based system as a host PC.
To get the preceding kernel messages, we can use both the dmesg and tail -f /var/log/kern.log commands.
This behavior means that the BeagleBone Black is working correctly, so let's first log in to the system.
Let's take a look at the preceding kernel messages. We will notice the following two lines:
cdc_acm 2-1.1:1.2: This device cannot do calls on its own. It is not a modem.
cdc_acm 2-1.1:1.2: ttyACM0: USB ACM device
The serial device ttyACM0 can be used to get access to the BeagleBone Black's internal system. To do so, we can use a terminal emulator; usually, I use minicom, but you can use your preferred tool. In case of minicom, the following command line is used:
$ minicom -o -D /dev/ttyACM0
You must now verify that the serial port setup is 115200,8N1 without the hardware and software flow control (in minicom, these settings can be checked using the Ctrl +A + O key sequence, and then selecting the entry in the Serial port setup menu).
Now, if we press the Enter key, we get the following string:
Password:
Nothing to worry about, just hit the Enter key again and then enter the string root when the board asks for an user account as reported as follows:
BeagleBone login:
No password is needed here. The console then displays the last login time and the version. It will look something like this:
Last login: Wed Apr 23 20:20:54 UTC 2014 on ttyGS0
Linux BeagleBone 3.8.13-bone47 #1 SMP Fri Apr 11 01:36:09 UTC 2014 armv7l

The programs included with the Debian GNU/Linux system are free software;
the exact distribution terms for each program are described in the
 individual files in /usr/share/doc/*/copyright.

Debian GNU/Linux comes with ABSOLUTELY NO WARRANTY, to the extent
permitted by applicable law.
root@BeagleBone:~#
Great! We just did our first login!


