Creating a PDF by using a scanner
All photos and scans are pixel-based images. File formats vary depending on the editing software or the selection of output by the user. The most common application-independent formats are the following:
- JPEG (or JPG), short for Joint Photographic Experts Group
- PNG, short for Portable Network Graphics
- GIF, short for Graphics Interchange Format
- TIFF, short for Tagged Image File Format
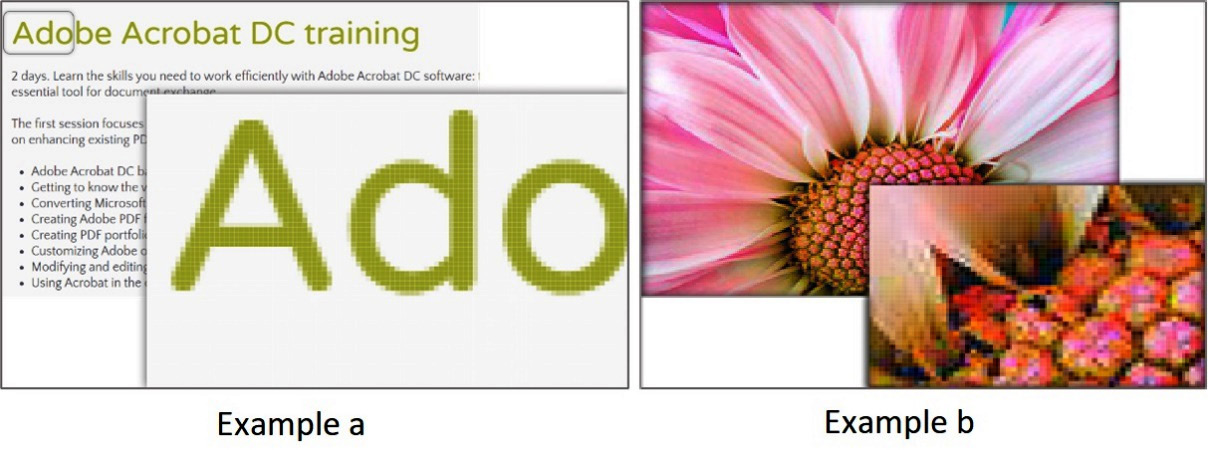
Bitmap or raster image (as opposed to vector) means that it is built by tiny squares arranged in columns and rows. Each square contains color information. You do not see pixels; you only see the content until the view is magnified very closely on the screen. Here are some examples of pixel-based images:

Figure 2.1 – Examples of text and photo in pixel-based images
The limitation of pixel-based images is that they are flat, meaning text is not editable. Therefore, scanned pages of publications need to be enhanced so that the text can be searched, copied, and possibly reused if the process does not infringe on copyrights.
The following discussion will take you through two separate though similar paths in creating PDFs from scans:
- Using a scanner connected to a desktop system with Acrobat Pro
- Using an image captured from a camera, and saved and opened in Acrobat Pro
For more information on the Adobe Scan mobile application, see the Using a mobile device as a scanner section in Chapter 1, Understanding Different Adobe Acrobat Versions and Services.
Scanning document pages
Scanners, as opposed to cameras, provide an optimal environment for converting paper pages to a digital format, especially pages with a lot of text. It is much easier to align paper edges and the content is more accurately represented in the scan, as opposed to photos, which need quite a bit of alignment adjustment.
Scanners come with their own application, but you can also work directly from Acrobat by selecting a connected scanner device (TWAIN scanner drivers and Windows Image Acquisition (WIA) drivers are supported). This allows you to also use the scanner interface and buttons.
![]() On macOS, Acrobat supports TWAIN and Image Capture (ICA). Configuration options appear after you choose a scanner and click Next.
On macOS, Acrobat supports TWAIN and Image Capture (ICA). Configuration options appear after you choose a scanner and click Next.
Important note
The options and specific steps are different in Microsoft Windows and macOS. I will do my best to at least acknowledge the differences and when possible include information for Mac users; however, our examples will focus on Windows and Microsoft Office for a Windows environment.
We will now learn how to scan a paper document. Here are the steps in Windows:
- Select the File | Create | PDF from scanner options. If you prefer using the Tools panel, select the Create PDF | Scanner options.
- The Scan & OCR options page opens with multiple choices to refine the output of the scanned pages. They will vary slightly based on the selected scanning device, which may include a smartphone if it is connected to your system. If you select a scanner, the following warning may appear: WIA Scanner Driver might face problems using “Hide Scanner’s Native Interface” mode. Switching to “Show Scanner’s Native Interface” mode.
The following are the steps on macOS:
- Select the File | Create | PDF from scanner options. This will open a window with options. If you prefer using the Tools panel, select the Create PDF | Scanner | Next options to open the available settings.
- The Scan & OCR options page opens with multiple choices to refine the output of the scanned pages. The settings will vary based on the scanning device connected to your system.
The following options are consistent in both the Mac and Windows OSs, though the specific location of each setting may vary. You can probably figure this one out. We are going to base our examples on Windows. We will go through the choices for optimizing scan quality.
- You can select the option to append to an existing file in a specified location. This will allow you to create a multipage scan saved in a specific location.

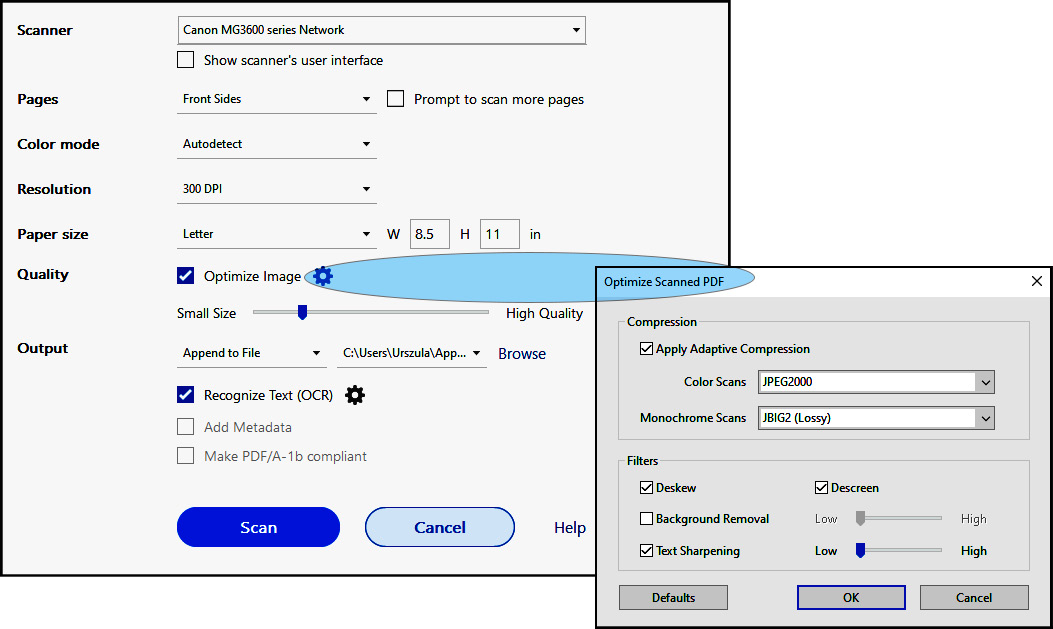
Figure 2.2 – Scanner options (availability of options depends on the selected scanner)
- Selecting the Scan | Default Settings options will open a dialog box, as shown in Figure 2.2, with options based on the selected scanner type. Here are some settings that you can define if you are using a Canon MG3600 series scanner:
- Whether the front or both sides of the page are to be scanned.
- The color model. The Black and White option is the best choice for black text on white pages, typically for office memos, forms, contracts, and more.
- The resolution of the scan, where the higher the resolution, the larger the file size. The recommended scanning resolutions are 300 dpi for grayscale and RGB input, or 600 dpi for black-and-white input for pages with a very small font size, 9 points or lower.
Important note
OCR stands for optical character recognition. It is a process where software analyzes an image of the text created by bitmaps/pixels and converts it into font-based editable type. Since fonts are mapped to international text character standards, enhancing a scanned image of text with OCR adds a dimension to a .pdf file. It makes its text content accessible, searchable, and editable, allowing it to expand document features to include other interactive enhancements.
Selecting the proper resolution setting for scanning sets a good balance between page image quality that affects OCR accuracy and file size. For black-and-white, mostly text pages, 300 dpi is optimal. Lower settings, such as 150 dpi or lower, produce a higher rate of font-recognition errors. On the other hand, 400 dpi or higher resolution slows down the scanning process and produces much larger file sizes.
For pages with very small font sizes, you may need to increase the resolution value to prevent OCR unrecognized word errors. To scan text-rich pages, the Black and White setting works best.
- The Deskew option rotates any page that is not square with the sides of the scanner bed, to make the PDF page align vertically. Choose a checked or unchecked box.
- Background Removal should be applied to pages with photos. What you see as white paper color is not pure white when interpreted by a scanner. To increase the contrast, this function whitens almost all white areas of grayscale and color to produce a white background. This is not needed in black-and-white input.
- The Descreen setting allows you to remove halftone dots. Photos printed on paper are built with tiny dots of ink: Cyan, Magenta, Yellow, and Black (CMYK) arranged in a very precise pattern to create a wide range of colors. When pages containing photos are scanned, a new pattern is created and it often disrupts the original pattern of dots, which degrades the quality of images. In the print industry, it is called a moire pattern. If text is part of a photo, the moire pattern also makes it difficult to recognize it by OCR. Toggling this setting on applies a filter that improves legibility for the OCR. If pages have no photos, the setting should be turned off.
- Text Sharpening sharpens the text of the scanned
.pdffile. The default value is set to Low but works for most documents. Increase it if the quality of the printed document is low and the text is unclear. - Paper size provides many standards listed as options or fields where you can type a custom page size.
- The Optimize Image options let you choose the format for color photo output, such as
.jpeg,.jpeg2000, or monochrome (black and white) images:- The
.jpegformat refers to a standard for images established by the Joint Photographic Experts Group designed to balance image quality and file size in digital photography. The format is lossy, meaning the process of compression deletes pixel data. It was created in 1992 and since then has been widely adopted by all browsers on the World Wide Web and social media. .jpeg2000was created in the year 2000 by the same group with the intent to address the limitations of the original format caused by loss of pixel data in images. It preserves transparency and a higher level of compression, keeping the file size smaller while preserving the high quality of images. Unlike its predecessor, it has not gained universal acceptance and it is largely used in professional imaging environments such as medical diagnostics or digital cinema production. Do not use.jpeg2000when creatingPDF/A-compliant files.- ZIP compression refers to the
.tifflossless format used for compressing large-file-size images used in print only. They cannot be used on the internet as they are not supported by browsers.
- The
- Output provides choices to create a new PDF, append an existing one, or save multiple files.
- The gear icon next to OCR lets you choose one of 42 languages and provides a choice for Editable Text and Images, which creates a new custom font that closely resembles the original while preserving the page background using a low-resolution copy. The Searchable Image option deskews the original image if needed and places a text layer over it.
- Metadata such as document title, author, keywords, and others may be added.
- Scanned pages may automatically be made compliant with the PDF/A-1b standard designed for archiving PDFs. This ensures they meet internationally recognized formats and that documents can be preserved for viewing over a very long time.
Important note
PDF/A-1b is a version of PDF designed for archiving that meets basic levels of conformance. PDF/A compliant means your file meets the requirements of the PDF/A format. The most basic PDF/A requirements are as follows: all content is embedded (fonts, colors, text, images, and so on) and does not contain audio or video. The file is not encrypted. It follows standards for metadata, does not contain JavaScript, does not contain references to external content, and is not an XFA form created in LiveCycle Designer.
Creating a digital image of a paper page through scanning is the first step in creating a quality PDF. Options selected will affect how clean and sharp pages look. This will also have an impact on how accurately OCR will render live text in an invisible layer.
In the following section, we will discuss the options available to enhance both the visible content of a page (ink on paper) and text output after OCR conversion. We will start the process with a scanned or photographed page, where conversion or enhancements were not applied.


