(For more resources related to this topic, see here.)
Publishing a Video Demo project
Due to its very nature, a Video Demo project can only be published as an .mp4 video file. In the following exercise, you will return to the encoderVideo.cpvc project and explore the available publishing options:
- Open the encoderVideo.cpvc file under Chapter08.
- Make sure the file opens in Edit mode.
- If you are not in Edit mode, click on the Edit button at the lower-right corner of the screen. (If the Edit button is not displayed on the screen, it simply means that you already are in Edit mode.)
When the file is open in Edit mode, take a look at the main toolbar at the top of the interface.
- Click on the Publish icon or navigate to File | Publish.
The Publish Video Demo dialog opens.
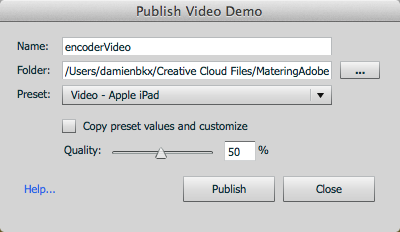
- In the Publish Video Demo dialog, make sure the Name of the project is encoderVideo.
- Click on the … button and choose the publish folder of your exercises as the destination of the published video file.
- Open the Preset dropdown. Take some time to inspect the available presets. When done, choose the Video - Apple iPad preset.
- Make sure the Publish Video Demo dialog looks similar to what is shown in the following screenshot and click on the Publish button:

Publishing a Video Demo project can be quite a lengthy process, so be patient. When the process is complete, a message asks you what to do next. Notice that one of the options enables you to upload your newly created video to YouTube directly.
- Click on the Close button to discard the message.
- Use Windows Explorer (Windows) or the Finder (Mac) to go to the publish folder of your exercises.
- Double-click on the encoderDemo.mp4 file to open the video in the default video player of your system.
Remember that a Video Demo project can only be published as a video file. Also remember that the published .mp4 video file can only be experienced in a linear fashion and does not support any kind of interactivity.
Publishing to Flash
In the history of Captivate, publishing to Flash has always been the primary publishing option. Even though HTML5 publishing is a game changer, publishing to Flash is still an important capability of Captivate. Remember that this publishing format is currently the only one that supports every single feature, animation, and object of Captivate.
In the following exercise, you will publish the Encoder Demonstration project in Flash using the default options:
- Return to the encoderDemo_800.cptx file under Chapter08.
- Click on the Publish icon situated right next to the Preview icon. Alternatively, you can also navigate to File | Publish.
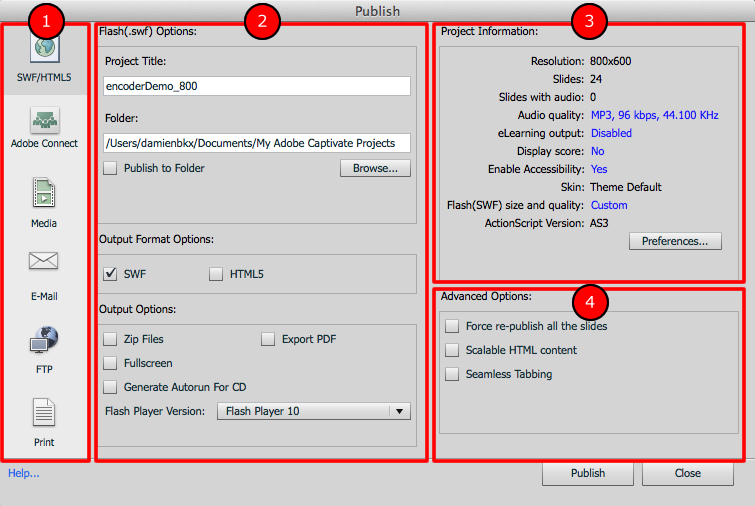
The Publish dialog box opens as shown in the following screenshot:

Notice that the Publish dialog of a regular Captivate project contains far more options than its Publish Video Demo counterpart in .cpvc files. The Publish dialog box is divided into four main areas:
- The Publish Format area (1): This is where you choose the format in which you want to publish your projects. Basically, there are three options to choose from: SWF/HTML5, Media, and Print. The other options (E-Mail, FTP, and Adobe Connect) are actually suboptions of the SWF/HTML5, Media, and Print formats.
- The Output Format Options area (2): The content of this area depends on the format chosen in the Publish Format (1) area.
- The Project Information area (3): This area is a summary of the main project preferences and metadata. Clicking on the links of this area will bring you back to the corresponding preferences dialog boxes.
- The Advanced Options area (4): This area provides some additional advanced publishing options.
You will now move on to the actual publication of the project in the Flash format.
Unlock access to the largest independent learning library in Tech for FREE!
Get unlimited access to 7500+ expert-authored eBooks and video courses covering every tech area you can think of.
Renews at €18.99/month. Cancel anytime
- In the leftmost column of the Publish dialog, make sure the chosen format is SWF/HTML5.
- In the central area, change the Project Title to encoderDemo_800_flash.
- Click on the Browse… button situated just below the Folder field and choose to publish your movie in the publish folder of your exercises folder.
- Make sure the Publish to Folder checkbox is selected.
- Take a quick look at the remaining options, but leave them all at their current settings.
- Click on the Publish button at the bottom-right corner of the Publish dialog box.
When Captivate has finished publishing the movie, an information box appears on the screen asking whether you want to view the output.
- Click on No to discard the information box and return to Captivate.
You will now use the Finder (Mac) or the Windows Explorer (Windows) to take a look at the files Captivate has generated.
- Use the Finder (Mac) or the Windows Explorer (Windows) to browse to the publish folder of your exercises.
Because you selected the Publish to Folder checkbox in the Publish dialog, Captivate has automatically created the encoderDemo_800_flash subfolder in the publish folder.
- Open the encoderDemo_800_flash subfolder to inspect its content.There should be five files stored in this location:
- encoderDemo_800_flash.swf: This is the main Flash file containing the compiled version of the .cptx project
- encoderDemo_800_flash.html: This file is an HTML page used to wrap the Flash file
- standard.js: This is a JavaScript file used to make the Flash player work well within the HTML page
- demo_en.flv: This is the video file used on slide 2 of the movie
- captivate.css: This file provides the necessary style rules to ensure there is proper formatting of the HTML page
If you want to embed the compiled Captivate movie in an existing HTML page, only the .swf file (plus, in this case, the .flv video) is needed. The HTML editor (such as Adobe Dreamweaver) will recreate the necessary HTML, JavaScript, and CSS files.
Captivate and Dreamweaver
Adobe Dreamweaver CC is the HTML editor of the Creative Cloud and the industry-leading solution for authoring professional web pages. Inserting a Captivate file in a Dreamweaver page is dead easy! First, move or copy the main Flash file (.swf) as well as the needed support files (in this case, the .flv video file), if any, somewhere in the root folder of the Dreamweaver site. When done, use the Files panel of Dreamweaver to drag and drop the main .swf file onto the HTML page. That's it! More information on Dreamweaver can be found at http://www.adobe.com/products/dreamweaver.html.
You will now test the compiled project in a web browser. This is an important test as it closely recreates the conditions in which the students will experience the movie once uploaded on a web server.
- Double-click on the encoderDemo_800_flash.html file to open it in a web browser.
- Enjoy the final version of the demonstration you have created!
Now that you have experienced the workflow of publishing the project to Flash with the default options, you will explore some additional publishing options.
Using the Scalable HTML content option
Thanks to Scalable HTML content option of Captivate, the eLearning content is automatically resized to fit the screen on which it is viewed. Let's experiment with this option hands on using the following steps:
- If needed, return to the encoderDemo_800.cptx file under Chapter08.
- Click on the Publish icon situated right next to the Preview icon. Alternatively, you can also navigate to File | Publish.
- In the leftmost column, make sure the chosen format is SWF/HTML5.
- In the central column, change the Project Title to encoderDemo_800_flashScalable.
- Click on the Browse… button situated just below the Folder field and ensure that the publish folder is still the publish folder of your exercises.
- Make sure the Publish to Folder checkbox is selected.
- In the Advanced Options section (lower-right corner of the Publish dialog), select the Scalable HTML content checkbox.
- Leave the remaining options at their current value and click on the Publish button at the bottom-right corner of the Publish dialog box.
When Captivate has finished publishing the movie, an information box appears on the screen asking whether you want to view the output.
- Click on Yes to discard the information box and open the published movie in the default web browser.
During the playback, use your mouse to resize your browser window and notice how the movie is resized and always fits the available space without being distorted.
The Scalable HTML content option also works when the project is published in HTML5.
 United States
 Great Britain
 India
India
 Germany
 France
 Canada
 Russia
 Spain
Spain
 Brazil
 Australia
 Singapore
 Hungary
 Ukraine
 Luxembourg
 Estonia
 Lithuania
 South Korea
 Turkey
 Switzerland
 Colombia
 Taiwan
 Chile
Chile
 Norway
 Ecuador
 Indonesia
 New Zealand
 Cyprus
 Denmark
 Finland
 Poland
 Malta
Malta
 Czechia
 Austria
 Sweden
 Italy
Italy
 Egypt
Egypt
 Belgium
 Portugal
 Slovenia
 Ireland
 Romania
 Greece
 Argentina
 Netherlands
 Bulgaria
 Latvia
 South Africa
 Malaysia
 Japan
Japan
 Slovakia
 Philippines
 Mexico
 Thailand


