Introducing our ScriptableObject – SOActorModel
In this section, we are going to cover scriptable objects and their benefits. Similar to our interface, scriptable objects cover the same six classes. The reason for this is that our interface uses the SOActorModel and, therefore, creates an attachment with the other variables.
It is also good to remind ourselves of the Game Design Document (GDD) and how it is incorporated into the overview of the creation of our game.
Our game has three series of game objects that will hold similar properties: EnemyWave, EnemyFlee, and Player. These properties will include health, speed, score value, and more. The difference between each of these as described in the game design brief is the way they act and also how they are instantiated in our game.
Player will be instantiated at every level, EnemyWave will be spawned from EnemySpawner, and EnemyFlee will be placed in particular areas of the third level.
All of the aforementioned game objects will relate to the SOActorModel object.
The following diagram is also a partial view of our game framework, showing the scriptable object and the six classes that inherit it:
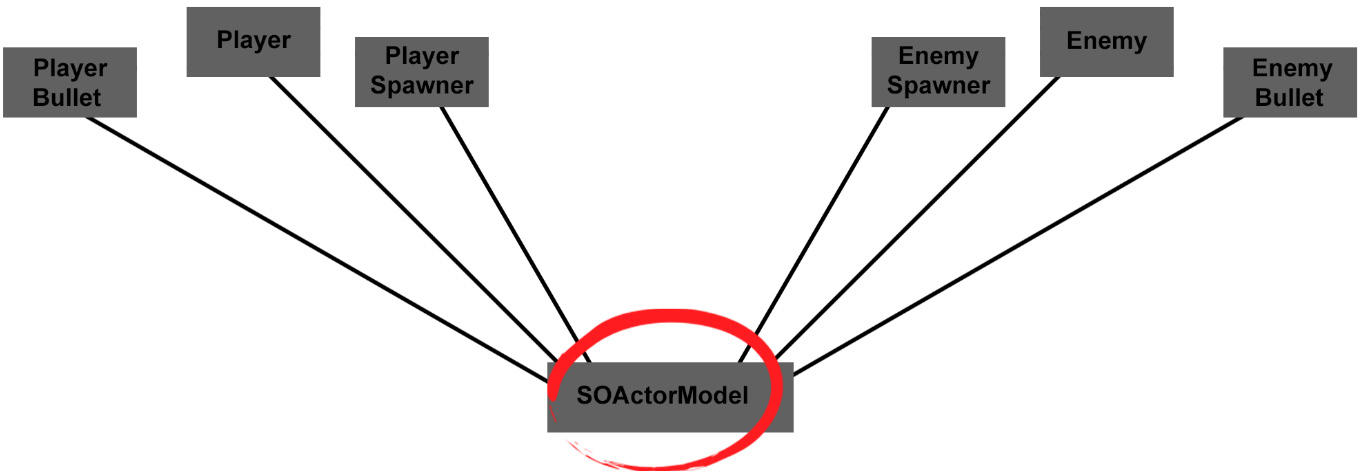
Figure 2.31 – SOActorModel UML
Similar to what was mentioned with the interface script is that the name of the scriptable object name starts with SO, which isn't a standard way of naming the script, but it's easier to identify as a ScriptableObject.
The purpose of this scriptable object is to hold general values for each of the game objects it's being given to. For example, all game objects have a name, so within our SOActorModel is a string named actorName. This actorName will be used to name the type of enemy, spawner, or bullet it is.
Let's create a scriptable object, as follows:
- In the Project window in the Unity Editor, create a script in the
Assets/Scriptsfolder with the filenameSOActorModel. - Open the script and enter the following code:
using UnityEngine; [CreateAssetMenu(fileName = "Create Actor", menuName = "Create Actor")] public class SOActorModel : ScriptableObject { public string actorName; public AttackType attackType; public enum AttackType { wave, player, flee, bullet } public string description; public int health; public int speed; public int hitPower; public GameObject actor; public GameObject actorsBullets; } - Save the script.
Inside the SOActorModel, we will be naming most, if not all, of these variables in the Player script. Similar to how an interface signs a contract with a class, the SOActorModel does the same because it's being inherited, but isn't as strict as an interface by throwing an error if the content from the scriptable object isn't applied.
The following is an overview of the SOActorModel code we just entered.
We named our scriptable object SOActorModel as a generic term to try and cover as many game objects as will likely use the scriptable object. This way of working also supports the SOLID principles we covered in the first chapter by encouraging us to try and keep our code concise and efficient.
The main categories we'll cover for this script are as follows:
- Importing libraries: As you can see, the only library we have imported in the
SOActorModelscript isusing UnityEngine; no other libraries are required. - Creating an asset: The
CreateAssetMenuattribute creates an extra selection from the drop-down list in the Project window in the Unity Editor when we right-click and select Create, as shown in the following screenshot:
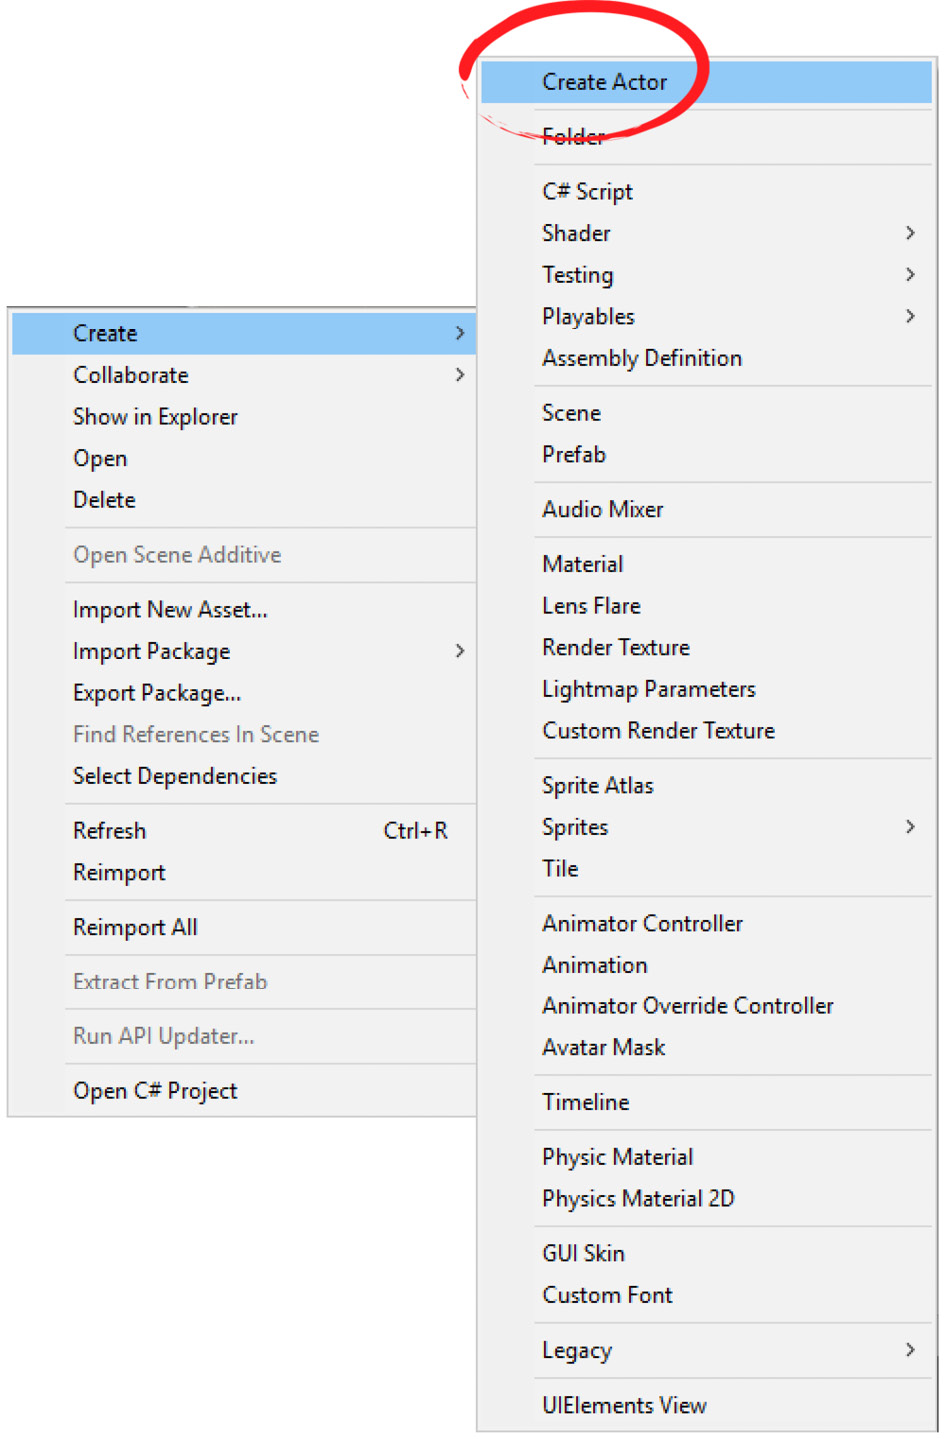
Figure 2.32 – Creating an Actor in the Unity Editor
- Inheritance: We aren't inheriting
MonoBehaviourbutScriptableObjectinstead, as it's a requirement when it comes to creating an asset. - Variables: Finally, these are the variables that will be sent to our selected classes.
In the following sections, we are going to create assets from the scriptable object script to give our scripts different values.
Creating a PlayerSpawner ScriptableObject asset
With our SOActorModel ScriptableObject made, we can now create an asset that will act as a template that can be used not just by programmers but also by designers who want to tweak game properties/settings without needing to know how to code.
To create an Actor Model asset, do the following:
- Back in the Unity Editor, in the Project window, right-click and choose Create | Create Actor.
- Rename the newly created asset file in the Project window
Player_Defaultand store the file in theAssets/Resourcesfolder. - Click on the new asset, and in the Inspector window, you'll see the content of the asset.
The following screenshot shows the Actor Model asset's fields, where I have entered my own values:
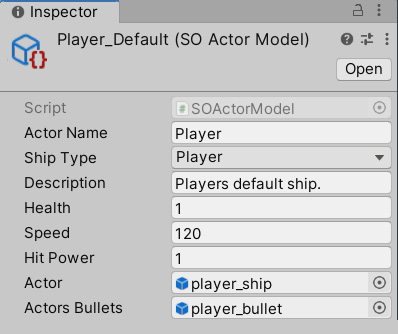
Figure 2.33 – Player values
Let's break down each of the values that have been added to our newly created asset:
- Actor Name: The name of the actor (in our case, this is
Player). - Ship Type: Choose which category this game object belongs to.
- Description: Designer/internal notes that don't affect the game but can be helpful.
- Health: How many times the player can get hit before dying.
- Speed: The movement speed of the player.
- Hit Power: Determines how much damage the player will cause if they collide with the enemy.
- Actor: Place the
player_shipprefab here (Assets/Prefab/Player - Actors Bullets: Place the
player_bulletprefab here (Assets/Prefab /Player/).
We will add this asset to our PlayerSpawner script once it's built later on in the chapter. Let's move on to the next scriptable object asset.
Creating an EnemySpawner ScriptableObject asset
In this section, we are going to make our enemy asset attach to EnemySpawner for later on in the chapter. For the sake of keeping our work fresh and complete, let's continue with that before moving on to the EnemySpawner script.
To make an enemy asset, follow these instructions:
- Back in the Editor, in the Project window, right-click and choose Create | Create Actor.
- Rename the new file to refer to what it's being attached to (
BasicWave Enemy) and store the file in theAssets/ScriptableObjectlocation. - Click on the new script, and our Inspector window will show the content of our script.
The following screenshot shows what the BasicWave Enemy asset is going to look like once we've finished:
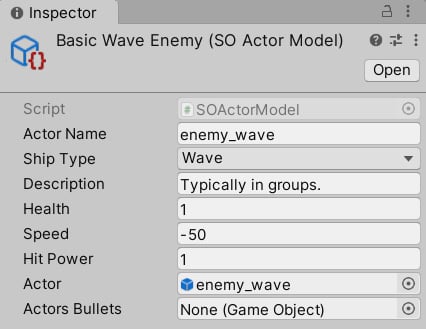
Figure 2.34 – The Basic Wave Enemy values
Let's briefly go through each of the values for our enemy:
- Actor Name:
enemy_wave. - Ship Type: Here, this is
Wave. This explains what type of enemy it is and how it attacks the player. - Description: Here, this reads
Typically in groups. As mentioned before, it's more of a guideline than a rule to comment on anything. - Health:
1, which means it takes 1 hit to die. - Speed:
-50, because our enemy is moving from right to left, so we give it a minus figure. - Hit Power:
1, which means that if this enemy collides with the player, it will cause 1 hit point of damage. - Actor: Place the
enemy_waveprefab here (Assets/Prefab/Enemies). - Actors Bullets: This enemy doesn't fire bullets.
Hopefully, you can see how useful scriptable objects are. Imagine continuing to develop this game with 50 enemies, where all we need to do is create an asset and customize it.
We are going to move on to the final scriptable object asset for this chapter in the next section.
Creating a PlayerBullet ScriptableObject Asset
In this section, we are going to create an asset for the player's bullet for when they fire. As with the last two sections, create an asset, name it PlayerBullet, and store it in the same folder as the other assets.
The following screenshot shows the final results for the PlayerBullet asset:
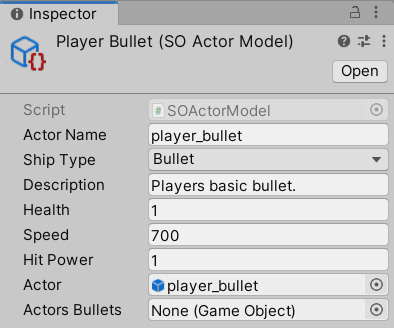
Figure 2.35 – The Player Bullet values
Let's briefly go through each variable's values:
- Actor Name:
player_bullet. - Ship Type: Bullet.
- Description: It is optional to enter any details about the asset here.
- Health: Our bullet has a health value of
1. - Speed:
700. - Hit Power:
1sends a hit point of 1. - Actor: Place the
player_bulletprefab here (Assets/Prefab/Player). - Actors Bullets: None (Game Object).
In a later chapter, when we build a shop for our game, we will be able to buy power-ups for our player's ship. One of the power-ups will be similar to the one that we just made, but the Actor Name will be different, and the Hit Power will have a higher number.
Now, we can move on to the next section and create the player's scripts and attach these assets to them.


