Adding properties to a shader
The properties of a shader are very important for the shader pipeline as you use them to let the artist or user of the shader assign textures and tweak your shader values. Properties allow you to expose GUI elements in a material's Inspector tab, without you having to use a separate editor, which provides us with visual ways to tweak a shader. With your shader open in your IDE of choice, look at lines three through nine. This is called the Properties block of the script. Currently, it will have one texture property called _MainTex.
If you look at your material that has this shader applied to it, you will notice that there is one texture GUI element in the Inspector tab. These lines of code in our shader are creating this GUI element for us. Again, Unity has made this process very efficient in terms of coding and the amount of time it takes to change your properties.
Getting ready
Let's see how this works in our current shader, called StandardDiffuse, by creating some properties and learning more about the syntax involved. For this example, we will refit the shader we created previously. Instead of using a texture, it will only use its color and some other properties that we will be able to change directly from the Inspector tab. Start by duplicating the StandardDiffuse shader. You can do this by selecting it from the Inspector tab and pressing Ctrl + D. This will create a copy called StandardDiffuse 1. Go ahead and rename it StandardColor.
Note
You can give a friendlier name to your shader in its first line. For instance, Shader "CookbookShaders/StandardDiffuse" tells Unity to call this shader StandardDiffuse and move it to a group called CookbookShaders. Adding additional groups, as we did in our previous example, works similarly to how folders work within a project. If you duplicate a shader using Ctrl + D, your new file will share the same name. To avoid confusion, make sure that you change the first line of each new shader so that it uses a unique alias in this and future recipes.
How to do it...
Once the StandardColor shader is ready, we can start changing its properties:
- In the first line of the script, update the name to the following:
Shader "CookbookShaders/Chapter 02/StandardColor"
Downloading the example code
As we mentioned at the beginning of this chapter, it is possible to download the example code from this book via this book's GitHub page at https://github.com/PacktPublishing/Unity-2021-Shaders-and-Effects-Cookbook-Fourth-Edition.
- In the
Propertiesblock of our shader, remove the current property by deleting the following code from our current shader:_MainTex ("Albedo (RGB)", 2D) = "white" {} - After removing this, we should remove all of the other references to
_MainTexas well. Let's remove this other line inside of theSubShadersection:sampler2D _MainTex;
- The original shader used
_MainTexto color the model. Let's change this by replacing the first line of code of thesurf()function with this:fixed4 c = _Color;
Just like you may be used to the
floattype being used for floating-point values when writing code in C# and other programming languages,fixedis used for fixed-point values and is the type that's used when writing shaders. You may also see thehalftype being used as well, which is like thefloattype but takes up half the space. This is useful for saving memory but is less precise in how it is presented. We will discuss this in much greater detail in the Techniques to make shaders more efficient recipe in Chapter 9, Mobile Shader Adjustment.Note
For more information on fixed-point values, check out https://en.wikipedia.org/wiki/Fixed-point_arithmetic.
4infixed4stands for the fact that the color is a single variable that contains fourfixedvalues: red, green, blue, and alpha. You will learn more about how this works and how to modify these values in more detail in the next chapter, Chapter 3, Working with Surface Shaders. - When you save and return to Unity, the shader will compile. Now, we will need to create a material that will use our new shader. From the Project window, go to the Chapter 02 | Materials folder, duplicate the StandardDiffuse material, and rename the newly created material
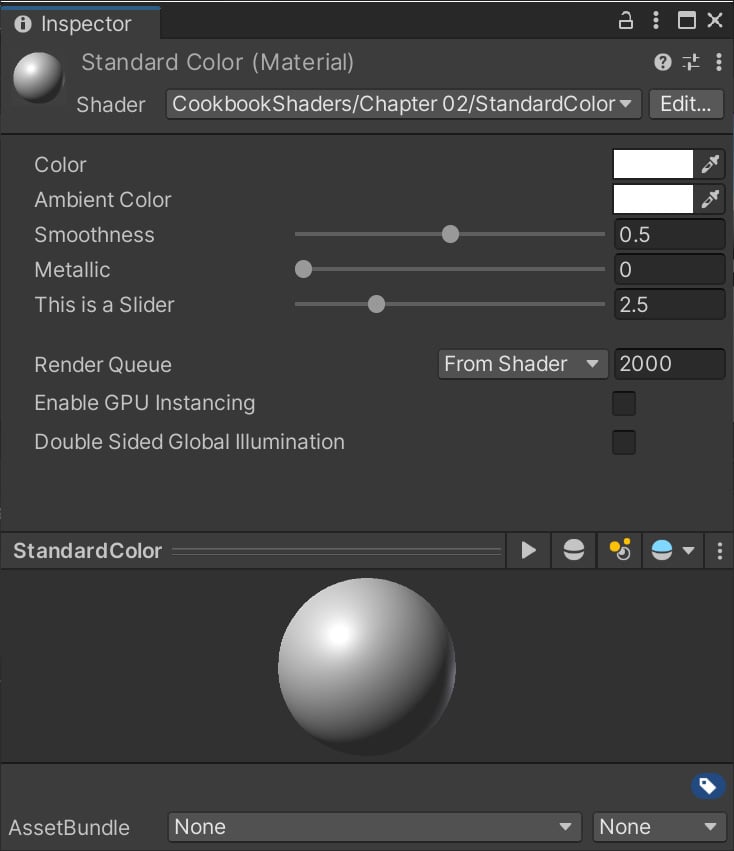
StandardColor. From the Inspector window, change the shader to CookbookShaders/Chapter 02/StandardColor:
Figure 2.12 – The Standard Color (Material) shader
- As you can see, our material's Inspector tab doesn't have a texture swatch anymore. To refit this shader, let's add one more property to the
Propertiesblock and see what happens. Go back into your code editor of choice and enter the following code shown in bold:Properties { _Color("Color", Color) = (1,1,1,1) _AmbientColor("Ambient Color", Color) = (1,1,1,1) _Glossiness("Smoothness", Range(0,1)) = 0.5 _Metallic("Metallic", Range(0,1)) = 0.0 } - We have added another color swatch to the material's Inspector tab. Now, let's add one more to get a feel for other kinds of properties that we can create. Add the following code to the
Propertiesblock:_MySliderValue ("This is a Slider", Range(0,10)) = 2.5 - With that, we have created another GUI element that allows us to visually interact with our shader. This time, we created a slider called This is a Slider, as shown in the following screenshot:

Figure 2.13 – Properties added to the shader
Properties allow you to tweak shaders without having to change the values in the shader code itself. The next recipe will show you how these properties can be used to create a more interesting shader.
Note
While properties belong to shaders, the values associated with them are stored in materials. The same shader can be safely shared between many different materials. On the other hand, changing the property of a material will affect the look of all the objects that are currently using it.
How it works...
Every Unity shader has a built-in structure that it is looking for in its code. The Properties block is one of those functions that is expected by Unity. The reason behind this is to give you, the shader programmer, a means of quickly creating GUI elements that tie directly into your shader code. These properties (variables) that you declare in the Properties block can then be used in your shader code to change values, colors, and textures. The syntax for defining a property is as follows:

Figure 2.14 – Properties syntax
Let's take a look at what is going on under the hood here. When you first start writing a new property, you will need to give it a variable name. The variable name is going to be the name that your shader code is going to use to get the value from the GUI element. This saves us a lot of time because we don't have to set up this system ourselves.
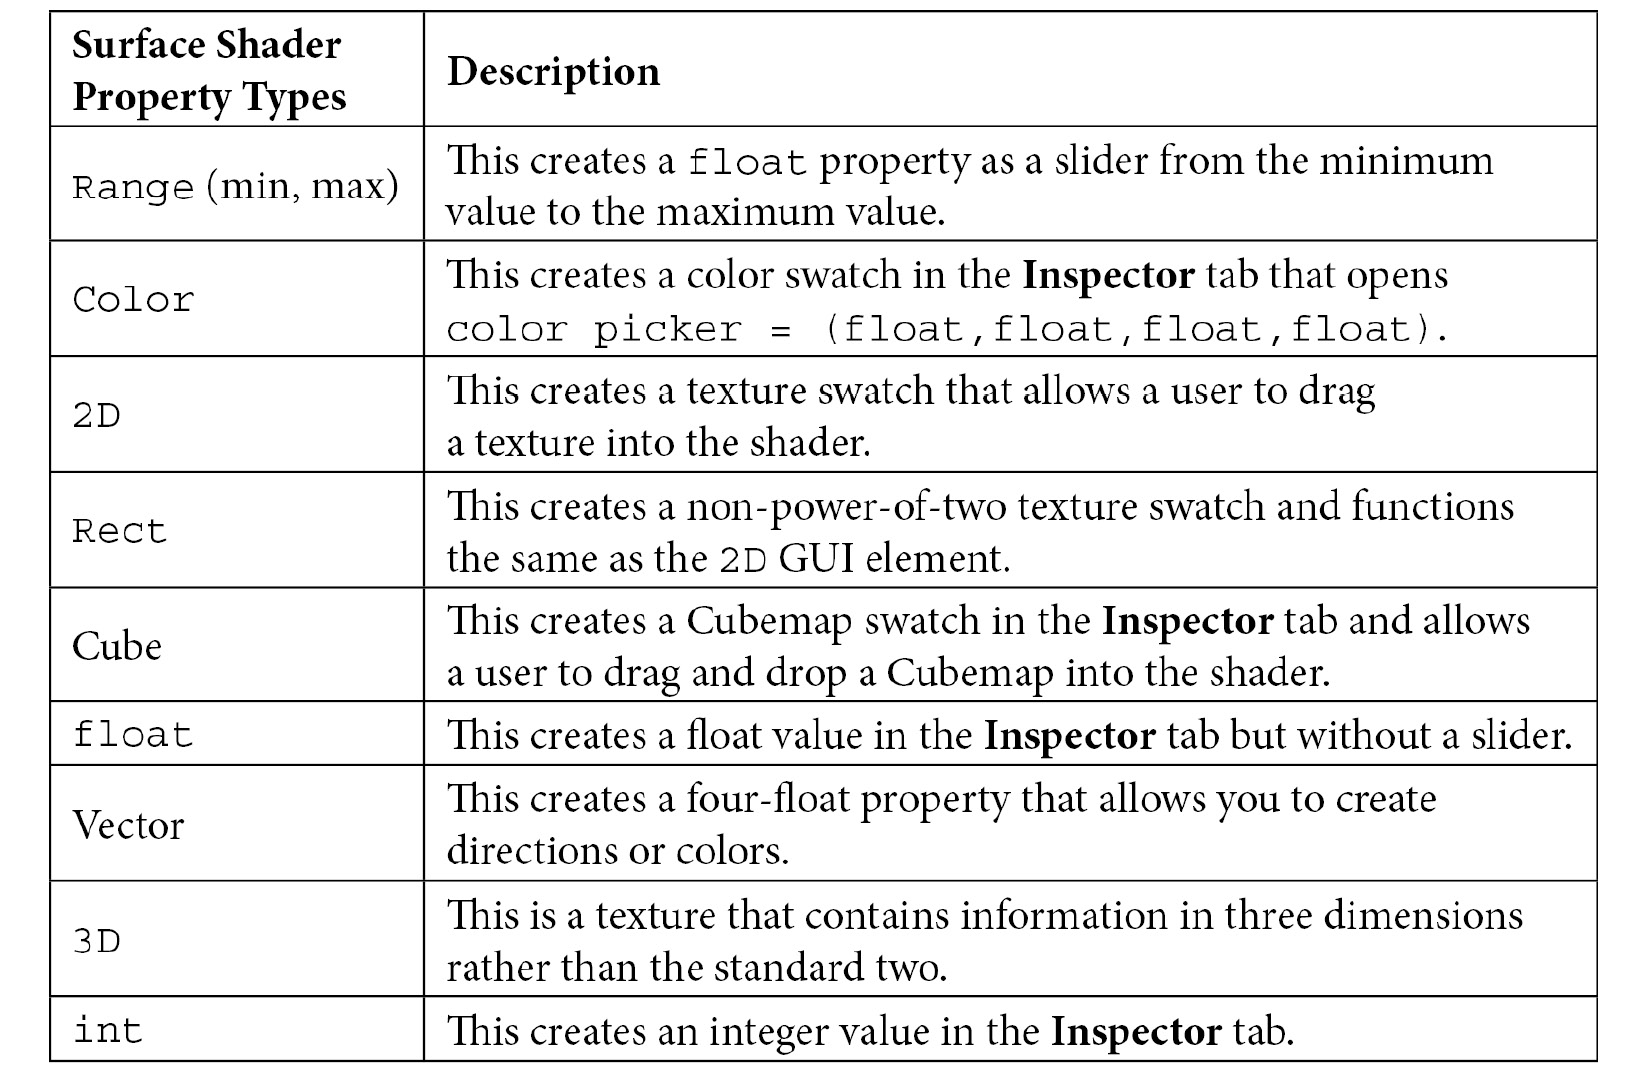
The next elements of a property are the inspector GUI name and the type of the property, which are contained within parentheses. The inspector GUI name is the name that is going to appear in the material's Inspector tab when the user is interacting with and tweaking the shader. The type is the type of data that this property is going to control. There are many types that we can define for properties inside Unity shaders.
The following table describes the types of variables that we can have in our shaders:

Finally, there is the default value. This simply sets the value of this property to the value that you placed in the code. So, in the previous example diagram, the default value for the _AmbientColor property, which is of the Color type, is set to a value of 1, 1, 1, 1. As this is a Color property expecting a color that is RGBA or float4 or r, g, b, a = x, y, z, w, this Color property, when it's created, is set to white.
Note
Default values are only set the first time a shader is assigned to a new material. After that, the material's values are used. Changing the default value will not affect the values of existing materials that use the shader. This is a good thing, of course, but often forgotten. So, if you change a value and notice something not changing, this could be the reason for this.
See also
These properties are documented in the Unity manual at http://docs.unity3d.com/Documentation/Components/SL-Properties.html.


