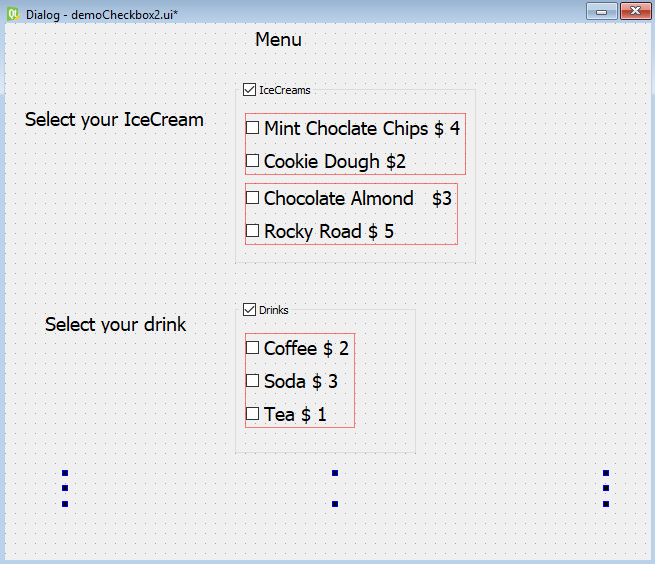
In this application, we will learn to make two groups of checkboxes. The user can select any number of checkboxes from either group and, accordingly, the result will appear.
Displaying two groups of checkboxes
Getting ready
We will try displaying a menu of a restaurant where different types of ice creams and drinks are served. We will create two groups of checkboxes, one of ice creams and the other of drinks. The ice cream group displays four checkboxes showing four different types of ice cream, mint chocolate chip, cookie dough, and so on, along with their prices. The drinks group displays three checkboxes, coffee, soda, and so on, along with their prices. The user can select any number of checkboxes from either of the groups. When the user selects any of the ice creams or drinks, the total price of the selected ice creams and drinks will be displayed.
How to do it...
Here are the steps to create an application, which explain how checkboxes can be arranged into different groups and how to take respective action when the state of any checkbox from any group changes:
- Create a new application based on the Dialog without Buttons template.
- Drag and drop four Label widgets, seven Check Box widgets, and two Group Box widgets onto the form.
- Set the text property of the first three Label widgets to Menu, Select your IceCream, and Select your drink respectively.
- Delete the text property of the fourth Label widget because we will display the total amount of the selected ice creams and drinks through the code.
- Through Property Editor, increase the font size of the all the widgets to increase their visibility in the application.
- Set the text property of the first four checkboxes to Mint Choclate Chips $4, Cookie Dough $2, Choclate Almond $3, and Rocky Road $5. Put these four checkboxes into the first group box.
- Set the text property of the next three checkboxes to Coffee $2, Soda $3, and Tea $1 respectively. Put these three checkboxes into the second group box.
- Change the object names of the first four checkboxes to checkBoxChoclateChips, checkBoxCookieDough, checkBoxChoclateAlmond, and checkBoxRockyRoad.
- Set the objectName property of the first group box to groupBoxIceCreams.
- Change the objectName property of the next three checkboxes to checkBoxCoffee, checkBoxSoda, and checkBoxTea.
- Set the objectName property of the second group box to groupBoxDrinks.
- Set the objectName property of the fourth Label widget to labelAmount.
- Save the application with the name demoCheckBox2.ui. It is through this Label widget that the total amount of the selected ice creams and drinks will be displayed, as shown in the following screenshot:

The .ui (XML) file is then converted into Python code through the pyuic5 command utility. You can find the generated Python code, the demoCheckbox2.py file, in the source code bundle of this book.
- Import the demoCheckBox2.py file as a header file in our program to invoke the user interface design, and to write code to calculate the total cost of ice creams and drinks through a Label widget when the user selects or unselects any of the checkboxes.
- Let's name the program callCheckBox2.pyw; its code is shown here:
import sys
from PyQt5.QtWidgets import QDialog
from PyQt5.QtWidgets import QApplication, QWidget, QPushButton
from demoCheckBox2 import *
class MyForm(QDialog):
    def __init__(self):
        super().__init__()
        self.ui = Ui_Dialog()
        self.ui.setupUi(self)
        self.ui.checkBoxChoclateAlmond.stateChanged.connect
        (self.dispAmount)
        self.ui.checkBoxChoclateChips.stateChanged.connect(self.
        dispAmount)
        self.ui.checkBoxCookieDough.stateChanged.connect(self.
        dispAmount)
        self.ui.checkBoxRockyRoad.stateChanged.connect(self.
        dispAmount)
        self.ui.checkBoxCoffee.stateChanged.connect(self.
        dispAmount)
        self.ui.checkBoxSoda.stateChanged.connect(self.
        dispAmount)
        self.ui.checkBoxTea.stateChanged.connect(self.
        dispAmount)
        self.show()
    def dispAmount(self):
        amount=0
        if self.ui.checkBoxChoclateAlmond.isChecked()==True:
            amount=amount+3
        if self.ui.checkBoxChoclateChips.isChecked()==True:
            amount=amount+4
        if self.ui.checkBoxCookieDough.isChecked()==True:
            amount=amount+2
        if self.ui.checkBoxRockyRoad.isChecked()==True:
            amount=amount+5
        if self.ui.checkBoxCoffee.isChecked()==True:
            amount=amount+2
        if self.ui.checkBoxSoda.isChecked()==True:
            amount=amount+3
        if self.ui.checkBoxTea.isChecked()==True:
            amount=amount+1
        self.ui.labelAmount.setText("Total amount is
        $"+str(amount))
if __name__=="__main__":
    app = QApplication(sys.argv)
    w = MyForm()
    w.show()
    sys.exit(app.exec_())
How it works...
The stateChanged() event of all the checkboxes is connected to the dispAmount function, which will calculate the cost of the selected ice creams and drinks. In the dispAmount function, you check the status of the checkboxes to find out whether they are checked or unchecked. The cost of the ice creams and drinks whose checkboxes are checked is added and stored in the amount variable. Finally, the addition of the amount stored in the amount variable is displayed via the labelAmount widget. On running the application, you get a dialog prompting you to select the ice creams or drinks that you want to order. On selecting the ice creams or drinks, the total amount of the chosen items will be displayed, as shown in the following screenshot:


