Installing software and setting up
As the book title says, Python is the language we will use to implement all machine learning algorithms and techniques throughout the entire book. We will also exploit many popular Python packages and tools, such as NumPy, SciPy, scikit-learn, TensorFlow, and PyTorch. By the end of this initial chapter, make sure you have set up the tools and working environment properly, even if you are already an expert in Python or familiar with some of the aforementioned tools.
Setting up Python and environments
We will use Python 3 in this book. The Anaconda Python 3 distribution is one of the best options for data science and machine learning practitioners.
Anaconda is a free Python distribution for data analysis and scientific computing. It has its own package manager, conda. The distribution (https://docs.anaconda.com/free/anaconda/, depending on your OS, or Python version 3.7 to 3.11) includes around 700 Python packages (as of 2023), which makes it very convenient. For casual users, the Miniconda (https://conda.io/miniconda.html) distribution may be the better choice. Miniconda contains the conda package manager and Python. Obviously, Miniconda takes up much less disk space than Anaconda.
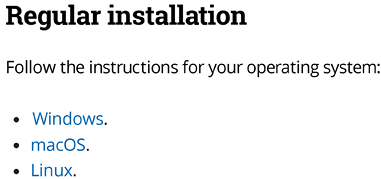
The procedures to install Anaconda and Miniconda are similar. You can follow the instructions from https://docs.conda.io/projects/conda/en/latest/user-guide/install/. First, you must download the appropriate installer for your OS and Python version, as follows:

Figure 1.13: Installation entry based on your OS
Follow the steps listed in your OS. You can choose between a GUI and a CLI. I personally find the latter easier.
Anaconda comes with its own Python installation. On my machine, the Anaconda installer created an anaconda directory in my home directory and required about 900 MB. Similarly, the Miniconda installer installs a miniconda directory in your home directory.
Feel free to play around with it after you set it up. One way to verify that you have set up Anaconda properly is by entering the following command line in your terminal on Linux/Mac or Command Prompt on Windows (from now on, we will just mention Terminal):
python
The preceding command line will display your Python running environment, as shown in the following screenshot:

Figure 1.14: Screenshot after running “python” in the terminal
If you don’t see this, please check the system path or the path Python is running from.
To wrap up this section, I want to emphasize the reasons why Python is the most popular language for machine learning and data science. First of all, Python is famous for its high readability and simplicity, which makes it easy to build machine learning models. We spend less time worrying about getting the right syntax and compilation and, as a result, have more time to find the right machine learning solution. Second, we have an extensive selection of Python libraries and frameworks for machine learning:
|
Tasks |
Python libraries |
|
Data analysis |
NumPy, SciPy, and pandas |
|
Data visualization |
Matplotlib, and Seaborn |
|
Modeling |
scikit-learn, TensorFlow, Keras, and PyTorch |
Table 1.5: Popular Python libraries for machine learning
The next step involves setting up some of the packages that we will use throughout this book.
Installing the main Python packages
For most projects in this book, we will use NumPy (http://www.numpy.org/), SciPy (https://scipy.org/), the pandas library (https://pandas.pydata.org/), scikit-learn (http://scikit-learn.org/stable/), TensorFlow (https://www.tensorflow.org/), and PyTorch (https://pytorch.org/).
In the sections that follow, we will cover the installation of several Python packages that we will mainly use in this book.
Conda environments provide a way to isolate dependencies and packages for different projects. So it is recommended to create and use an environment for a new project. Let’s create one using the following command to create an environment called “pyml":
conda create --name pyml python=3.10
Here, we also specify the Python version, 3.10, which is optional but highly recommended. This is to avoid using the latest Python version by default, which may not be compatible with many Python packages. For example, at the time of writing (late 2023), PyTorch does not support Python 3.11.
To activate the newly created environment, we use the following command:
conda activate pyml
The activated environment is displayed in front of your prompt like this:
(pyml) hayden@haydens-Air ~ %
NumPy
NumPy is the fundamental package for machine learning with Python. It offers powerful tools including the following:
- The N-dimensional array (
ndarray) class and several subclasses representing matrices and arrays - Various sophisticated array functions
- Useful linear algebra capabilities
Installation instructions for NumPy can be found at https://numpy.org/install/. Alternatively, an easier method involves installing it with conda or pip in the command line, as follows:
conda install numpy
or
pip install numpy
A quick way to verify your installation is to import it in Python, as follows:
>>> import numpy
It is installed correctly if no error message is visible.
SciPy
In machine learning, we mainly use NumPy arrays to store data vectors or matrices composed of feature vectors. SciPy (https://scipy.org/) uses NumPy arrays and offers a variety of scientific and mathematical functions. Installing SciPy in the terminal is similar, again as follows:
conda install scipy
or
pip install scipy
pandas
We also use the pandas library (https://pandas.pydata.org/) for data wrangling later in this book. The best way to get pandas is via pip or conda, for example:
conda install pandas
scikit-learn
The scikit-learn library is a Python machine learning package optimized for performance, as a lot of its code runs almost as fast as equivalent C code. The same statement is true for NumPy and SciPy. scikit-learn requires both NumPy and SciPy to be installed. As the installation guide in http://scikit-learn.org/stable/install.html states, the easiest way to install scikit-learn is to use pip or conda, as follows:
pip install -U scikit-learn
or
conda install -c conda-forge scikit-learn
Here, we use the “-c conda-forge" option to tell conda to search for packages in the conda-forge channel, which is a community-driven channel with a wide range of open-source packages.
TensorFlow
TensorFlow is a Python-friendly open-source library invented by the Google Brain team for high-performance numerical computation. It makes machine learning faster and deep learning easier, with the Python-based convenient frontend API and high-performance C++-based backend execution. TensorFlow 2 was largely a redesign of its first mature version, 1.0, and was released at the end of 2019.
TensorFlow has been widely known for its deep learning modules. However, its most powerful point is computation graphs, which algorithms are built on. Basically, a computation graph is used to convey relationships between the input and the output via tensors.
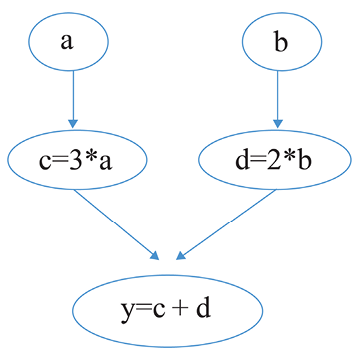
For instance, if we want to evaluate a linear relationship, y = 3 * a + 2 * b, we can represent it in the following computation graph:

Figure 1.15: Computation graph for a y = 3 * a + 2 * b machine
Here, a and b are the input tensors, c and d are the intermediate tensors, and y is the output.
You can think of a computation graph as a network of nodes connected by edges. Each node is a tensor, and each edge is an operation or function that takes its input node and returns a value to its output node. To train a machine learning model, TensorFlow builds the computation graph and computes the gradients accordingly (gradients are vectors that provide the steepest direction where an optimal solution is reached). In the upcoming chapters, you will see some examples of training machine learning models using TensorFlow.
We highly recommend you go through https://www.tensorflow.org/guide/data if you are interested in exploring more about TensorFlow and computation graphs.
TensorFlow allows easy deployment of computation across CPUs and GPUs, which empowers expensive and large-scale machine learning. In this book, we will focus on the CPU as our computation platform. Hence, according to https://www.tensorflow.org/install/, installing TensorFlow 2 is done via the following command line:
conda install -c conda-forge tensorflow
or
pip install tensorflow
You can always verify the installation by importing it in Python.
PyTorch
PyTorch is an open-source machine learning library primarily used to develop deep learning models. It provides a flexible and efficient framework to build neural networks and perform computations on GPUs. PyTorch was developed by Facebook’s AI Research lab and is widely used in both research and industry.
Similar to TensorFlow, PyTorch performs its computations based on a directed acyclic graph (DAG). The difference is that PyTorch utilizes a dynamic computational graph, which allows for on-the-fly graph construction during runtime, while TensorFlow uses a static computational graph, where the graph structure is defined upfront and then executed. This dynamic nature enables greater flexibility in model design and easier debugging, and also facilitates dynamic control flow, making it suitable for a wide range of applications.
PyTorch has become a popular choice among researchers and practitioners in the field of deep learning, due to its flexibility, ease of use, and efficient computational capabilities. Its intuitive interface and strong community support make it a powerful tool for various applications, including computer vision, natural language processing, reinforcement learning, and more.
To install PyTorch, it is recommended to look up the command in the latest instructions on https://pytorch.org/get-started/locally/, based on the system and method.
As an example, we install the latest stable version (2.2.0 as of late 2023) via conda on a Mac using the following command:
conda install pytorch::pytorch torchvision -c pytorch
Best practice
If you encounter issues in installation, please read more about the platform and package-specific recommendations provided on the instructions page. All PyTorch code in this book can be run on your CPU, unless specifically indicated for a GPU only. However, using a GPU is recommended if you want to expedite training neural network models and fully enjoy the benefits of PyTorch. If you have a graphics card, refer to the instructions and set up PyTorch with the appropriate compute platform. For example, I install it on Windows with a GPU using the following command:
conda install pytorch torchvision pytorch-cuda=11.8 -c pytorch -c nvidia
To check if PyTorch with GPU support is installed correctly, run the following Python code:
>>> import torch
>>> torch.cuda.is_available()
True
Alternatively, you can use Google Colab (https://colab.research.google.com/) to train some neural network models using GPUs for free.
There are many other packages we will use intensively, for example, Matplotlib for plotting and visualization, Seaborn for visualization, NLTK for natural language processing tasks, transformers for state-of-the-art models pretrained on large datasets, and OpenAI Gym for reinforcement learning. We will provide installation details for any package when we first encounter it in this book.


