CRM composite application
If you need a simple application to keep track of customers, then deal with their enquiries, keep track of their orders, and quickly generate Sales Pipeline reports, this recipe will show you how it can be done.
The problem
Based on the success of our Power User cookbook, my company is launching a new SharePoint 2010 training business. We need a simple CRM application to help us keep track of it. We want to maintain a list of customers, a calendar of our public training courses, be able to quickly respond to course enquiries, track our customers' orders, and invoices for training places. We need some simple reports and charts that quickly give us an overall picture of how the training business is performing.
Our solution
Building on the previous recipe, we again create a custom SharePoint 2010 Team Site as the starting point of our solution. In this case, we add and customize a contacts list to track the details of our training course customers. We use the calendar list to record the public schedules of the courses we intend to present. We remove the Shared Documents library that was created automatically and replace it with two new document libraries designed to store sales resources and customer documents respectively.
The Sales resources library is used to store course information, company fliers, and other sales documents that we want to be able to quickly send out to customers in response to course enquiries.
The customer documents library is used to store the documentation related to existing customers. We create add content types for customer documents such as quotations, orders, and invoices, allowing us to capture different metadata for each document type. Our documents are generated in Word and uploaded to the library. We create a lookup field in each content type that links the documents to our customer list. We add a new web part page to the site and use connected web parts to give us a filtered view showing each customer's documents.
Getting ready
This recipe works for:
SharePoint 2010 Foundation
SharePoint 2010 Standard Edition
SharePoint 2010 Enterprise Edition
How to do it...
Tip
These instructions are intended to guide you through the key steps that you should perform to build this composite application. They are not a comprehensive guide like the recipes presented earlier. You will need to apply the knowledge you have learned and refer back to the recipes presented previously to successfully build this application. Recipes that will be particularly useful to you are listed in the Recipes that will help you build this application section at the end of this recipe. This recipe assumes the knowledge presented in the earlier Project Management composite application section. I recommend that you also read the How it works section of this recipe first to gain further insight before trying to recreate this application.
Create a new SharePoint 2010 Team Site for the SharePoint 2010 training site. Customize the site's home page to remove the out of the box placeholders and add relevant information. Apply an appropriate security model.
Add details of the public training schedule to the Calendar. Add a view of the Calendar to the home page of the site. Change the title of the Calendar to Course Schedule.
Create a new Contacts list named Customers to store customer details. Remove any columns from the list that are not required.
Delete the Shared Documents library and add two new document libraries named Sales Resources and Customer Documents respectively.
Upload any sales resources, such as course outlines, to the Sales Resources library.
The home page of the site should look like the following screenshot:

Create document content types for Quote, Order, and Invoice. Add appropriate metadata columns and document templates. Ensure that each content type contains a Total column (currency).
Enable content types for the Customer Documents list. Add the Quote, Order, and Invoice content types. Make Quote the default content type and then delete the Document content type from the list. When you have finished the New Document menu for the list, it should look like the following screenshot:

Create a new lookup column named Customer in the Customer Documents list and connect it to the Company field in the Customers list.
Set Require that this column contains information to Yes and Enforce unique values to No.
In the Add a column to show each of these additional fields, check the Last Name and First Name options.
Check the Add to all content types and Add to default view options.
Check the Enforce relationship behavior and select the Restrict delete option.

Add details of existing customers to the Customers list.
Upload any existing customer documentation to the Customer Documents library. Set the Content Type and metadata for each document uploaded.

Create new Standard Views on the Customer Documents library to show Quotes, Orders, and Invoices respectively. For each view, set the Filter value to select the correct content type (you will have to type in the content type's name as text), and add the content type specific columns to the views (for example, Quote Status to the Quotes view). In the Inline Editing section, check the Allow inline editing checkbox. In the Totals section, add a Sum to the Total column. The quotes view is shown in the following screenshot:

Using your web browser, add a new Web Part Page to the site and call it
CustomerView.aspx. Select the Header, Left Column, and Body layout. Save the page in the Site Pages library.Add list view web parts (Lists and Libraries) to the page for the Customers list (left column) and three separate views of the Customer Documents library (that is, add the same library web part three times) to the body.
Edit the Customers web part. Set the Title to Select Customer and set the Chrome Type to Title and Border.
Edit each of the Customer Documents web part properties in turn. Set the Title of the first web part to Quotes and the Selected View to Quotes. Repeat for the second and third web parts, setting the corresponding properties to Orders and Invoices views respectively. Set the Chrome Type on each web part to Title plus Border.
Your web part page should look somewhat similar to the following screenshot, displaying the list of customers together with different views showing all the quotes, orders, and invoices stored on the site.

Edit the
CustomerView.aspxpage using SharePoint Designer 2010. Highlight the Select Customer web part and click on the Add Connection button from the Options tab of the List View Tools ribbon.The Web Part Connections Wizard is displayed. Connect the Select Customers web part to the Quotes web part by joining the Company and Customer columns as shown in the following series of screenshots. Repeat this process to connect the Select Customer web part in turn to the Orders and Invoices web part.

Save the page. It now displays a filtered view of customer documents, according to the customer that you select, as illustrated in the following screenshot:

How it works...
This composite application combines a custom Team Site, content types, and connected web parts to create a powerful yet simple CRM application.
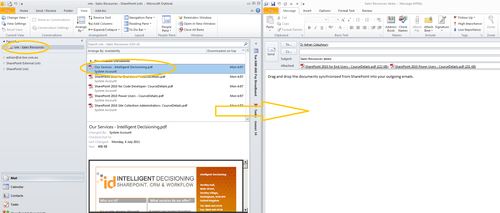
The sales process starts when an enquiry is received from a potential training course customer. An initial e-mail response can quickly be produced using Outlook 2010. Because the course schedule calendar and the Sales Resources document library from the site can be connected to Outlook 2010, all the information required to craft an appropriate response is automatically synchronized and readily available. Course outlines and company information can be easily dragged and dropped into the outgoing e-mails.

Positive enquiry responses can be converted into formal quotations, orders, and invoices. This application makes use of content types to allow all these different types of customer documents to be stored in the same document library, whilst at the same time employing different document templates, capturing different metadata, applying different workflows, and so on. Content types allow composite applications to successfully model and manage these real world entities. You should seek to employ them wherever possible.
Note
SharePoint 2010 allows a site collection to be designated as a content type hub. Content types defined in the hub can be published and shared across your SharePoint installation, providing consistency in metadata, document templates, information management policies, and associated workflows wherever that content type is consumed.
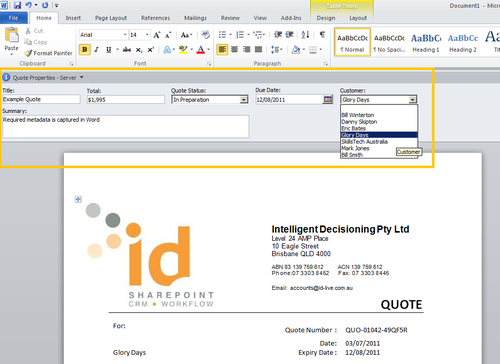
New invoices, orders, and quotations can be quickly generated in Microsoft Word 2010 by using the templates saved to their corresponding content type. The metadata required is prompted for and can be entered directly within the document information panel within Word documents themselves.

Tip
You can use the Quick Parts within the Insert ribbon in Microsoft Word 2010 to embed the metadata from your content types directly into the body of your documents.
The content type in this application ensures that sales documents are captured in a structured way. Each content type has a lookup column on the customers' list, allowing all sales documents to be related back to their parent customer. This fact is exploited in the Customer View web part page to create a customer dashboard showing filtered views of selected customer's documents. The page makes use of web part connections to filter the custom Quotations, Orders, and Invoices views on the customer's documents list based on the value selected in the customers' list displayed on the page. All this magic happens through a few mouse clicks and a simple wizard; no code required. Web part connections are a great feature for building composite applications.
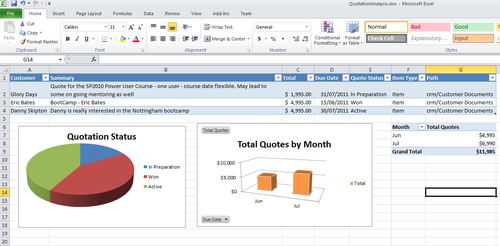
Finally, when it comes to analyzing our sales performance, all we need to do is select the view on the customer documents library we want and hit the Export to Excel button on the Library tab of the List Tools ribbon. From there we can analyze our sales data using Excel charts, pivot tables, and reports that allow us to present the data however we choose.

Note
If you want to get really smart, then publish your exported spreadsheet back to SharePoint using Excel Services and then embed the charts and tables into your pages using the Excel Services web part. Every time you refresh the worksheet, all the data displayed in your site will be updated.
What we have learnt
The recipe reinforces the concept that a Team Site makes a great starting point for many composite applications.
In this case, we see the power of content types and how the use of content types helps us store quotation, orders, and invoice documents in the same document list, allowing us to capture different metadata and apply different business rules and workflows for each different document types.
We have learnt how to use web part connections to create connected views of business data, allowing us to quickly view all the customer documents for an individual customer, while at the same time using the summary fields of SharePoint views to automatically display the total values of quotes, orders, and invoices.
The narrative surrounding this recipe is designed to remind you that SharePoint is only one of many tools that you have at your disposal when creating composite applications. It is best used in conjunction with the Office applications such as Word, Excel, and Outlook 2010.
There's more...
There are an almost infinite number of ways that this composite application could be extended. A lookup column could be added to the invoice column to allow the invoices to be related back to orders as well as customers, creating a master/detail view of this data. Meeting workspaces could be used in the calendar to plan each course instance (storing details such as the trainer, location, attendees, and so on). Custom declarative workflows could be attached to each of the content types to perform sales pipeline functionality such as creating tasks to follow up a quote a week after it was sent out or chasing up a customer invoice when it is overdue. The task list could be modified to include a customer lookup and the tasks for a particular customer added to the Customer View page. More views could be added to the customer documents library using more advanced filter criteria such as combining the content type, due date, and invoice status column to create an overdue invoice view and so on.
Tip
When creating any composite application, you may find your imagination getting the better of you. Always start simple and get something working. Then evolve and refine the application as you use it. Only add the features that you really need and don't over-complicate it.
Recipes that will help you build this application
Project Management composite application
Creating a SharePoint list, Chapter 1
Creating a content type, Chapter 1
Creating a Team Site, Chapter 2
Adding users to a Team Site, Chapter 2
Adding a new page to a Team Site, Chapter 2
Creating a SharePoint Contact List and connecting it to Outlook 2010, Chapter 2
Creating a custom list view, Chapter 3
Uploading an existing document to a document library, Chapter 3
Uploading multiple documents to a document library, Chapter 3
Requiring users to check out a document before they can edit it, Chapter 4
Enabling versioning on a document library, Chapter 4
Publishing a major version of a document, Chapter 4
Enabling content approval on a document library, Chapter 4
Using content types to store different types of documents in the same document library, Chapter 4
Creating an Excel Spreadsheet to run on the server, Chapter 7
Creating a list workflow using SharePoint Designer 2010, Chapter 8


