The structure of a Magento theme
The files in a Magento theme are divided into two main directories: app and skin, as shown in the following screenshot:
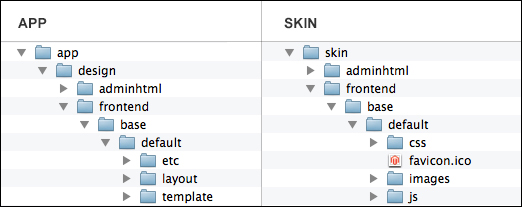
The following is the description of the two directories:
app: Theapp/design/frontend/base/default/directory contains the layout, translation, and template filesskin: Theskin/frontend/base/default/directory contains the images, CSS, and JavaScript files
Design packages and design themes
Magento allows you to incorporate the themes in design packages. This provides greater flexibility to manage the graphics and design of a store.
The following screenshot shows the base package and the default theme:
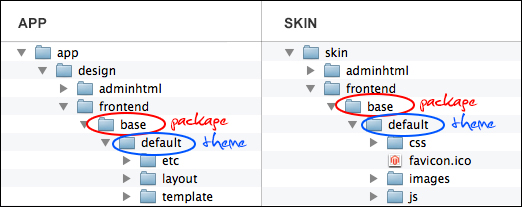
The main advantage of packages is very simple: we can create a default theme and endless themes with the graphic variants for the same store without having to change the entire theme.
Directory 1 – app
This directory contains the layout, translation, and template files.
The layout subdirectory
The layout subdirectory allows you to define the structure of the pages through the XML files. Various page types and blocks within each page type are defined in respective XML files. Using XML, you can also incorporate CSS files or JavaScript either to be loaded throughout the site or for specific pages.
There are layouts for page types such as a catalog and category, but not for CMS pages; for them you can define custom XML directly from the admin.
Each page, part, and block of the theme is defined by an XML file. Every page is defined by a handle. To understand better how they work, we need to have an overview of the handles.
The following are the two main handles:
Default handles that manage the whole site
Non-default handles that handle specific parts of the site
A handle is a reference name that Magento uses to refer to a particular page. For example, the <cms_page> handle is used to control the layout of the pages in your Magento store created through the CMS (Content Management System). Another example is the <catalog_product_view> handle used to control the layout of the product view page.
The XML files are located in app/design/frontend/base/default/layout/. For the curious, the following is a piece of code of the XML file page.xml:
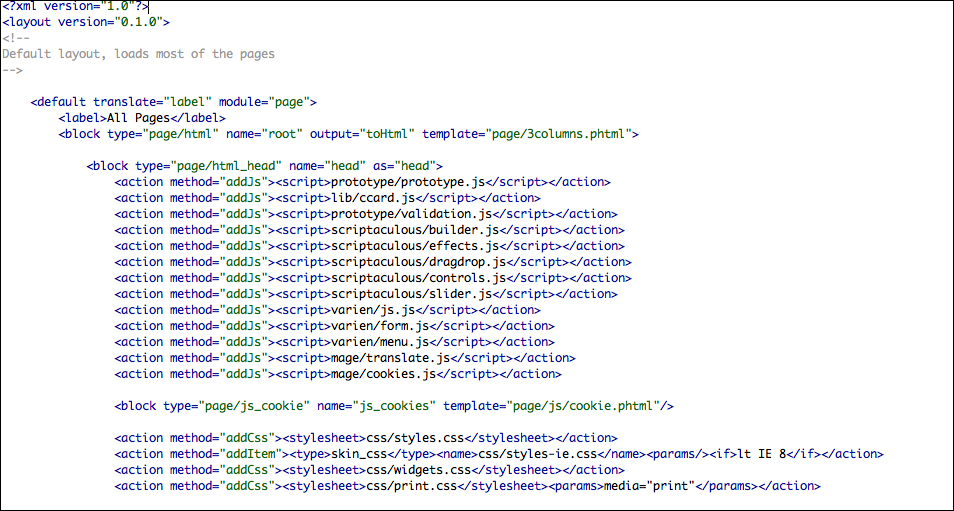
In this example, we see in action the <default> handle that defines the generic JavaScript and CSS for the whole theme.
For the layout, there is no need to duplicate every single XML file to change the appearance of a block; just insert a JavaScript file or CSS file. In fact, with the exception of template files, we can create a single XML file where we can declare all the information that will add or override information of the basic theme.
For example, if we want to insert a new custom JavaScript test.js file in the head for the whole site (where all the main JS are defined), we don't need to duplicate the page.xml file, and declare the new JavaScript file there. Overrides should go in the local.xml file of our theme.
So, we can insert the new custom JavaScript test.js file in the header for the whole site by performing the following steps:
Open the
page.xmlfile fromapp/design/frontend/base/default/layout/page.xml(we open that file only for reference). Check how the JavaScript is declared in the base theme. In this case, we will see that the generic JavaScript is declared in the<default>handle in the following way:<action method="addJs"> <script>varien/js.js</script></action>
Please note that this directory is typically used by third-party extensions to store JS files. The JS loaded from themes is expected to be stored in
/skin/frontend/package/theme/default/jsand they are declared similarly using the following way:<action method="addItem"> <type>skinJs</type><script>js/test.js</script></action>
In the
layout.xmlfile, insert the action in our default handle, and change it.Create the JS file in the specified folder in
[magento_root]/skin/frontend/package/default/js/test.js.
Templates
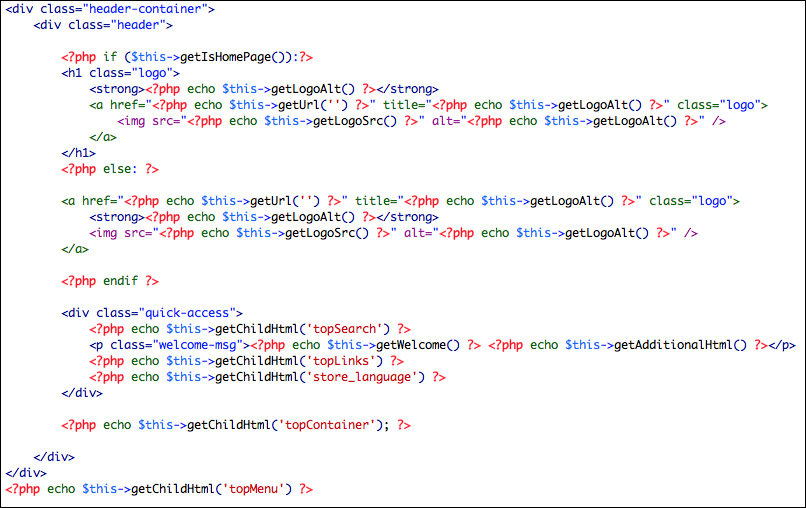
The template files are the PHTML files, a mix of HTML and PHP. These files contain the code of the various blocks and are located at app/design/frontend/base/default/template/.
The following screenshot shows a piece of code of the header.phtml file located at app/design/frontend/base/default/page/html:
Locales
Locales contain the files of localization and translation of the theme. The folder that contains translation files of the theme is app/design/frontend/base/locale.
The file that handles the translations must be named translate.csv, and within it, we're going to insert the original lines of text that are defined in the translations, or of the new text that we created in the PHTML file.
To find the default Magento localizations lines of text, you can explore the files at app/locale/en_US. If you open this folder, you can see that the translations are organized in various CSV files. Each of them represents a specific section of the site. For example, the Mage_Catalog.csv file includes all the text about the catalog pages of the site.
The locale folder contains many folders, as there are translations that we want provide, and the translate.csv file must be placed inside the language folder. For example, app/design/frontend/base/locale/en_US/translate.csv.
en_US is the name of the folder that indicates the language of the localization (en) and the country or region of the language (US).
For example, if we want to create an Italian version of the theme, we have to duplicate the translate.csv file from app/design/frontend/base/locale/en_US/ to app/design/frontend/base/locale/it_IT/.
This will be very useful to those who use the theme and will have to translate it in the future.
As I said before, we can change some existent translations or create a new one for the custom text that we insert in the PHTML files. To change the existent translation, we have to proceed in this way. For example, let's suppose that we want to change the text of the Add to Cart button from the default Add to Cart to Buy. We have to write in our two CSV columns. In the first column, the original text, and in the second column, the translated text: Add to Cart, Buy.
Alternatively, you can use the inline translation that will be stored in the database and is the final fallback. However, for theming the method described previously, it is better to have the theme localized.
Creating new translatable entries
Let's suppose that you want to add a new title or a new text line into a block. Inside the PHTML file, to make the line translatable, you must incorporate the text into the PHP code in the following way:
<?php echo $this->__('New text') ?>Now, put the following in the default CSV file: "New text","New text".
When I say "the default CSV file", I mean the English version of the translate.csv file.
Directory 2 – skin
The skin folder contains CSS and .js files and images of the theme and is located at skin/frontend/base/default/.
Structural blocks and content blocks
The following screenshot shows Reference Blocks and Content Blocks:
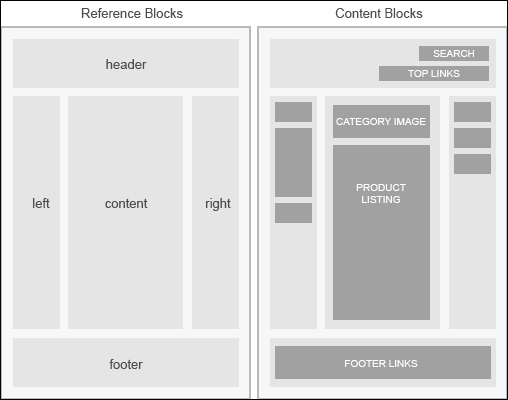
The reference blocks or structural blocks are the blocks that precisely define the container of the content blocks. For example, the header, the footer, the left and right sidebar, and the main content are a part of structural blocks. These blocks are defined in the layout XML files and the source files in the template files.
The content blocks are the blocks that hold the content. The structural blocks hold these blocks. For example, the logo, the links at the top, and the search are "content blocks" that are placed inside the reference block "header".
CMS blocks and page
CMS (Content Management System) pages and blocks are static pages and blocks that you can manage through the admin panel. Both CMS pages and CMS blocks can contain the HTML code and Magento variables (check the next topic for more information).
CMS blocks
CMS blocks are blocks that you can create from the admin panel. They are useful for allowing the end user to customize some parts of the theme without modifying the files directly by the admin.
To create a CMS block, navigate to Admin Panel | CMS | Static Blocks as shown in the following screenshot:

Let's say, a customer needs to insert a banner independently, but hasn't HTML or other programming knowledge. We can create a link to a specific CMS block into an XML file that the customer can directly edit by admin, using the editor to insert text or an image.
CMS pages
CMS pages are the pages that can be created directly from the admin panel. CMS pages are static pages such as Homepage, About Us, and Customer Service. They are available via their own URL address that can be defined with his content from the admin as well.
You can create new pages by navigating to Admin Panel | CMS | Pages, as shown in the following screenshot:

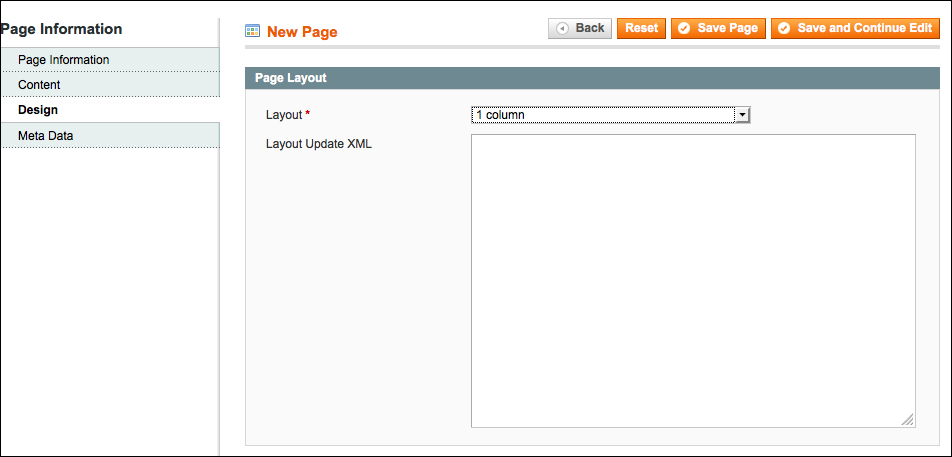
CMS pages can contain html code and Magento variables. You can also customize the page aspect through the Design tab, where you can choose the layout of the page, and add additional Layout Update XML that will overwrite the local.xml file as shown in the following screenshot:
Magento variables
Magento variables, which were mentioned in the previous topic, are moveable pieces of plain text or HTML content that are great for adding to transactional e-mails, or adding a constant copy and designs to your store with static blocks and CMS pages.
By doing so, custom text and design can be created once and applied to multiple areas to save the merchant time.
Magento comes with some system variables such as {{store url=""}} (stores the website address), {{var logo_url}} (URL of the store logo), and many others. For a full reference about Magento variables, check the Magento blog at http://www.magentocommerce.com/knowledge-base/entry/defining-transactional-variables.
We can also create a new custom variable from the admin panel. To create a custom variable, perform the following steps:
In the backend, navigate to System | Custom Variable as shown in the following screenshot:

Click on the Add New Variable button.
In the Variable Code field, enter the variable identifier only in lowercase and with no spaces, for example,
store_city,as seen in the following screenshot:
Enter Variable Name, only for internal purposes.
Enter the HTML code or plain text in one of the relative text areas and save it.
Note
The html code of this new variable that you created will be
{{CustomVar code="store_city"}}. It is important to insert it with the editor hidden, or the editor will change the code.
Now, you can use this variable in the transactional e-mail, or in CMS pages, or also in CMS blocks. For example, insert the custom variable in the About Us page by performing the following steps:
Open the CMS About Us page (this page is present only if you are working on Magento with sample data).
Hide the editor and insert the following line:
<p>Our store Location: {{CustomVar code="store_city"}}</p>This is shown in the following screenshot:

Save the page and go to the frontend at
http://path_to_magento/about-magento-demo-store; the following will then appear:
You can also add the custom variable through the Insert Variable button, which is visible when the editor is hidden.
Widgets
Magento widgets are frontend blocks with a predefined set of configuration options. These configuration options are displayed in a special edit form in the backend panel when a widget is being added or edited by a store owner. The ability to easily set widget configuration options allows store owners the full control of widget placement on a page.
Magento widgets allow users with no technical knowledge to easily add dynamic content (including product data, for example) to pages in Magento stores. This allows the user to create informational and marketing content through administrator tools with some easy steps. Some examples of widgets are as follows:
CMS blocks (yes, you can add a CMS block in a page as a widget)
Recently viewed items
Catalog product link
The same options can also be seen in the following screenshot:

We will discuss more about this topic in the chapter dedicated to creating a widget.


