Search icon CANCEL
Subscription
0
Cart icon
Your Cart (0 item)
Close icon
You have no products in your basket yet
Save more on your purchases! discount-offer-chevron-icon
Savings automatically calculated. No voucher code required.
Arrow left icon
Explore Products
Best Sellers
New Releases
Books
Videos
Audiobooks
Learning Hub
Newsletter Hub
Free Learning
Arrow right icon
timer SALE ENDS IN
0 Days
:
00 Hours
:
00 Minutes
:
00 Seconds
Arrow up icon
GO TO TOP
Low Poly 3D Modeling in Blender

You're reading from   Low Poly 3D Modeling in Blender Kickstart your career as a 3D artist by learning how to create low poly assets and scenes from scratch

Arrow left icon
Product type Paperback
Published in Feb 2024
Publisher Packt
ISBN-13 9781803245478
Length 318 pages
Edition 1st Edition
Tools
Concepts
Arrow right icon
Author (1):
Arrow left icon
Samuel Sullins Samuel Sullins
Author Profile Icon Samuel Sullins
Samuel Sullins
Arrow right icon
View More author details
Toc

Table of Contents (22) Chapters Close

Preface 1. Part 1:Getting Started with Low Poly Modeling
2. Chapter 1: Getting Familiar with Blender FREE CHAPTER 3. Chapter 2: Understanding Low Poly Modeling 4. Chapter 3: Creating a Low Poly Tree 5. Part 2:Modeling and Shading for Low Poly
6. Chapter 4: Exploring Modifiers 7. Chapter 5: Creating Low Poly Mushrooms 8. Chapter 6: Understanding Materials and Shading 9. Part 3:Creating Your Own Assets
10. Chapter 7: Creating a Low Poly Tractor 11. Chapter 8: Low Poly Environment Modeling 12. Chapter 9: Modeling a Kangaroo 13. Chapter 10: Creating Low Poly Houses and Buildings 14. Chapter 11: Using the Asset Browser 15. Part 4:Building a Complete Low Poly Scene
16. Chapter 12: Blocking Out the Scene 17. Chapter 13: Building the Scene 18. Chapter 14: The Big Render 19. Index 20. Other Books You May Enjoy Appendix

Adding details to the stem

In our reference, the stem is slightly curved. This adds a really neat look to the mushroom. To accomplish this, we’ll do two things – first, we’ll add more edge loops along the stem so that it can be bent. Then, we’ll use the trusty R (rotate) and G (grab/move) keys to give the stem a bit of a curve by moving the new edges around:

  1. Press Ctrl + R to activate the Loop Cut tool.
  2. Move your mouse around until you see a yellow line around the stem. This is where the cut will happen.
  3. Scroll (with two fingers on a trackpad or with a mouse wheel) to change the number of cuts. Four or five cuts should work fine.
  4. Click once to confirm the cut and start sliding your new edges, and then right-click to cancel the slide (this will keep the new edge loops).
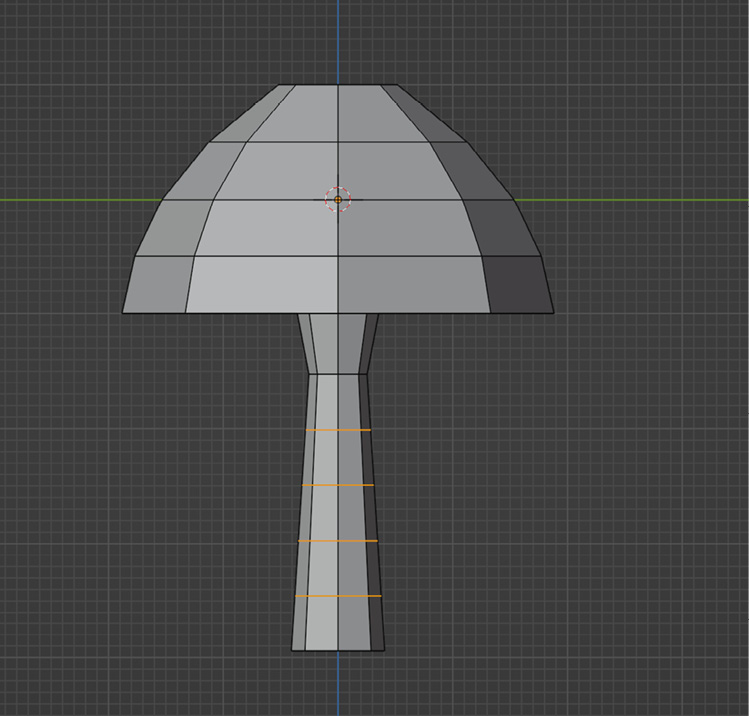
Figure 5.17 – Loop cuts for the stem

Figure 5.17 – Loop cuts for the stem

  1. Make sure you’re still in the X-Ray view mode (Alt + Z), and press 3 to enter...
lock icon The rest of the chapter is locked
Register for a free Packt account to unlock a world of extra content!
A free Packt account unlocks extra newsletters, articles, discounted offers, and much more. Start advancing your knowledge today.
Unlock this book and the full library FREE for 7 days
Get unlimited access to 7000+ expert-authored eBooks and videos courses covering every tech area you can think of
Renews at $19.99/month. Cancel anytime
Banner background image