Core components
We need to understand all the basic components before we can move on. This will help us realize how to mix them so that we can create even bigger and more complex components. This will also make things easier when we're planning our app. In Chapter 4, Your First Cross-Platform App, we'll create a functional app for us to be proud of and our friends to look up to. The following list shows the core components:
- View:
So, let's start by discussing the most important component in React Native: View. This component is the fundamental of all components. The
Viewcomponent is so important because you cannot build a UI without it. Acting like a container for other components, this is your best bet if you want to style something differently or arrange the layout in a specific way.Let's see a basic example:
<View>
      <Text>Hi! Welcome!</Text>
</View>
- Text:
We've already used this component and it's pretty straightforward. We can use this component to display text on the screen.
Let's see a basic example:
<Text>This is a text</Text>
- Image:
This is cool because it allows us to display an image and style it the way we want to..
Let's see a basic example:
<Image source={{uri: 'https://via.placeholder.com/300'}} /> - StyleSheet
We can find an example of how this component is used by looking at our
App.jsfile again. It creates a stylesheet similar to CSS but with fewer styling rules. It's really easy to use once you understand it, and we'll go further into styling once we get to our first practical challenge, where we'll create and style our very own first screen.Let's see a basic example:
const styles = StyleSheet.create({ logo: { backgroundColor: '#fff', } }); - TextInput
This is a component that was created for inputting text into the app using the keyboard. It is packed with all the necessary methods you'd want from an input, such as
onSubmitEditingandonFocus. Don't worry – we'll use all of these when we need them.Let's see a basic example:
<TextInput placeholder='email' />
- Button
This component renders a basic button that handles touches.
Let's see a basic example:
<Button title='Press me' />
I'm pretty sure you've noticed some of these components have another word inside their tags. For example, for our Image component, we have the word "source," which grabs the link we're giving to know what image to display. That word is called a prop, and we'll learn more about them in the next chapter.
Before moving on, let's use the examples we have here for Button and TextInput in our app. We're doing this for practice and to get used to what things look like on our devices once we use these components.
Let's go and write some code displaying our age and hometown underneath our Text component using the examples we have for TextInput and Button. Now, the main function will look like this:
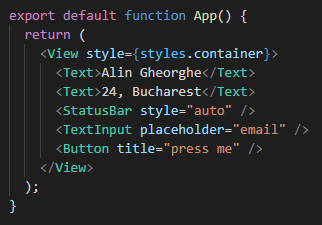
Figure 2.5 – Your new code after importing and using the new components
Now, let's hit refresh and look at our simulator/physical device. We'll see two new things: an input that, if pressed, opens a keyboard where you can write things, and a blue button with text written in uppercase.
We haven't used the Image component yet as it requires styling for it to work. It needs to be told what size the image should be. We'll look at styling in more detail in the next chapter.
At this point, we've talked about all these components in a bit more detail and explained what the purpose for each one is. These are all core components because they deal with hardware capabilities and they need native code to run. By native code, we mean code written in Swift or Java for iOS or Android. Developers are building and styling components that inherit from these.
Next, we'll learn how to create components and how to organize our files so that we'll never forget where to import from.
Understanding and creating your own component
We're getting closer to our goal: creating a cross-platform mobile app. For this to become a reality, we need to learn how to create components.
First, let's create a new folder in our project's main directory and call it components. Here, we'll create a new file named PersonalInformation.js.
This folder will serve as a safe space for all our components to live in, a place where we can always import our components, just like we'd normally do with any package we'd find online.
So, we've already talked about how components are created – they're JavaScript functions that return a bunch of JSX code. However, what I haven't told you is that these components are called functional components and that there are different types of components out there.
Let's build our first functional component by writing all the necessary code inside our newly created file. We'll create a component whose main purpose will be to display our already written personal information on the screen.
We'll begin by writing our necessary imports. So, for this component, we know we need a Text component. Let's go ahead and import that. Write the following at the beginning of your file:
import React from 'react';
import { Text } from 'react-native';
We've imported React because, as I mentioned earlier in this chapter, we need it if we want to create components and use JSX. Because that's the most important and basic import, we're going to place it at the beginning of our code. After that, we imported the Text component from React Native.
Creating the function
Let's continue and write our functional component now, just like we learned earlier:
function PersonalInformation(props) {
     return <Text>some text</Text>;
}
Earlier, we mentioned that we need it to display the same information we did previously (our name, age, and hometown) but I haven't written anything like that. That's because we've run into our first problem.
Let's say we try to write something like this:
function PersonalInformation(props) {
      return (
           <Text>Alin Gheorghe</Text>
           <Text>24, Bucharest</Text>
);
}
Here, we'll see a bunch of red lines underneath our code. That's because JSX doesn't allow two tags to be next to each other if they're not encapsulated in a bigger tag. This is where View comes in handy. So, let's import that as well. Our second line of code will now look like this:
import { Text, View } from 'react-native';
Because we now have the View component, we can write our function with it while encapsulating our Text components, like this:
function PersonalInformation(props) {
      return (
           <View>
                <Text>Alin Gheorghe</Text>
                <Text>24, Bucharest</Text>
           </View>
);
}
With that, we've successfully created our first component. But why did we write the same thing? We already had this information in our main App.js file. We're doing this to understand why components are so cool.
Exporting and importing our component
Before we move to the main file, we'll have to be able to import this. We can't do this before we export it. Makes sense, right? Let's go ahead and add the following line to the top of the file:
export default PersonalInformation;
Now, your code should look something like this:
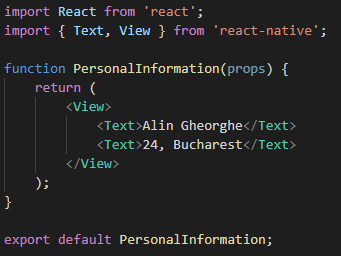
Figure 2.6 – The code we've written in our PersonalInformation.js file
If everything looks correct, save the file and move to App.js so that we can look at the most useful features of components: reusability and readability.
Now that we're in App.js, let's delete what we already have in our custom-made component – I'm talking about the Text components that are displaying our personal information. After deleting those, we can import our new component. Importing this should be easy if you've followed along so far – you just have to go underneath your last import and add another line. There, you'll import your component, like this:
import PersonalInformation from './components/PersonalInformation';
Now, let's use this component instead of the already removed Text components we had previously. This is as easy as writing <PersonalInformation />.
Now, your code should look like this:
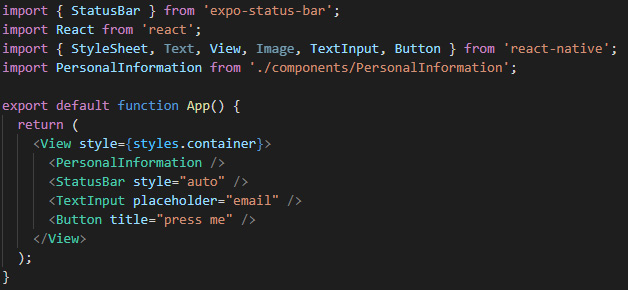
Figure 2.7 – Our code after all the modifications
Now, let's save and look at our app. As you can see, nothing has changed, but we've cleaned our code because we're only writing one line of code to get two lines of output, and that makes it a lot more natural to follow. It's a lot simpler to read because we instantly know that the Personal Information component will output personal information, and on top of that, it's really easy for us to find exactly what is of interest when we're looking for a specific part of our code.
So, if we want to go ahead and change something from our main screen – let's say we want to change our age because we're now 1 year older – you can easily see that your personal information is in a component called PersonalInformation that was imported from a folder called components. Now, all you have to do is go inside that folder, look for that specific file, and modify the text. That's easy to follow, right?
Let's create another one so that we can see how we can simplify and clean up this process even more.
Creating the Bio component
For now, let's remove the TextInput and Button components from App.js. We're not using those right now and they don't look like they have anything to do with our personal information.
After removing those from your main function, go inside our components folder and create a new file called Bio.js. This is pretty self-explanatory, but I feel like a profile should have a small biography at the top with just your name and age.
We already know that we want to import a Text component and create our functional component. I won't repeat the process of creating a new component; instead, I will write something personal inside the Text component.
Important Note
Don't forget that you don't need a View component now because we're only using a Text component here. The fact that we only have one JSX element means our component can easily return it without needing a parent component encapsulating it.
The new component should look like this:
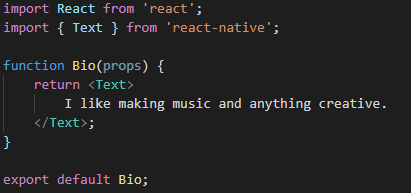
Figure 2.8 – Our new Bio component
Let's save and import it into our main file, App.js. As we did previously, we create a new line underneath our last import and write the following:
import Bio from './components/Bio';
Now, let's use it inside our app – I'm placing it underneath our <PersonalInformation /> component. Save and refresh. You should now be able to see your bio underneath your age and hometown on your device.
This is great, but are we going to keep on having a new line for each component? Imagine having 30 custom components. That's going to turn into a hellish nightmare to scroll past.
Creating the main file for our components
We can easily solve this by going into the PersonalInformation.js file and removing the default keyword from the last line of our file. Do the same thing with Bio.js. Your last line in both files should say something like this:
export Component;
Of course, instead of Component, you'll have the actual name of your function, which should be PersonalInformation or Bio.
Because we've done that, we can create a new file inside our components folder called index.js. We'll create a list of all of our components here, which will allow us to import these custom components from a single line.
Inside our newly created file, index.js, we'll import our components and then export them. This sounds easy and somehow redundant but this is useful as it's going to make things even clearer and easier to read and follow.
After writing everything in our index file, the code inside should look like this:

Figure 2.9 – The index.js file with all the code written inside it
Now that we have this file that stores all of our newly created custom components, let's go into our App.js file and rewrite our imports the way they should be written.
Refactoring our main code
Here, we must delete our first two custom component imports and write the following code:
import { PersonalInformation, Bio } from './components';
That's the only change we're making. Pretty easy, right? And it looks so much better and more organized.
Now, let's remove the unused components, such as Text and Image, and save our file. After making all these modifications, your App.js file will look like this:
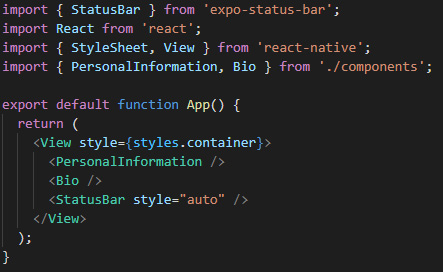
Figure 2.10 – Our final code for this chapter
Yay! We've finished creating two new components for our app while also organizing the code in such a manner that any programmer would be proud of us. I'm not a believer in homework but I do believe in the power of exercise. Now, it's your turn. Create as many components as you can think of. Don't stop at simple text-based components; try and use more of the core components React Native has at its disposal. Don't be afraid of getting something wrong – that is the best way to learn: trial and error.


