


Quick start – the basics of Netcat
Netcat, like many security tools, can be used for legitimate or nefarious purposes. As an author, I do not wish to presuppose your individual moral compass. I would highly advise that you, as a reader, should adhere to all laws and regulations that govern your actions.
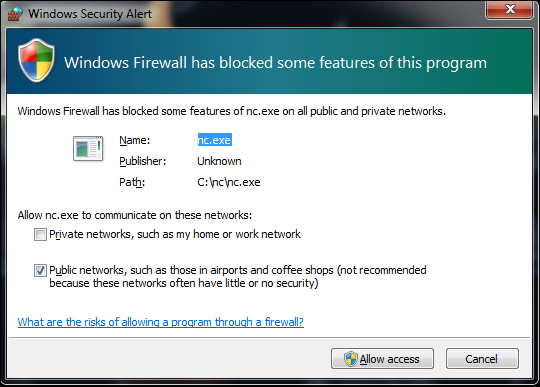
Furthermore, the very first time you launch the Netcat executable on a Windows machine, your anti-virus and/or firewall may detect malicious activity as illustrated in the screenshot that follows. Note that the screenshot shows the default screenshot as prompted by Windows 7; however, the options that you select here are largely based on what your intentions with Netcat are. In a lab setting, perhaps it would be advisable to flip-flop the checkboxes to only allow Netcat to communicate on private networks.
Admittedly, I wanted to write this book to provide you with some general instructions on getting up to speed on Netcat efficiently, and teach some of the more common features of the application. In order to accomplish this, we will be going over functions in simple exercises, whose primary purpose is to give you an overview of the tool itself.
Step 1 – using Netcat for a simple chat interface
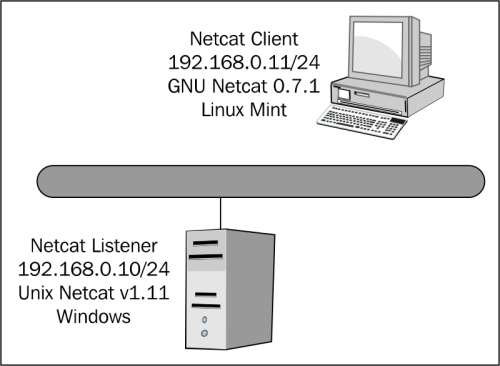
For this exercise, we are going to use a simple configuration to demonstrate how Netcat can be used as a simple chat interface between a client and a listener. For these exercises, the flavors of Netcat and the operating systems do not matter. In this specific exercise, you only really need a single machine running two instances of Netcat from the command line to accomplish the goals. However, future lessons will probably work best with multiple machines, which can easily be accomplished using a virtualization software application from one of the sources listed in the following table:
|
Package |
Download URL |
|---|---|
|
Oracle VirtualBox |
http://www.oracle.com/technetwork/server-storage/virtualbox/downloads/index.html |
|
VMware Player |
https://my.vmware.com/web/vmware/evalcenter?p=player |
|
Microsoft Virtual PC |
http://www.microsoft.com/windows/virtual-pc/download.aspx |
For this exercise, I will be connecting to the TCP port 31337. This port number could be anything really; I chose 31337 for no particular reason. To illustrate the relationship between an IP address and a port number, think of how the post office delivers mail to you. If you consider that your street address is analogous to an IP address, a port can be thought of as the name on the envelope. It is up to the sender to identify the specific person that the mail is intended for. If all goes well, the recipient will recognize that the mail is destined for a specific person. Of course, perhaps the sender knows that John, Mary, Jane, and Gregory live at the address, 123 Main Street. At this point, the sender only needs to specify that the letter is intended for Gregory. Regardless of the port you select, once you have your client and listener configured, let's go ahead and get started with the exercise. On the listener machine, we will want to perform the following tasks:
Launch a command prompt if your listener operating system is Windows-based as in the preceding example (You would open a shell using a terminal on Unix and Linux).
Type in the following command:
nc –l –p 31337
In the preceding example, we launched Netcat in listener mode by invoking the
–lswitch. We specified the utility to listen on the TCP port31337by invoking the–pswitch. Alternatively, Netcat allows you to concatenate switches as well, so I could have accomplished the same thing by typingnc –lp 31337.You will notice that the cursor is immediately under the command prompt. Once we begin sending raw packets across, this is where they will appear. At this point, we only have one end of the connection open, so let's establish the other end of the connection now with our client machine.
Launch a shell using terminal.
In the shell prompt, type the following command:
nc 192.168.0.10 31337
With our Netcat listener activated on the host
192.168.0.10, we completed the other end of the connection by specifying the host we wanted to connect to, followed by the port number. At this point, we have a fully established and unencrypted socket between the client and listener. We will demonstrate this by typing a message from the client.On the client machine, type
message from client to listenerand hit Enter. The following screenshot shows what the client sees on the terminal:
If you switch to the listener console, you will see that the following screenshot demonstrates what the listener sees:

Now, we are simply going to reverse the direction and send communication from the listener to the client.
From the listener, type
message from listener to clientand hit Enter. The following screenshot shows what the listener sees:
Switching to the client session, the next screenshot shows what the client sees:

After completing the exercise, sending the key combination Ctrl + C on either side will terminate the connection. It is important to note that if you want to re-establish the connection, you will need to launch the listener again when using the –l switch. Netcat can be run with the –L (capital L) switch only on the Windows utility, and when a connection is terminated the listener will remain open.
Step 2 – transferring data with Netcat
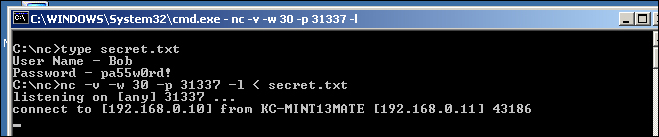
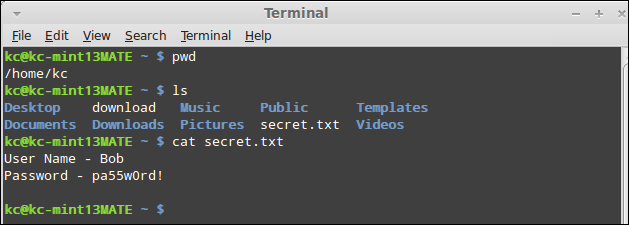
In the next exercise we are going to execute a basic file transfer from the role of a penetration tester or ethical hacker using Netcat. Once again, we will be using the same setup as the previous exercise. A simple scenario is that a forgetful junior server administrator has left a file, called secret.txt on the Windows server, and the file contains a username and password (see the screenshot that follows for the contents of the file). Unfortunately, the server is not running any good FTP utilities or other applications that will allow us to fulfill a file transfer. As a result, we are going to turn to our trusty utility Netcat to help us in a bind. With Netcat, it is important to understand that the files are transferred in a raw nature without any type of special characters or other indications that a file is transferred. Netcat simply processes the file, unencrypted, and waits.

On the listening computer, the Windows Server, we are simply going to type in the following command:
nc –v –w 30 –p 31337 –l < secret.txt

You will notice that there are some new switches that we have added to the command, so let's go over them now. The –v switch is the parameter for using Netcat in verbose mode. Verbosity is simply the amount of feedback that the utility provides back to the screen during operation. Netcat also supports –vv (double v) for additional verbosity that will give you the number of bytes transferred during a file transfer. The –w switch instructs Netcat to wait for a specific number of seconds before timing out the connection. In our example, we specify 30 seconds. With the exception of Windows-based listeners, if we do not initiate the transfer within 30 seconds, Netcat will throw a connection timeout error and exit to a prompt. Windows-based listeners (like our example shows) do not respect the 30 seconds to initiate, but will terminate 30 seconds after the connection is complete or if communications are severed during the data stream. We have discussed the –p switch and indicated it as the port that Netcat will be listening on. Again, we have selected TCP/31337 as our listening port. The –l switch indicates that Netcat is in Listener mode. The < symbol indicates the direction of the transfer. If you are not familiar with redirection of files, think of the entire command as saying, "I want to push the secret.txt file to the listener". Later on, we will see the other side of the connection, which will essentially say, "Grab the output of the listener and push it to a file that I specify".
Once we hit Enter, our listener begins listening as illustrated in the screenshot that follows. You will notice that with the verbosity switch enabled, we see that the status is displayed. Normally, there would simply be a blinking cursor.

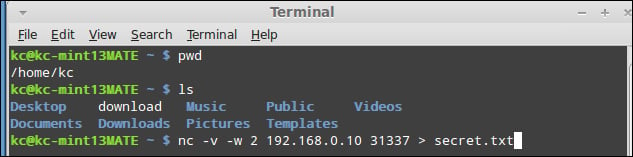
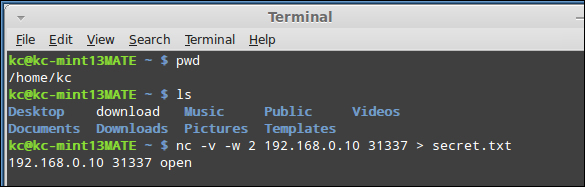
Now let's switch over to the client. Our command is similar, but there are some slight differences that I will explain in a second. For now, simply perform the following step, as illustrated in the next screenshot, by typing the following command in the command line:
nc –v –w 2 192.168.0.10 31337 > secret.txt
So let's review the switches and commands that we just put in. Again, the –v switch is for verbosity. The –w switch specifies that if the connection is interrupted for more than two seconds, then abort the stream. If you recall, we set the listener for 30 seconds. So why do we set the client for 2? The simple answer is that the functions of the devices dictated that the server (listener) would more likely be affected by multiple requests and various operations. Obviously, these are arbitrary parameters, so your mileage will vary.
The remainder of the command specifies the hostname or IP address of the listener, followed by the port number. Finally, we reach the other side of the redirection. As mentioned before, think of it as "take whatever 192.168.0.10:31337 is serving up, and output it to the file secret.txt". It is important to note that the name of the file here does not have to be identical to the filename on the listener. Call it bob.txt or id10t.gde; the point is, it just doesn't have to be the same.
As the transfer is occurring, the listener will show only the display as illustrated in the following screenshot:
Simultaneously, the client perspective is shown in the following screenshot:
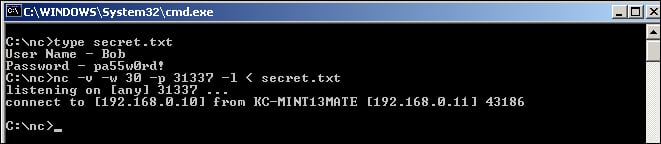
Eventually, when the transfer is completed, the session will time out (thanks to the –w parameter on the listener). The next two screenshots show the output to the screen after the transfer is completed. First, we will show the output from the listener perspective.
Next, we demonstrate the output from the client's perspective in the following screenshot:
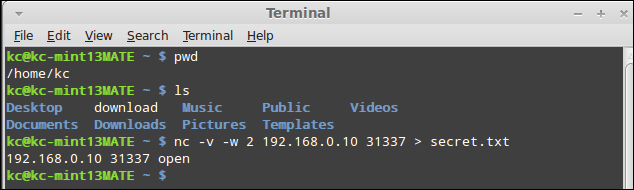
Finally, we can check the output of the new file that was created on our client machine to verify that the text is identical, as illustrated in the following screenshot:
In this very basic example, we executed a file transfer between the listener and client using nothing more than Netcat as the conduit. You may be asking yourself why this is such a big deal, when file transfers occur all the time using far more sexy programs. To this question, we would answer that Netcat's power lies in its flexibility and its simplicity. With very little overhead, we have the ability to move files between two (or more) machines over any port we need to. Is a firewall blocking TCP port 21? Shift Netcat to an open port, that is, TCP/80 and you are off to the races. Netcat is not the ideal file transfer solution for every situation, but my intention here is only to demonstrate some basic capabilities and lay the groundwork for more complicated uses.
Tip
Netcat just overwrote my file!
One thing you will need to be particularly careful of is overwriting files that already exist on your system. When using the single redirectors, < and >, Netcat will not warn you or prompt you before beginning the data transmission of the stream. Netcat does support double redirectors, << and >>, that allow you to append to a file instead of overwriting it.
Step 3 – banner grabbing with Netcat
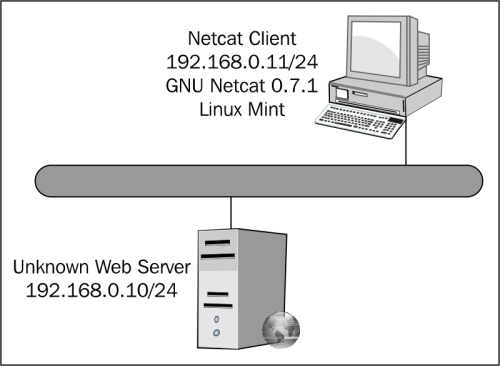
Sometimes, we may need to interrogate a particular service or port to see what is happening, because it is not immediately obvious. For instance, think of the slew of Trojan horses and other applications that may be running on a strange port. Alternatively, perhaps you are conducting a penetration test and need to interrogate a web server to determine the version and patch level that the server is running. For all those who are not very familiar with Netcat, a common solution for accomplishing this is through Telnet. However, as we have explained, applications like Telnet alter the data stream and may produce unpredictable results. Since Netcat does not alter the data stream, it is an ideal tool to use for banner grabbing. So let's go ahead and see what we have and give it a go. The screenshot that follows describes the environment. Note that the device located at 192.168.0.10 appears to be a web server of some type. For the purpose of this exercise, let us assume we discovered that TCP Port 80 was listed as open-based on a simple port scan of the host.
The syntax to execute a basic banner grab from a target is simply to use the target address or hostname and the port to be interrogated. From our client machine, we perform the following steps:
Type the following commands as illustrated in the code and screenshot that follows:
nc 192.168.0.10 80
<enter>
<enter>
<enter>

The preceding commands will trigger a response from the web server as follows:

In the preceding example, we established a simple connection to a port on our target web server. In this particular situation, we were not concerned with stealth, and so we simply opened the connection, sent an unexpected stream to the server, and convinced it to tell us that we made an error in our request, as evidenced by the HTTP status code of 400. In this situation, we discovered what we wanted, which was the version of the web server application. In a more realistic scenario, we would not be so bold to simply brute force a response such as this, as our IP address and details are all over the server log. Rather, we would probably look to interrogate the service in a manner that adheres to the protocol of the service.
The options that you have with banner grab are limited only by the protocol and functions of the service itself. Remember, you are establishing a raw socket between your client and the web server. In the next example, we will do the same basic technique, only instead of doing it so noisily, we will use the protocol's syntax and spoof some details of the connection.
Once again, type the following syntax as shown in the code and illustrated in the screenshot that follows:
nc 192.168.0.10 80
GET / HTTP/1.1
Host:  192.168.0.10
User-Agent: SPOOFED-BROWSER
Referrer: K0NSP1RACY.COM
<enter>
<enter>
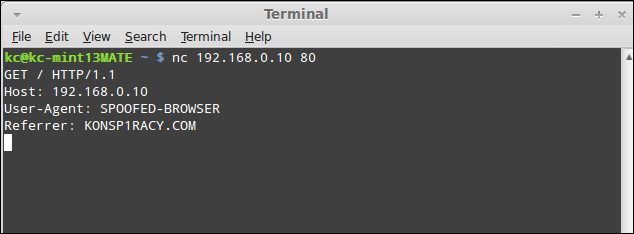
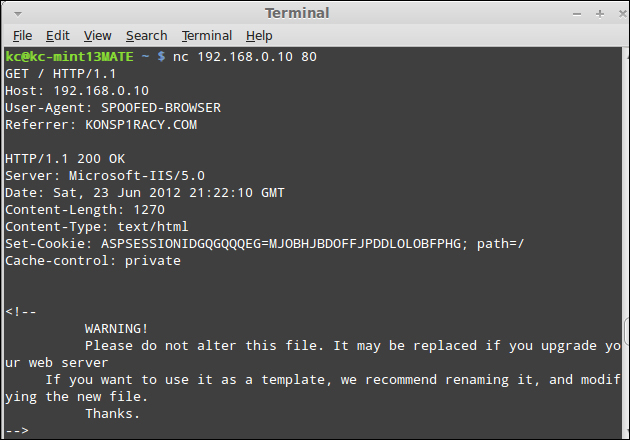
The web server responds with an HTTP status code of 200, meaning OK. As you see in the screenshot that follows, the web server pushes the HTML code to the connection. Depending on your purpose for initiating the connection, you can either camouflage yourself in the server logs or make it easy to find your specific connection information.
At this point in the book, you should be starting to get a sense of some of the things that are possible with a minimal amount of effort using Netcat. While Netcat is a compact utility, it has amazing power in the hands of a capable practitioner. With some of the basic use cases and a general sense of the utility itself, we can begin exploring some more advanced use cases and features of the utility in the next section.


