Using Manager
The Manager section, in a nutshell, is an interface for managing configuration files. The number of files and options in these configuration files is truly daunting, so the web interface concentrates on the most commonly used options across the different configuration types.
Note
Splunk is controlled exclusively by plain text configuration files. Feel free to take a look at the configuration files that are being modified as you make changes in the admin interface. You will find them in $SPLUNK_HOME/etc/system/local/ and $SPLUNK_HOME/etc/apps/.
You may notice configuration files with the same name in different locations. We will cover, in detail, the different configuration files, their purposes, and how these configurations merge together, in Chapter 10, Configuring Splunk. Don't start modifying the configurations directly until you understand what they do and how they merge.
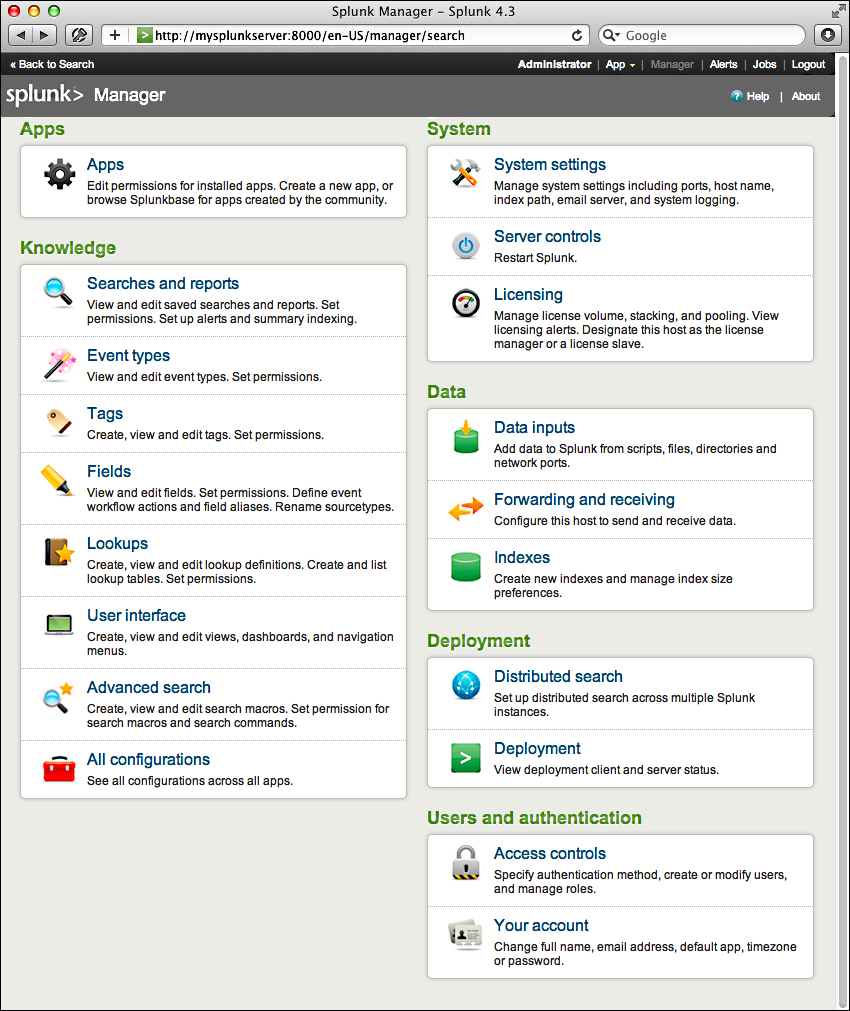
Clicking on Manager, on the top bar, takes you to the Manager page.

The options are organized into logical groupings, as follows:
Apps: This interface allows you to easily add new apps and manage apps that are currently installed. If you installed the ImplementingSplunkDataGenerator app, you have already seen this interface.
Knowledge: Each of the links under Knowledge allows you to control one of the many object types that are used at search time. The following screenshot shows an example of one object type, workflow actions.

Let's cover the administration of each object type that we will cover in later chapters:
System: The options under this section control system-wide settings.
System settings covers network settings, the default location to store indexes, outbound e-mail server settings, and how much data Splunk logs about itself
Server controls contains a single page that lets you restart Splunk from the web interface
Licensing lets you add license files or configure Splunk as a slave to a Splunk license server
Data: This section is where you manage data flow.
Data Inputs: Splunk can receive data by reading files (either in batch mode or in real time), listening to network ports, or running scripts
Forwarding and receiving: Splunk instances don't typically stand alone. Most installations consist of at least one Splunk indexer and many Splunk forwarders. Using this interface, you can configure each side of this relationship and more complicated setups (we will discuss this in a more detail in Chapter 11, Advanced Deployments ):
Indexes: An Index is essentially a datastore. Under the covers, it is simply a set of directories, created and managed by Splunk. For small installations, a single index is usually acceptable. For larger installations, using multiple indexes allows flexibility in security, retention, and performance tuning, and better use of hardware. We will discuss this further in Chapter 10, Configuring Splunk.
Deployment: The two options here relate to distributed deployments. (we will cover these options in detail in Chapter 11, Advanced Deployments):
Distributed Search: Any Splunk instance running searches can utilize itself and other Splunk instances to retrieve results. This interface allows you to configure access to other Splunk instances.
Deployment: Splunk includes a deployment server component to aid in distributing configurations to the many instances that can be involved in a distributed installation. There is no need to use the deployment server, particularly if you already have something to manage configurations.
Users and authentication: This section provides authentication controls and an account link.
Access controls: This section is for controlling how Splunk authenticates users and what users are allowed to see and do. We will discuss this further in Chapter 10, Configuring Splunk.
Your account: We saw this earlier when we clicked on the name of the user currently logged in on the top bar.


