Search icon CANCEL
Subscription
0
Cart icon
Your Cart (0 item)
Close icon
You have no products in your basket yet
Save more on your purchases! discount-offer-chevron-icon
Savings automatically calculated. No voucher code required.
Arrow left icon
Explore Products
Best Sellers
New Releases
Books
Videos
Audiobooks
Learning Hub
Free Learning
Arrow right icon
Arrow up icon
GO TO TOP
Arduino Essentials

You're reading from   Arduino Essentials Enter the world of Arduino and its peripherals and start creating interesting projects

Arrow left icon
Product type Paperback
Published in Feb 2015
Publisher Packt
ISBN-13 9781784398569
Length 206 pages
Edition 1st Edition
Tools
Arrow right icon
Toc

Table of Contents (12) Chapters Close

Preface 1. Meeting the Arduino Family FREE CHAPTER 2. The Arduino Development Environment 3. Interacting with the Environment the Digital Way 4. Controlling Outputs Softly with Analog Outputs 5. Sensing the Real World through Digital Inputs 6. Analog Inputs to Feel Between All and Nothing 7. Managing the Time Domain 8. Communicating with Others 9. Dealing with Interrupts 10. Arduino in a Real Case – Greenhouse Control Index

A dial tachograph


For a more complete example in this section, we will build a tachograph, a device that will present the current revolutions per minute of the motor in a visual manner by using a dial.

The motor speed will be commanded serially from our computer by reusing some of the codes in our previous projects.

It is not going to be very complicated if we include some way to inform about an excessive number of revolutions and even cut the engine in an extreme case to protect it, is it?

The complete schematic of such a big circuit is shown in the following image. Don't get scared about the number of components as we have already seen them all in action before:
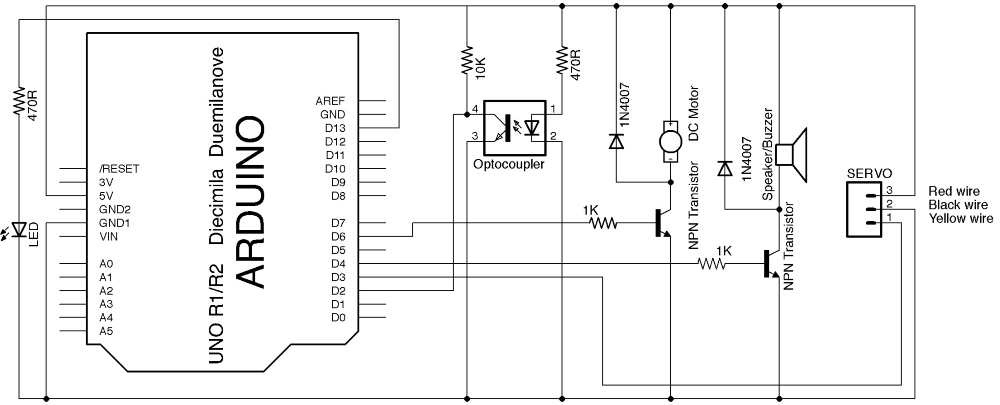
The tachograph circuit

As you may see, we will use a total of five pins of our Arduino board to sense and command such a set of peripherals:

  • Pin 2: This is the interrupt 0 pin and thus it will be used to connect the output of the optocoupler.

  • Pin 3: It will be used to deal with the servo to move the dial.

  • Pin 4: We will use this pin...

lock icon The rest of the chapter is locked
Register for a free Packt account to unlock a world of extra content!
A free Packt account unlocks extra newsletters, articles, discounted offers, and much more. Start advancing your knowledge today.
Unlock this book and the full library FREE for 7 days
Get unlimited access to 7000+ expert-authored eBooks and videos courses covering every tech area you can think of
Renews at $19.99/month. Cancel anytime
Banner background image