Configuring your development environment
A well-organized environment with the right tools is the first step toward excellence and productivity; now, let’s set this environment up in your workspace.
After installing Node.js following the instructions in the Technical requirements section, the following tools and their plugins will help you in your workflow.
VS Code
VS Code (https://code.visualstudio.com/) is currently the default tool for most developers, especially for frontend projects.
There are other very good ones such as WebStorm (https://www.jetbrains.com/webstorm), but VS Code, with its plugins especially for Angular projects, facilitates great productivity and ergonomics.
To install the plugins listed here, in the code editor, click on Extensions or use the shortcut Ctrl + Shift + X (Windows) or Cmd + Shift + X (macOS).
The following are the VS Code plugins recommended for developing Angular applications.
Git Extension Pack
Git Extension Pack (https://marketplace.visualstudio.com/items?itemName=donjayamanne.git-extension-pack) is not specifically for developing Angular applications but it is useful for any kind of work.
Git is the default tool for version control and VS Code has native support for it. This set of plugins improves this support even further, adding the ability to read comments and changes made in previous commits in the editor, support for multiple projects, and a better view of your repository history and logs.
Angular Language Service
The Angular Language Service (https://marketplace.visualstudio.com/items?itemName=Angular.ng-template) extension is maintained by the Angular team and adds support for most of the framework’s functionality right from the code editor.
By adding this extension to your editor, it will have the following features:
- Autocomplete in the HTML template file, allowing you to use component methods without having to consult the TypeScript file
- Checking for possible compilation errors in HTML template files and TypeScript files
- Quick navigation between HTML and TypeScript templates, allowing you to consult the definition of methods and objects
This extension is also available for other IDEs such as WebStorm and Eclipse.
Prettier
Prettier (https://marketplace.visualstudio.com/items?itemName=esbenp.prettier-vscode) is a JavaScript tool that solves the code formatting problem. It is opinionated on formatting settings although some customization is possible.
In addition to TypeScript, Prettier formats HTML, CSS, JSON, and JavaScript files, making this extension useful also for backend development using Node.js.
To standardize formatting across your entire team, you can install Prettier as a package for your project and run it on the project’s CI/CD track, which we’ll see in Chapter 12, Packaging Everything – Best Practices for Deployment.
ESLint
When creating an application, the use of a linter is highly recommended to ensure good language practices and avoid errors from the beginning of development.
In the past, the default tool for linting TypeScript projects was TSLint, but the project has been absorbed by ESLint (https://marketplace.visualstudio.com/items?itemName=dbaeumer.vscode-eslint), which allows you to verify JavaScript and TypeScript projects.
With this extension, verification occurs quickly while you type the code of your project. ESLint can be installed as a package in your Angular project and thus performs this validation on the CI/CD conveyor of your project, which we will see in Chapter 12, Packaging Everything – Best Practices for Deployment.
EditorConfig
The EditorConfig (https://marketplace.visualstudio.com/items?itemName=EditorConfig.EditorConfig) plugin has the function of creating a default configuration file for not only VS Code but also any IDE that supports this format.
This plugin is useful for standardizing things for your project and your team – for example, the number of spaces that each Tab key represents, or whether your project will use single quotes or double quotes to represent strings.
To use it, just create or have a file named .editorconfig at the root of your project and VS Code will respect the settings described in the file.
VS Code settings
VS Code, in addition to extensions, has several native settings that can help in your day-to-day work. By accessing the File menu, we can activate the automatic saving flag so you don’t have to worry about pressing Ctrl + S all the time (although this habit is already engraved in stone in our brains...).
Another interesting setting is Zen mode, where all windows and menus are hidden so you can just focus on your code. To activate it, go to View | Appearance | Zen Mode, or use the keyboard shortcut Ctrl + K + Z for Windows/Linux systems and Cmd + K + Z for macOS.
To improve the readability of your code during editing, an interesting setting is Bracket coloring, which will give each parenthesis and bracket in your code a different color.
To enable this setting, open the configuration file using the shortcut Ctrl + Shift + P for Windows/Linux or Cmd + Shift + P for macOS and type Open User Settings (JSON).
In the file, add the following elements:
{
  "editor.bracketPairColorization.enabled": true,
  "editor.guides.bracketPairs": true
}
VS Code also has the Inlay Hints feature, which shows details of parameter types and return methods, as well as other useful information on the line you are reading in the code.
To configure it in the Settings menu, look for Inlay Hints and activate it if it is not already configured. For the development of your Angular application, you can also perform specific configurations by selecting TypeScript.
It is also possible to turn on this functionality by directly configuring the settings.json file with the following elements:
{
  "typescript.inlayHints.parameterNames.enabled": "all",
  "typescript.inlayHints.functionLikeReturnTypes.enabled": true,
  "typescript.inlayHints.parameterTypes.enabled": true,
  "typescript.inlayHints.propertyDeclarationTypes.enabled": true,
  "typescript.inlayHints.variableTypes.enabled": true,
  "editor.inlayHints.enabled": "on"
}
Fira Code font and ligatures
An important detail that not every developer pays attention to is the type of font they use in their code editor. A confusing font can make it difficult to read code and tire your eyes.
The ideal option is to use monospaced fonts, that is, fonts where the characters occupy the same horizontal space.
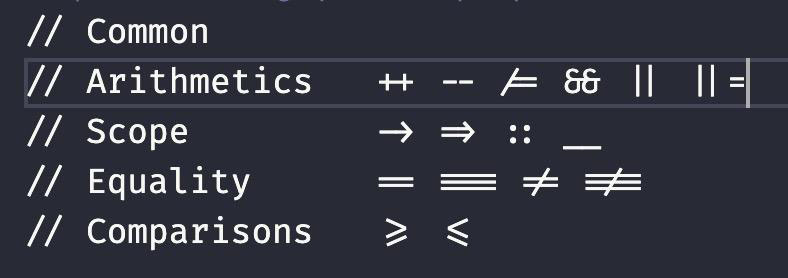
A very popular font is Fira Code (https://github.com/tonsky/FiraCode), which, in addition to being monospaced, has ligatures for programming – that is, joining or changing characters that represent symbols such as ==, >=, and =>, as shown in the following figure:

Figure 1.1 – Example of symbols with font ligatures
After installing the font on your operating system, to enable ligatures in the font in VS Code, access the configuration file as in the previous section and add the following elements:
{
  "editor.fontFamily": "Fira Code",
  "editor.fontLigatures": true,
}
Standardizing the extensions and settings in the project
In the Why choose Angular? section, we learned that one of the advantages of choosing this framework for your project is the standardization it provides to development and the team.
You can also standardize your VS Code settings and record them in your Git repository so that not only you but also our team can have that leap in productivity.
To do this, in your repository, create a folder called .vscode, and inside that folder, create two files. The extensions.json file will have all the extensions recommended by the project. In this example, we will use the extensions we saw earlier:
{
  "recommendations": [
    "dbaeumer.vscode-eslint",
    "esbenp.prettier-vscode",
    "Angular.ng-template",
    "donjayamanne.git-extension-pack",
    "editorconfig.editorconfig"
  ]
 }
Let’s also create the settings.json file, which allows you to add VS Code settings to your workspace. These settings take precedence over user settings and VS Code’s default settings.
This file will have the previously suggested settings:
{
  "editor.bracketPairColorization.enabled": true,
  "editor.guides.bracketPairs": true
  "editor.fontFamily": "Fira Code",
  "editor.fontLigatures": true,
  "typescript.inlayHints.parameterNames.enabled": "all",
  "typescript.inlayHints.functionLikeReturnTypes.enabled": true,
  "typescript.inlayHints.parameterTypes.enabled": true,
  "typescript.inlayHints.propertyDeclarationTypes.enabled": true,
  "typescript.inlayHints.variableTypes.enabled": true,
  "editor.inlayHints.enabled": "on"
}
By synchronizing these files in your repository, when your team members download the project and open VS Code for the first time, the following message will appear:

Figure 1.2 – VS Code prompt for recommended extensions
Once confirmed, all the extensions configured in the file will be installed in the VS Code development environment of your team members, thus automating the task of standardizing the team’s work environment.
Angular DevTools
One tool missing from the Angular framework was a way to drill down into an application in the browser. Browsers such as Chrome and Firefox have greatly improved the developer experience over the years, broadly for all types of websites.
With that in mind, the Angular team, starting from version 12, created the Angular DevTools extension for Chrome and Firefox.
To install it, you need to go to the extension store of the browser (Chrome or Firefox) and click on Install.
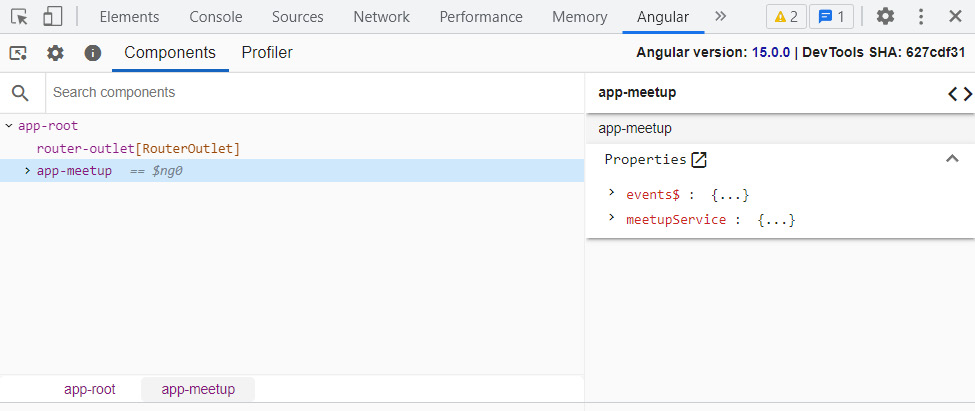
With it installed, access to the site built with Angular, and with the build set up for development, the Angular tab will appear in the developer tools:

Figure 1.3 – Angular DevTools Chrome extension example
This tool allows you to browse the structure of your app, locate the code of the components on the screen, and profile your application to detect possible performance problems.
Now you have a productive development environment for developing Angular applications, we are ready to start our application.


