Working with network services
In this section, we’ll enumerate some of the most common network services running on Linux. Not all the services mentioned here are installed or enabled by default on your Linux platform of choice. Chapter 9, Securing Linux, and Chapter 10, Disaster Recovery, Diagnostics, and Troubleshooting, will dive deeper into how to install and configure some of them. Our focus in this section remains on what these network services are, how they work, and the networking protocols they use for communication.
A network service is typically a system process that implements application layer (OSI Layer 7) functionality for data communication purposes. Network services are usually designed as peer-to-peer or client-server architectures.
In peer-to-peer networking, multiple network nodes each run their own equally privileged instance of a network service while sharing and exchanging a common set of data. Take, for example, a network of DNS servers, all sharing and updating their domain name records.
Client-server networking usually involves one or more server nodes on a network and multiple clients communicating with any of these servers. An example of a client-server network service is SSH. An SSH client connects to a remote SSH server via a secure Terminal session, perhaps for remote administration purposes.
Each of the following subsections briefly describes a network service, and we encourage you to explore topics related to these network services in Chapter 13 or other relevant titles recommended at the end of this chapter. Let’s start with DHCP servers.
DHCP servers
A DHCP server uses the DHCP protocol to enable devices on a network to request an IP address that’s been assigned dynamically. The DHCP protocol was briefly described in the TCP/IP protocols section earlier in this chapter.
A computer or device requesting a DHCP service sends out a broadcast message (or query) on the network to locate a DHCP server, which, in turn, provides the requested IP address and other information. Communication between the DHCP client (device) and the server uses the DHCP protocol.
The DHCP protocol’s initial discovery workflow between a client and a server operates at the data link layer (Layer 2) in the OSI model. Since Layer 2 uses network frames as PDUs, the DHCP discovery packets cannot transcend the local network boundary. In other words, a DHCP client can only initiate communication with a local DHCP server.
After the initial handshake (on Layer 2), DHCP turns to UDP as its transport protocol, using datagram sockets (Layer 4). Since UDP is a connectionless protocol, a DHCP client and server exchange messages without a prior arrangement. Consequently, both endpoints (client and server) require a well-known DHCP communication port for the back-and-forth data exchange. These are the well-known ports 68 (for a DHCP server) and 67 (for a DHCP client).
A DHCP server maintains a collection of IP addresses and other client configuration data (such as MAC addresses and domain server addresses) for each device on the network requesting a DHCP service.
DHCP servers use a leasing mechanism to assign IP addresses dynamically. Leasing an IP address is subject to a lease time, either finite or infinite. When the lease of an IP address expires, the DHCP server may reassign it to a different client upon request. A device would hold on to its dynamic IP address by regularly requesting a lease renewal from the DHCP server. Failing to do so would result in the potential loss of the device’s dynamic IP address. A late (or post-lease) DHCP request would possibly result in a new IP address being acquired if the previous address had already been allocated by the DHCP server.
A simple way to query the DHCP server from a Linux machine is by invoking the following command:
ip route
This is the output of the preceding command:

Figure 7.26 – Querying the IP route for DHCP information
The first line of the output provides the DHCP server (192.168.122.1).
Chapter 13, Configuring Linux Servers, will further go into the practical details of installing and configuring a DHCP server.
For more information on DHCP, please refer to RFC 2131 (https://tools.ietf.org/html/rfc2131).
DNS servers
A Domain Name Server (DNS), also known as a name server, provides a name-resolution mechanism by converting a hostname (such as wikipedia.org) into an IP address (such as 208.80.154.224). The name-resolution protocol is DNS, briefly described in the TCP/IP protocols section earlier in this chapter. In a DNS-managed TCP/IP network, computers and devices can also identify and communicate with each other via hostnames, not just IP addresses.
As a reasonable analogy, DNS very much resembles an address book. Hostnames are relatively easier to remember than IP addresses. Even in a local network, with only a few computers and devices connected, it would be rather difficult to identify (or memorize) any of the hosts by simply using their IP address. The internet relies on a globally distributed network of DNS servers.
There are four different types of DNS servers: recursive servers, root servers, top-level domain (TLD) servers, and authoritative servers. All these DNS server types work together to bring you the internet as you experience it in your browser.
A recursive DNS server is a resolver that helps you find the destination (IP) of a website you search for. When you perform a lookup operation, a recursive DNS server is connected to different DNS servers to find the IP address that you are looking for and return it to you in the form of a website. Recursive DNS lookups are faster as they cache every query that they perform. In a recursive type of query, the DNS server calls itself and does the recursion while still sending the request to another DNS server to find the answer.
In contrast, an iterative DNS lookup is done by every DNS server directly, without using caching. For example, in an iterative query, each DNS server responds with the address of another DNS server, until one of them has the matching IP address for the hostname in question and responds to the client. For more details on DNS server types, please check out the following Cloudflare learning solution: https://www.cloudflare.com/learning/dns/what-is-dns/.
DNS servers maintain (and possibly share) a collection of database files, also known as zone files, which are typically simple plaintext ASCII files that store the name and IP address mapping. In Linux, one such DNS resolver file is /etc/resolv.conf.
To query the DNS server managing the local machine, we can query the /etc/resolv.conf file by running the following code:
cat /etc/resolv.conf | grep nameserver
The preceding code yields the following output:

Figure 7.27 – Querying DNS server using /etc/resolv.conf
A simple way to query name-server data for an arbitrary host on a network is by using the nslookup tool. If you don’t have the nslookup utility installed on your system, you may do so with the commands outlined here.
On Ubuntu/Debian, run the following command:
sudo apt install dnsutils
On Fedora, run this command:
sudo dnf install bind-utils
For example, to query the name-server information for a computer named neptune.local in our local network, we can run the following command:
nslookup neptune.local
The output is shown here:
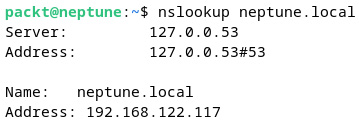
Figure 7.28 – Querying name-server information with nslookup
We can also use the nslookup tool interactively. For example, to query the name-server information for wikipedia.org, we can simply run the following command:
nslookup
Then, in the interactive prompt, we must enter wikipedia.org, as illustrated here:
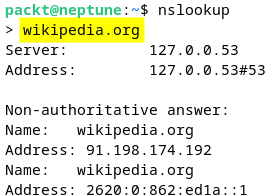
Figure 7.29 – Using the nslookup tool interactively
To exit the interactive shell mode, press Ctrl + C. Here’s a brief explanation of the information shown in the preceding output:
- Server (address): The loopback address (
127.0.0.53) and port (53) of the DNS server running locally - Name: The internet domain we’re looking up (
wikipedia.org) - Address: The IPv4 (
91.198.174.192) and IPv6 (2620:0:862:ed1a::1) addresses that correspond to the lookup domain (wikipedia.org)
nslookup is also capable of reverse DNS search when providing an IP address. The following command retrieves the name server (dns.google) corresponding to the IP address 8.8.8.8:
nslookup 8.8.8.8
The preceding command yields the following output:

Figure 7.30 – Reverse DNS search with nslookup
For more information on the nslookup tool, you can refer to the nslookup system reference manual (man nslookup).
Alternatively, we can use the dig command-line utility. If you don’t have the dig utility installed on your system, you can do so by installing the dnsutils package on Ubuntu/Debian or bind-utils on Fedora platforms. The related commands for installing the packages were shown previously with nslookup.
For example, the following command retrieves the name-server information for the google.com domain:
dig google.com
This is the result (see the highlighted ANSWER SECTION):

Figure 7.31 – DNS lookup with dig
To perform a reverse DNS lookup with dig, we must specify the -x option, followed by an IP address (for example, 8.8.4.4), as follows:
dig -x 8.8.4.4
This command yields the following output (see the highlighted ANSWER SECTION):

Figure 7.32 – Reverse DNS lookup with dig
For more information about the dig command-line utility, please refer to the related system manual (man dig).
The DNS protocol operates at the application layer (Layer 7) in the OSI model. The standard DNS service’s well-known port is 53.
Chapter 8, Linux Shell Scripting, will cover the practical details of installing and configuring a DNS server in more detail. For more information on DNS, you can refer to RFC 1035 (https://www.ietf.org/rfc/rfc1035.txt).
The DHCP and DNS network services are arguably the closest to the TCP/IP networking stack while playing a crucial role when computers or devices are attached to a network. After all, without proper IP addressing and name resolution, there’s no network communication.
There’s a lot more to distributed networking and related application servers than just strictly the pure network management stack performed by DNS and DHCP servers. In the following sections, we’ll take a quick tour of some of the most relevant application servers running across distributed Linux systems.
Authentication servers
Standalone Linux systems typically use the default authentication mechanism, where user credentials are stored in the local filesystem (such as /etc/passwd and /etc/shadow). We explored the related user authentication internals in Chapter 4, Managing Users and Groups. However, as we extend the authentication boundary beyond the local machine – for example, accessing a file or email server – having the user credentials shared between the remote and localhosts would become a serious security issue.
Ideally, we should have a centralized authentication endpoint across the network that’s handled by a secure authentication server. User credentials should be validated using robust encryption mechanisms before users can access remote system resources.
Let’s consider the secure access to a network share on an arbitrary file server. Suppose the access requires Active Directory (AD) user authentication. Creating the related mount (share) locally on a user’s client machine will prompt for user credentials. The authentication request is made by the file server (on behalf of the client) to an authentication server. If the authentication succeeds, the server share becomes available to the client. The following diagram represents a simple remote authentication flow between a client and a server, using a Lightweight Directory Access Protocol (LDAP) authentication endpoint:
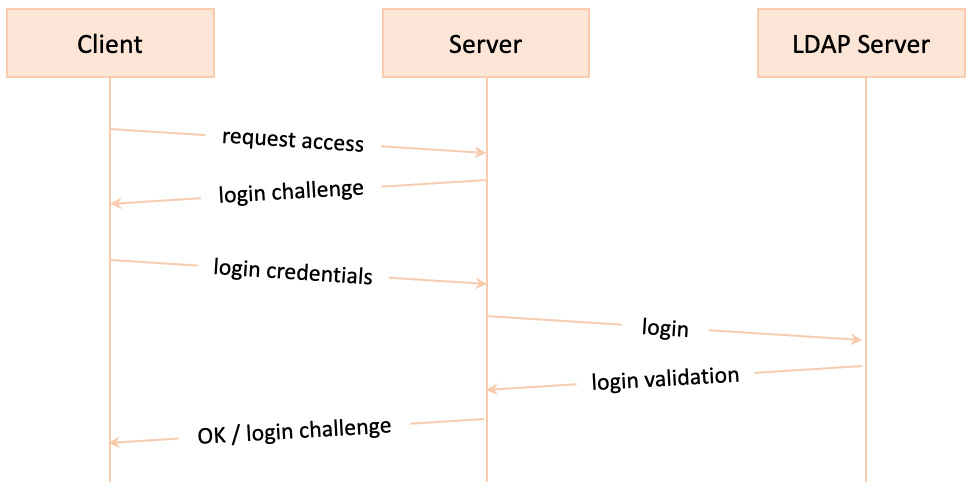
Figure 7.33 – Authentication workflow with LDAP
Here are some examples of standard secure authentication platforms (available for Linux):
- Kerberos (https://web.mit.edu/kerberos/)
- LDAP (https://www.redhat.com/en/topics/security/what-is-ldap-authentication)
- Remote Authentication Dial-In User Service (RADIUS) (https://freeradius.org/documentation/)
- Diameter (https://www.f5.com/glossary/diameter-protocol)
- Terminal Access Controller Access-Control System (TACACS+) (https://datatracker.ietf.org/doc/rfc8907/)
A Linux LDAP authentication server can be configured using OpenLDAP, which was covered in the first edition of this book.
In this section, we illustrated the authentication workflow with an example of using a file server. To remain on topic, we’ll look at network file-sharing services next.
File sharing
In common networking terms, file sharing represents a client machine’s ability to mount and access a remote filesystem belonging to a server, as if it were local. Applications running on the client machine would access the shared files directly on the server. For example, a text editor can load and modify a remote file, and then save it back to the same remote location, all in a seamless and transparent operation. The underlying remoting process – the appearance of a remote filesystem acting as local – is made possible by file-sharing services and protocols.
For every file-sharing network protocol, there is a corresponding client-server file-sharing platform. Although most network file servers (and clients) have cross-platform implementations, some operating system platforms are better suited for specific file-sharing protocols, as we’ll see in the following subsections. Choosing between different file-server implementations and protocols is ultimately a matter of compatibility, security, and performance.
Here are some of the most common file-sharing protocols, with some brief descriptions for each:
- Server Message Block (SMB): The SMB protocol provides network discovery and file- and printer-sharing services. SMB also supports interprocess communication over a network. SMB is a relatively old protocol, developed by International Business Machines Corporation (IBM) in the 1980s. Eventually, Microsoft took over and made some considerable alterations to what became the current version through multiple revisions (SMB 1.0, 2.0, 2.1, 3.0, 3.0.2, and 3.1.1).
- Common Internet File System (CIFS): This protocol is a particular implementation of the SMB protocol. Due to the underlying protocol similarity, SMB clients can communicate with CIFS servers and vice versa. Though SMB and CIFS are idiomatically the same, their internal implementation of file locking, batch processing, and – ultimately – performance is quite different. Apart from legacy systems, CIFS is rarely used these days. SMB should always be preferred over CIFS, especially with the more recent revisions of SMB 2 or SMB 3.
- Samba: As with CIFS, Samba is another implementation of the SMB protocol. Samba provides file- and print-sharing services for Windows clients on a variety of server platforms. In other words, Windows clients can seamlessly access directories, files, and printers on a Linux Samba server, just as if they were communicating with a Windows server.
As of version 4, Samba natively supports Microsoft AD and Windows NT domains. Essentially, a Linux Samba server can act as a domain controller on a Windows AD network. Consequently, user credentials on the Windows domain can transparently be used on the Linux server without being recreated, and then manually kept in sync with the AD users.
- Network File System (NFS): This protocol was developed by Sun Microsystems and essentially operates on the same premise as SMB – accessing files over a network as if they were local. NFS is not compatible with CIFS or SMB, meaning that NFS clients cannot communicate directly with SMB servers or vice versa.
- Apple Filing Protocol (AFP): The AFP is a proprietary file-sharing protocol designed by Apple and exclusively operates in macOS network environments. We should note that besides AFP, macOS systems also support standard file-sharing protocols, such as SMB and NFS.
Most of the time, NFS is the file-sharing protocol of choice within Linux networks. For mixed networking environments – such as Windows, Linux, and macOS interoperability – Samba and SMB are best suited for file sharing.
Some file-sharing protocols (such as SMB) also support print sharing and are used by print servers. We’ll take a closer look at print sharing next.
Printer servers
A printer server (or print server) connects a printer to client machines (computers or mobile devices) on a network using a printing protocol. Printing protocols are responsible for the following remote printing tasks over a network:
- Discovering printers or print servers
- Querying printer status
- Sending, receiving, queueing, or canceling print jobs
- Querying print job status
Common printing protocols include the following:
- Line Printer Daemon (LPD) protocol
- Generic protocols, such as SMB and TELNET
- Wireless printing, such as AirPrint by Apple
- Internet printing protocols, such as Google Cloud Print
Among the generic printing protocols, SMB (also a file-sharing protocol) was previously described in the File sharing section. The TELNET communication protocol was described in the Remote access section.
File- and printer-sharing services are mostly about sharing documents, digital or printed, between computers on a network. When it comes to exchanging documents, additional network services come into play, such as file transfer and email services. We’ll look at file transfer next.
File transfer
FTP is a standard network protocol for transferring files between computers on a network. FTP operates in a client-server environment, where an FTP client initiates a remote connection to an FTP server, and files are transferred in either direction. FTP maintains a control connection and one or more data connections between the client and the server. The control connection is generally established on the FTP server’s port 21, and it’s used for exchanging commands between the client and the server. Data connections are exclusively used for data transfer and are negotiated between the client and the server (through the control connection). Data connections usually involve ephemeral ports for inbound traffic, and they only stay open during the actual data transfer, closing immediately after the transfer completes.
FTP negotiates data connections in one of the following two modes:
- Active mode: The FTP client sends a
PORTcommand to the FTP server, signaling that the client actively provides the inbound port number for data connections - Passive mode: The FTP client sends a
PASVcommand to the FTP server, indicating that the client passively awaits the server to supply the port number for inbound data connections
FTP is a relatively messy protocol when it comes to firewall configurations due to the dynamic nature of the data connections involved. The control connection port is usually well known (such as port 21 for insecure FTP) but data connections originate on a different port (usually 20) on either side, while on the receiving end, the inbound sockets are opened within a preconfigured ephemeral range (1024 to 65535).
FTP is most often implemented securely through either of the following approaches:
- FTP over SSL (FTPS): SSL/TLS-encrypted FTP connection. The default FTPS control connection port is
990. - SSH File Transfer Protocol (SFTP): FTP over SSH. The default SFTP control connection port is
22. For more information on the SSH protocol and client-server connectivity, refer to SSH in the Remote access section, later in this chapter.
Next, we’ll look at mail servers and the underlying email exchange protocols.
Mail servers
A mail server (or email server) is responsible for email delivery over a network. A mail server can either exchange emails between clients (users) on the same network (domain) – within a company or organization – or deliver emails to other mail servers, possibly beyond the local network, such as the internet.
An email exchange usually involves the following actors:
- An email client application (such as Outlook or Gmail)
- One or more mail servers (Exchange or Gmail server)
- The recipients involved in the email exchange – a sender and one or more receivers
- An email protocol that controls the communication between the email client and the mail servers
The most used email protocols are POP3, IMAP, and SMTP. Let’s take a closer look at each of these protocols.
POP3
POP version 3 (POP3) is a standard email protocol for receiving and downloading emails from a remote mail server to a local email client. With POP3, emails are available for reading offline. After being downloaded, emails are usually removed from the POP3 server, thus saving up space. Modern-day POP3 mail client-server implementations (Gmail, Outlook, and others) also have the option of keeping email copies on the server. Persisting emails on the POP3 server becomes very important when users access emails from multiple locations (client applications).
The default POP3 ports are outlined here:
110: For insecure (non-encrypted) POP3 connections995: For secure POP3 using SSL/TLS encryption
POP3 is a relatively old email protocol that’s not always suitable for modern-day email communications. When users access their emails from multiple devices, IMAP is a better choice. We’ll look at the IMAP email protocol next.
IMAP
IMAP is a standard email protocol for accessing emails on a remote IMAP mail server. With IMAP, emails are always retained on the mail server, while a copy of the emails is available for IMAP clients. A user can access emails on multiple devices, each with their IMAP client application.
The default IMAP ports are outlined here:
143: For insecure (non-encrypted) IMAP connections993: For secure IMAP using SSL/TLS encryption
Both POP3 and IMAP are standard protocols for receiving emails. To send emails, SMTP comes into play. We’ll take a look at the SMTP email protocol next.
SMTP
SMTP is a standard email protocol for sending emails over a network or the internet.
The default SMTP ports are outlined here:
25: For insecure (non-encrypted) SMTP connections465or587: For secure SMTP using SSL/TLS encryption
When using or implementing any of the standard email protocols described in this section, it is always recommended to use the corresponding secure implementation with the most up-to-date TLS encryption, if possible. POP3, IMAP, and SMTP also support user authentication, an added layer of security – this is also recommended in commercial or enterprise-grade environments.
To get an idea of how the SMTP protocol operates, let’s go through some of the initial steps for initiating an SMTP handshake with Google’s Gmail SMTP server.
We will start by connecting to the Gmail SMTP server, using a secure (TLS) connection via the openssl command, as follows:
openssl s_client -starttls smtp -connect smtp.gmail.com:587
Here, we invoked the openssl command, simulated a client (s_client), started a TLS SMTP connection (-starttls smtp), and connected to the remote Gmail SMTP server on port 587 (-connect smtp.gmail.com:587).
The Gmail SMTP server responds with a relatively long TLS handshake block that ends with the following code:
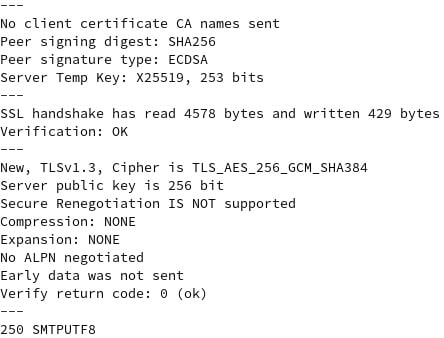
Figure 7.34 – Initial TLS handshake with a Gmail SMTP server
While still inside the openssl command’s interactive prompt, we initiate the SMTP communication with a HELO command (spelled precisely as such). The HELO command greets the server. It is a specific SMTP command that starts the SMTP connection between a client and a server. There is also an EHLO variant, which is used for ESMTP service extensions. Google expects the following HELO greeting:
HELO hellogoogle
Another handshake follows, ending with 250 smtp.gmail.com at your service, as illustrated here:
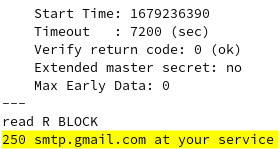
Figure 7.35 – The Gmail SMTP server is ready for communication
Next, the Gmail SMTP server requires authentication via the AUTH LOGIN SMTP command. We won’t go into further details, but the key point to be made here is that the SMTP protocol follows a plaintext command sequence between the client and the server. It’s very important to adopt a secure (encrypted) SMTP communication channel using TLS. The same applies to any of the other email protocols (POP3 and IMAP).
So far, we’ve covered several network services, some of them spanning multiple networks or even the internet. Network packets carry data and destination addresses within the payload, but there are also synchronization signals between the communication endpoints, mostly to discern between sending and receiving workflows. The synchronization of network packets is based on timestamps. Reliable network communications would not be possible without a highly accurate time-synchronization between network nodes. We’ll look at network timekeepers next.
NTP servers
NTP is a standard networking protocol for clock synchronization between computers on a network. NTP attempts to synchronize the system clock on participating computers within a few milliseconds of Coordinated Universal Time (UTC) – the world’s time reference.
The NTP protocol’s implementation usually assumes a client-server model. An NTP server acts as a time source on the network by either broadcasting or sending updated timestamp datagrams to clients. An NTP server continually adjusts its system clock according to well-known accurate time servers worldwide, using specialized algorithms to mitigate network latency.
A relatively easy way to check the NTP synchronization status on our Linux platform of choice is by using the ntpstat utility. ntpstat may not be installed by default on our system. On Ubuntu, we can install it with the following command:
sudo apt install ntpstat
On Fedora, we can install ntpstat with the following command:
sudo dnf install ntpstat
ntpstat requires an NTP server to be running locally. To set up a local NTP server, you will need to do the following (all examples shown here are for Ubuntu 22.04.2 LTS):
- Install the
ntppackage with the following command:sudo apt install ntp
- Check for the
ntpservice’s status:sudo systemctl status ntp
- Enable the
ntpservice:sudo systemctl enable ntp
- Modify the firewall settings:
sudo ufw allow from any to any port 123 proto udp
- Install the
ntpdatepackage:sudo apt install ntpdate
- Restart the
ntpservice:sudo systemctl restart ntp
Before installing the ntp utility, take into account that Ubuntu is using another tool instead of ntpd by default, named timesyncd. When installing ntpd, the default utility will be disabled.
To query the NTP synchronization status, we can run the following command:
ntpstat
This is the output:

Figure 7.36 – Querying the NTP synchronization status with ntpstat
ntpstat provides the IP address of the NTP server the system is synchronized with (31.209.85.242), the synchronization margin (29 milliseconds), and the time-update polling interval (64 seconds). To find out more about the NTP server, we can dig its IP address with the following command:
dig -x 31.209.85.242
It looks like it’s one of the lwlcom time servers (ntp1.lwlcom.net), as shown here:
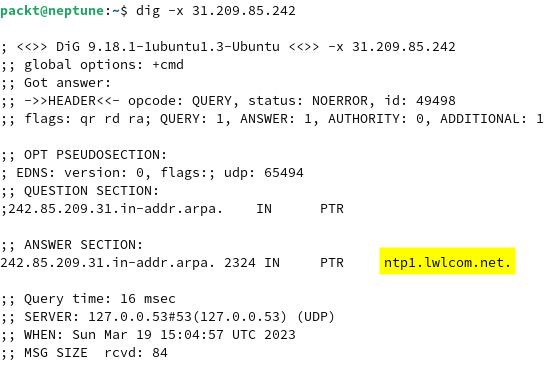
Figure 7.37 – Querying the NTP synchronization status with ntpstat
The NTP client-server communication uses UDP as the transport protocol on port 123. Chapter 9, Securing Linux, has a section dedicated to installing and configuring an NTP server. For more information on NTP, you can refer to https://en.wikipedia.org/wiki/Network_Time_Protocol.
With that, our brief journey into networking servers and protocols has come to an end. Everyday Linux administration tasks often require some sort of remote access to a system. There are many ways to access and manage computers remotely. The next section describes some of the most common remote-access facilities and related network protocols.
Remote access
Most Linux network services provide a relatively limited remote management interface, with their management command-line interface (CLI) utilities predominantly operating locally on the same system where the service runs. Consequently, the related administrative tasks assume local Terminal access. Direct console access to the system is sometimes not possible. This is when remote-access servers come into play to enable a virtual Terminal login session with the remote machine.
Let’s look at some of the most common remote-access services and applications.
SSH
SSH is perhaps the most popular secure login protocol for remote access. SSH uses strong encryption, combined with user authentication mechanisms, for secure communication between a client and a server machine. SSH servers are relatively easy to install and configure, and the Setting up an SSH server section in Chapter 13, Configuring Linux Servers, is dedicated to describing the related steps. The default network port for SSH is 22.
SSH supports the following authentication types:
- Public-key authentication
- Password authentication
- Keyboard-interactive authentication
The following sections provide brief descriptions of these forms of SSH authentication.
Public-key authentication
Public-key authentication (or SSH-key authentication) is arguably the most common type of SSH authentication.
Important note
This section will use the terms public-key and SSH-key interchangeably, mostly to reflect the related SSH authentication nomenclature in the Linux community.
The SSH-key authentication mechanism uses a certificate/key pair – a public key (certificate) and a private key. An SSH certificate/key pair is usually created with the ssh-keygen tool, using standard encryption algorithms such as the Rivest–Shamir–Adleman algorithm (RSA) or the Digital Signature Algorithm (DSA).
The SSH public-key authentication supports either user-based authentication or host-based authentication models. The two models differ in the ownership of the certificate/key pairs involved. With client authentication, each user has a certificate/key pair for SSH access. On the other hand, host authentication involves a single certificate/key pair per system (host).
Both SSH-key authentication models are illustrated and explained in the following sections. The basic SSH handshake and authentication workflows are the same for both models:
- First, the SSH client generates a secure certificate/key pair and shares its public key with the SSH server. This is a one-time operation for enabling public-key authentication.
- When a client initiates the SSH handshake, the server asks for the client’s public key and verifies it against its allowed public keys. If there’s a match, the SSH handshake succeeds, the server shares its public key with the client, and the SSH session is established.
- Further client-server communication follows standard encryption/decryption workflows. The client encrypts the data with its private key, while the server decrypts the data with the client’s public key. When responding to the client, the server encrypts the data with its own private key, and the client decrypts the data with the server’s public key.
SSH public-key authentication is also known as passwordless authentication, and it’s frequently used in automation scripts where commands are executed over multiple remote SSH connections without prompting for a password.
Let’s take a closer look at the user-based and host-based public-key authentication mechanisms:
- User-based authentication: This is the most common SSH public-key authentication mechanism. According to this model, every user connecting to a remote SSH server has its own SSH key. Multiple user accounts on the same host (or domain) would have different SSH keys, each with its own access to the remote SSH server, as suggested in the following figure:
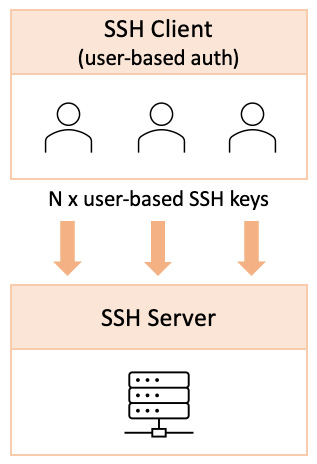
Figure 7.38 – User-based key authentication
- Host-based authentication: This is another form of SSH public-key authentication and involves a single SSH key per system (host) to connect to a remote SSH server, as illustrated in the following figure:

Figure 7.39 – Host-based key authentication
With host-based authentication, the underlying SSH key can only authenticate SSH sessions that originated from a single client host. Host-based authentication allows multiple users to connect from the same host to a remote SSH server. If a user attempts to use a host-based SSH key from a different machine than the one allowed by the SSH server, access will be denied.
Sometimes, a mix of the two public-key authentications is used – user- and host-based authentication –an approach that provides an increased level of security to SSH access.
When security is not critical, simpler SSH authentication mechanisms could be more suitable. Password authentication is one such mechanism.
Password authentication
Password authentication requires a simple set of credentials from the SSH client, such as a username and password. The SSH server validates the user credentials, either based on the local user accounts (in /etc/passwd) or select user accounts defined in the SSH server configuration (/etc/ssh/sshd_config). The SSH server configuration described in Chapter 9, Securing Linux, further elaborates on this subject.
Besides local authentication, SSH can also leverage remote authentication methods such as Kerberos, LDAP, RADIUS, and others. In such cases, the SSH server delegates the user authentication to a remote authentication server, as described in the Authentication servers section earlier in this chapter.
Password authentication requires either user interaction or some automated way to provide the required credentials. Another similar authentication mechanism is keyboard-interactive authentication, described next.
Keyboard-interactive authentication
Keyboard-interactive authentication is based on a dialogue of multiple challenge-response sequences between the SSH client (user) and the SSH server. This dialogue is a plaintext exchange of questions and answers, where the server may prompt the user for any number of challenges. In some respect, password authentication is a single-challenge interactive authentication mechanism.
The interactive connotation of this authentication method could lead us to think that user interaction would be mandatory for the related implementation. Not really. Keyboard-interactive authentication could also serve implementations of authentication mechanisms based on custom protocols, where the underlying message exchange would be modeled as an authentication protocol.
Before moving on to other remote access protocols, we should call out the wide use of SSH due to its security, versatility, and performance. However, SSH connectivity may not always be possible or adequate in specific scenarios. In such cases, TELNET may come to the rescue. We’ll take a look at it next.
TELNET
TELNET is an application-layer protocol for bidirectional network communication that uses a plaintext CLI with a remote host. Historically, TELNET was among the first remote-connection protocols, but it always lacked secure implementation. SSH eventually became the standard way to log in from one computer to another, yet TELNET has its advantages over SSH when it comes to troubleshooting various application-layer protocols, such as web- or email-server communication. You will learn more about how to use TELNET in Chapter 9, Securing Linux.
TELNET and SSH are command-line-driven remote-access interfaces. There are cases when a direct desktop connection is needed to a remote machine through a graphical user interface (GUI). We’ll look at desktop sharing next.
VNC
Virtual Network Computing (VNC) is a desktop-sharing platform that allows users to access and control a remote computer’s GUI. VNC is a cross-platform client-server application. A VNC server running on a Linux machine, for example, allows desktop access to multiple VNC clients running on Windows or macOS systems. The VNC network communication uses the Remote Framebuffer (RFB) protocol, defined by RFC 6143. Setting up a VNC server is relatively simple. VNC assumes the presence of a graphical desktop system. More details on this will be provided in Chapter 13, Configuring Linux Servers.
This concludes our section about network services and protocols. We tried to cover the most common concepts about general-purpose network servers and applications, mostly operating in a client-server or distributed fashion. With each network server, we described the related network protocols and some of the internal aspects involved. Chapter 9, Securing Linux, and Chapter 13, Configuring Linux Servers, will showcase practical implementations for some of these network servers.
In the next section, our focus will turn to network security internals.


